|
|
(34 intermediate revisions by 2 users not shown)
|
| Line 1: |
Line 1: |
| | <languages /> | | <languages /> |
| | + | {{Deprecated}} |
| | ==GIMX starten== | | ==GIMX starten== |
| | | | |
| − | ===Ubuntu or Windows=== | + | ===Ubuntu oder Windows=== |
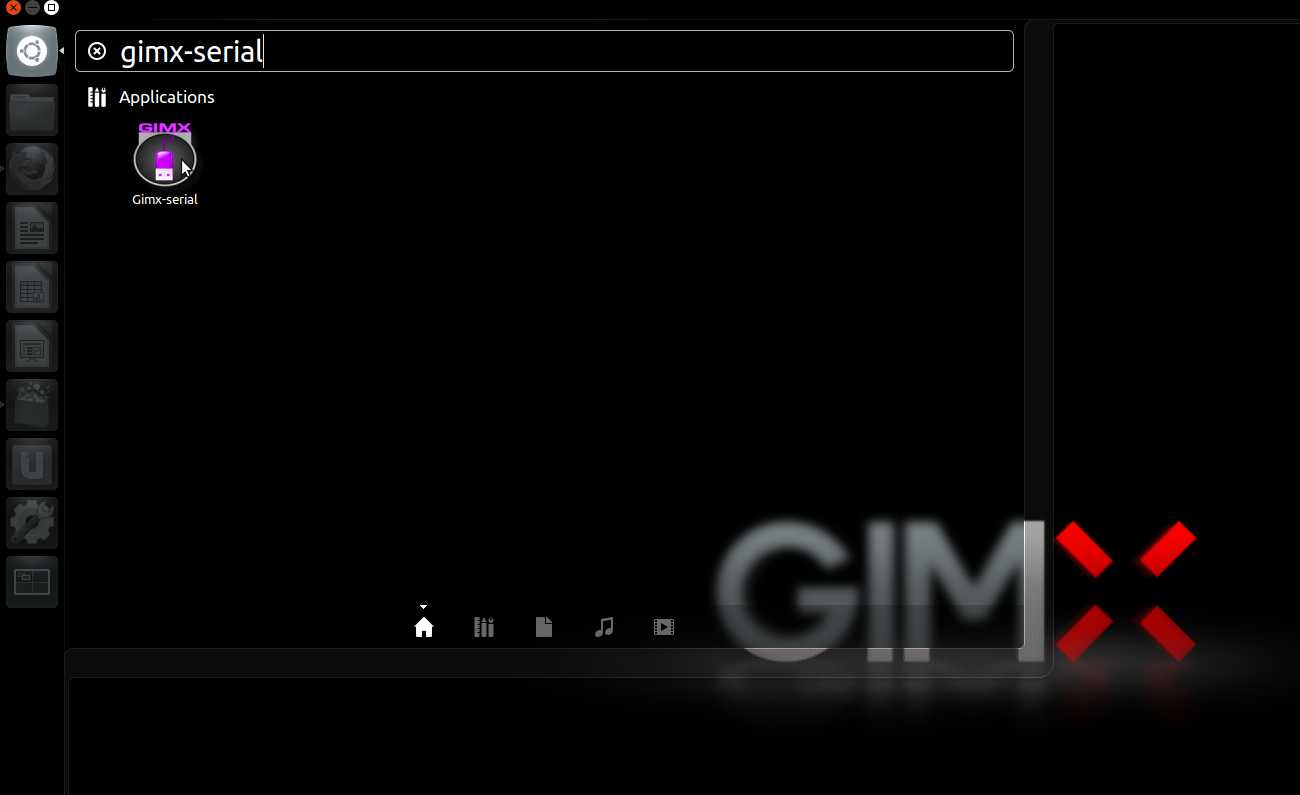
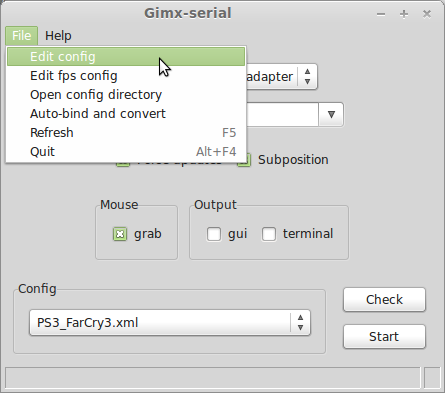
| − | Launch gimx-launcher.
| + | GIMX-Launcher ausführen. |
| | | | |
| − | TODO: update screenshot
| + | <div class="mw-translate-fuzzy"> |
| | + | <div class="image200px">[https://gimx.fr/img/screenshots/tuto/2.1_2_start_gimx-serial.jpg https://gimx.fr/img/screenshots/tuto/2.1_2_start_gimx-serial.jpg]</div> |
| | + | </div> |
| | | | |
| − | <div class="image200px">[https://gimx.fr/img/screenshots/tuto/2.1_2_start_gimx-serial.jpg https://gimx.fr/img/screenshots/tuto/2.1_2_start_gimx-serial.jpg]</div> | + | <div class="mw-translate-fuzzy"> |
| | + | ==Konfigurationsdateien herunterladen== |
| | + | </div> |
| | | | |
| − | ==Config file download== | + | <div class="mw-collapsible mw-collapsed"> |
| | + | '''This section contains information about downloading configuration from gimx-launcher.''' |
| | | | |
| − | A few config files are shared by users of the GIMX community, and can be downloaded from gimx-launcher.<br />
| + | Most config files shared by users of the GIMX community can be downloaded directly from gimx-launcher. <!-- TODO: link page ---> |
| | Please contribute by sharing your own configs in the [https://gimx.fr/forum/viewforum.php?f=9 Configuration and Requests forum section]. | | Please contribute by sharing your own configs in the [https://gimx.fr/forum/viewforum.php?f=9 Configuration and Requests forum section]. |
| | | | |
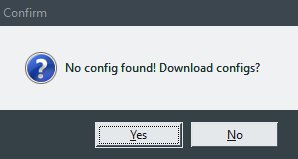
| − | The first time gimx-launcher is started, if there is no config file present on the PC, a message box will ask you if config files should be downloaded.<br /> | + | * The first time '''gimx-launcher''' is started, if there is no config file present on the PC, a message box will ask you if config files should be downloaded. <div class="image200px">[https://gimx.fr/wiki/images/d/d3/Noconfigs.jpg https://gimx.fr/wiki/images/d/d3/Noconfigs.jpg]</div> |
| − | <div class="image200px">[https://gimx.fr/img/screenshots/tuto/2.2_1_first_start.jpg https://gimx.fr/img/screenshots/tuto/2.2_1_first_start.jpg]</div> | + | |
| | + | |
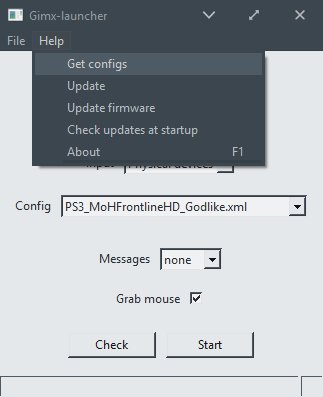
| | + | * The config file downloader is also available through the "Help>Get configs" menu entry. <div class="image200px">[https://gimx.fr/wiki/images/f/f0/Getconfigs.jpg https://gimx.fr/wiki/images/f/f0/Getconfigs.jpg]</div> |
| | + | |
| | | | |
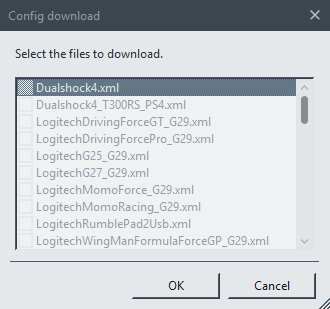
| − | The config file downloader is also available through the "Help>Get configs" menu entry.<br /> | + | * The config file downloader displays all config files available to download: <div class="image200px">[https://gimx.fr/wiki/images/9/96/Configdownload.jpg https://gimx.fr/wiki/images/9/96/Configdownload.jpg]</div> |
| − | <div class="image200px">[https://gimx.fr/img/screenshots/tuto/2.2_2_get_configs.png https://gimx.fr/img/screenshots/tuto/2.2_2_get_configs.png]</div> | |
| | | | |
| − | The config file downloader displays all config files available to download:<br />
| |
| − | <div class="image200px">[https://gimx.fr/img/screenshots/tuto/2.2_3_config_download.png https://gimx.fr/img/screenshots/tuto/2.2_3_config_download.png]</div>
| |
| | | | |
| − | The config name syntax is: <CONSOLE>_<GAME>_<AUTHOR>.xml or <CONSOLE>_<OS>_<DEVICE>_<AUTHOR>.xml.<br /> | + | The config name syntax is: <CONSOLE>_<GAME>_<AUTHOR>.xml or <CONSOLE>_<OS>_<DEVICE>_<AUTHOR>.xml. |
| | Examples: | | Examples: |
| − | * PS3_Battlefield3_McKack.xml: config file built by McKack for the PS3 version of Battlefiled 3. | + | * '''LogitechDrivingForceGT_G29.xml''': config file that emulates '''G29''' to use with '''Logitech Driving Force GT'''. |
| − | * PS3_LINUX_X360Pad.xml: config file to use in Linux with a 360 pad and a PS3. | + | * '''PS3_Battlefield3_McKack.xml''': config file to use with '''mouse''' built by McKack for the PS3 version of '''Battlefield 3'''. |
| | + | * '''PS3_LINUX_X360Pad.xml''': config file to use in Linux with a '''360''' pad and a '''PS3'''. |
| | + | |
| | + | Just select configurations you want to download and click <u>OK</u>, program will do the rest and you can now use config you've downloaded. |
| | + | |
| | + | |
| | + | </div> |
| | + | |
| | + | ==Maus Sensitivitätsumwandlung== |
| | | | |
| − | ==Mouse sensitivity conversion== | + | <div class="mw-collapsible mw-collapsed"> |
| | | | |
| − | This part is for the FPS gamers.
| + | <div class="mw-translate-fuzzy"> |
| − | Before using a prebuilt config file, you have to convert the sensitivity so that it matches your own mouse DPI.<br />
| + | Dieser Abschnitt ist für FPS-Spieler. |
| − | Make sure to set the in-game sensitivity to the highest, and make sure to have your mouse tracking at its highest DPI setting (examples: Logitech G5 @2000DPI, Logitech G500 @5700DPI).
| + | Bevor eine vorgefertigte Konfiguration benutzt werden kann, muss man die Empfindlichkeit konvertieren damit diese der eigenen Maus-Auflösung(DPI) angepasst ist.<br /> |
| | + | Im Spiel die Empfindlichkeit auf die höchste Stufe setzen und die Maus-Auflösung(DPI) auf die höchstmögliche stellen. (z.B.: Logitech G5 @2000DPI, Logitech G500 @5700DPI). |
| | + | </div> |
| | | | |
| | GIMX provides means to convert the sensitivity, knowing both the DPI of the source mouse (which can be embedded in the config file) and the DPI of the destination mouse.<br /> | | GIMX provides means to convert the sensitivity, knowing both the DPI of the source mouse (which can be embedded in the config file) and the DPI of the destination mouse.<br /> |
| | If the source DPI and the destination DPI are the same, there is no need to convert anything. | | If the source DPI and the destination DPI are the same, there is no need to convert anything. |
| | | | |
| − | It's possible to do this with gimx-config or gimx-fpsconfig. These tools are further detailed on [[Config_Editors|this page]].
| + | Es ist möglich, dies mit GIMX-Confog oder GIMX-Fpsconfig durchzuführen. Diese Tools werden hier detaillierter beschrieben: [[Config_Editors|this page]]. |
| | + | |
| | + | <div class="mw-translate-fuzzy"> |
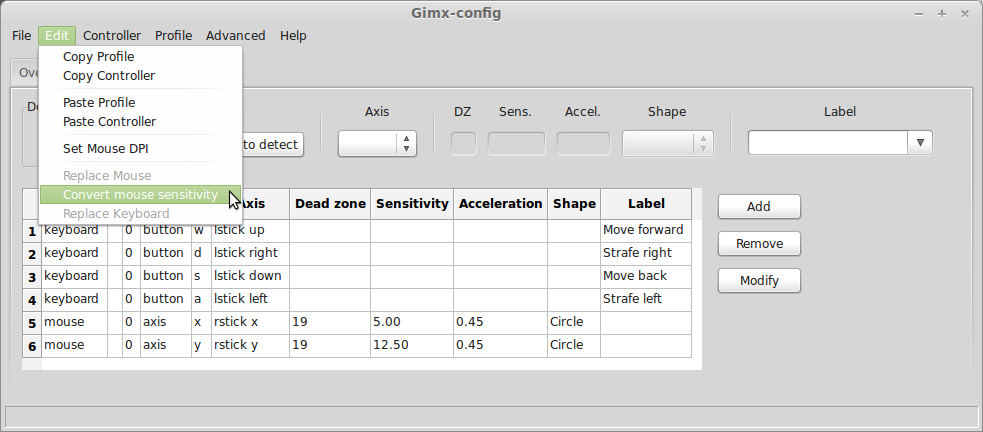
| | + | ===GIMX-Konfiguration=== |
| | + | Im GIMX-Launcher die Konfigurationsdatei auswählen und im Menu den Punkt "File>Edit config" auswählen.<br /> |
| | + | <div class="image200px">[https://gimx.fr/img/screenshots/tuto/2.3_1_edit_config.png https://gimx.fr/img/screenshots/tuto/2.3_1_edit_config.png]</div><br /> |
| | + | Dies öffnet die Konfiguration mit dem GIMX-Config Editor.<br /> |
| | + | Auf "Edit>Convert mouse sensitivity" klicken.<br /> |
| | + | <div class="image200px">[https://gimx.fr/img/screenshots/tuto/2.3_2_replace_mouse_dpi.png https://gimx.fr/img/screenshots/tuto/2.3_2_replace_mouse_dpi.png]</div><br /> |
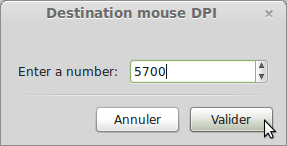
| | + | Wenn die Konfiguration keine DPI hinterlegt hat, erscheint ein Hinweis. Die Quell-DPI eingeben und bestätigen.<br /> |
| | + | Ein Hinweis erscheint. Die Ziel DPI eingeben und bestätigen. |
| | + | <div class="image200px">[https://gimx.fr/img/screenshots/tuto/2.3_4_new_dpi.png https://gimx.fr/img/screenshots/tuto/2.3_4_new_dpi.png]</div><br /> |
| | + | Die Empfindlichkeit wird in allen Profilen angepasst. (Hüft-Feuer = Profil 1, ADS = Profil 2) (PS: ADS = Betätigte rechte Maustaste).<br /> |
| | + | <div class="image200px">[https://gimx.fr/img/screenshots/tuto/2.3_5_multiplier_changed.png https://gimx.fr/img/screenshots/tuto/2.3_5_multiplier_changed.png]</div><br /> |
| | + | Auf "File>Save" klicken. |
| | + | </div> |
| | + | |
| | + | <div class="mw-collapsible mw-collapsed"> |
| | | | |
| − | ===Gimx-config===
| |
| | In gimx-launcher, select the config file, and click on the "File>Edit config" menu item.<br /> | | In gimx-launcher, select the config file, and click on the "File>Edit config" menu item.<br /> |
| | <div class="image200px">[https://gimx.fr/img/screenshots/tuto/2.3_1_edit_config.png https://gimx.fr/img/screenshots/tuto/2.3_1_edit_config.png]</div><br /> | | <div class="image200px">[https://gimx.fr/img/screenshots/tuto/2.3_1_edit_config.png https://gimx.fr/img/screenshots/tuto/2.3_1_edit_config.png]</div><br /> |
| Line 52: |
Line 84: |
| | Click on the "File>Save". | | Click on the "File>Save". |
| | | | |
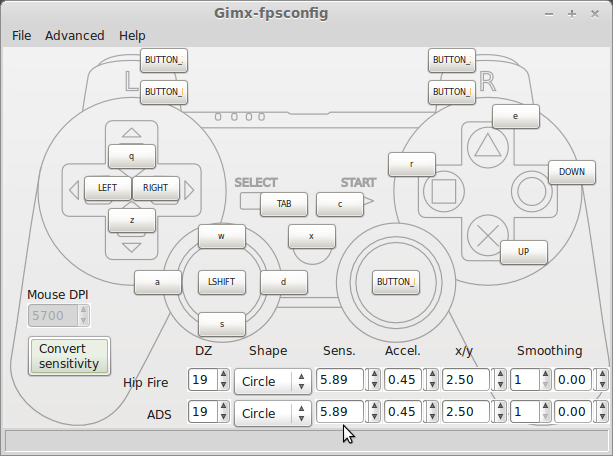
| − | ===Gimx-fpsconfig=== | + | </div> |
| | + | |
| | + | <div class="mw-translate-fuzzy"> |
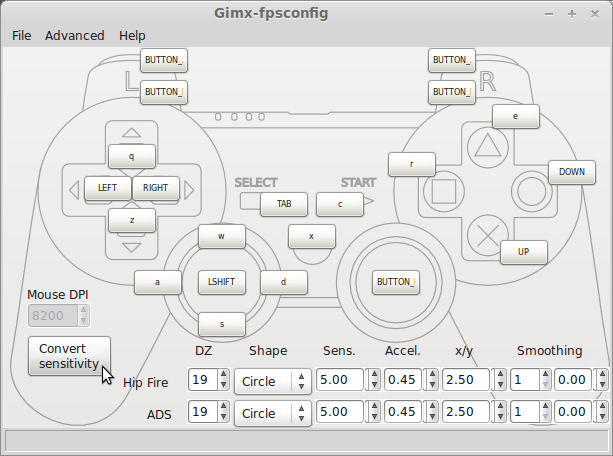
| | + | ===GIMX-FPS Konfiguration=== |
| | + | Im GIMX-Launcher die Konfigurationsdatei auswählen, im Menü auf "File>Edit FPS config" klicken.<br /> |
| | + | <div class="image200px">[https://gimx.fr/img/screenshots/tuto/2.3_6_edit_fps_config.png https://gimx.fr/img/screenshots/tuto/2.3_6_edit_fps_config.png]</div><br /> |
| | + | Dies öffnet die Konfigurationsdatei mit dem GIMX-Fpsconfig Editor.<br /> |
| | + | Wenn die Quell-DPI in der Konfiguration gespeichert wurden, sollte sie nicht den Wert 0 haben.<br /> |
| | + | Auf "Convert sensitivity" klicken. Ein Hinweis erscheint um die Ziel-DPI einzugeben, diese eingeben und auf "validate" klicken.<br /> |
| | + | <div class="image200px">[https://gimx.fr/img/screenshots/tuto/2.3_7_convert_sensitivity.png https://gimx.fr/img/screenshots/tuto/2.3_7_convert_sensitivity.png]</div><br /> |
| | + | <div class="image200px">[https://gimx.fr/img/screenshots/tuto/2.3_4_new_dpi.png https://gimx.fr/img/screenshots/tuto/2.3_4_new_dpi.png]</div><br /> |
| | + | Die Empfindlichkeit wird für Hüftfeuer und ADS konvertiert.<br /> |
| | + | <div class="image200px">[https://gimx.fr/img/screenshots/tuto/2.3_7_sensitivity_converted.png https://gimx.fr/img/screenshots/tuto/2.3_7_sensitivity_converted.png]</div><br /> |
| | + | Auf "File>Save" klicken. |
| | + | </div> |
| | + | |
| | + | <div class="mw-collapsible mw-collapsed"> |
| | + | |
| | In gimx-launcher, select the config file, and click on the "File>Edit FPS config" menu item.<br /> | | In gimx-launcher, select the config file, and click on the "File>Edit FPS config" menu item.<br /> |
| | <div class="image200px">[https://gimx.fr/img/screenshots/tuto/2.3_6_edit_fps_config.png https://gimx.fr/img/screenshots/tuto/2.3_6_edit_fps_config.png]</div><br /> | | <div class="image200px">[https://gimx.fr/img/screenshots/tuto/2.3_6_edit_fps_config.png https://gimx.fr/img/screenshots/tuto/2.3_6_edit_fps_config.png]</div><br /> |
| Line 64: |
Line 113: |
| | Click on the "File>Save". | | Click on the "File>Save". |
| | | | |
| − | ==Play== | + | </div> |
| | + | </div> |
| | + | |
| | + | ==Spielen== |
| | | | |
| − | ===Ubuntu or Raspbian + bluetooth=== | + | ===Ubuntu oder Raspbian + Bluetooth=== |
| | | | |
| − | Make sure to read the [[Main_Page#Hardware_requirements|Hardware requirements]].
| + | <div class="mw-collapsible mw-collapsed"> |
| | + | |
| | + | Diese Seite ebenfalls lesen: [[Main_Page#Hardware_requirements|Hardware requirements]]. |
| | | | |
| | ====PS3==== | | ====PS3==== |
| | | | |
| − | # Open gimx-launcher. | + | <div class="mw-collapsible mw-collapsed"> |
| − | # In the "Output" drop-down menu, select "Bluetooth / PS3". | + | |
| − | # If no previous pairing was defined, you will be asked to create a new pairing. Click on "Yes". | + | # GIMX-Launcher öffnen. |
| − | # As requested, connect a Sixaxis / Dualshock 3, and click on "Yes". | + | # Im "Output" Drop-Down Menü, "Bluetooth / PS3" auswählen". |
| − | # Select the pairing to use and click on "Validate". | + | # Wenn keine vorgängigen Verbindungen vorhanden sind, wird GIMX eine neue erstellen wollen: Auf "Yes" klicken. |
| − | # As requested, connect a bluetooth dongle, and click on "Yes". | + | # Wie gefordert, einen Sixaxis / Dualshock 3 anschliessen und auf "Yes" klicken. |
| − | # Save the bluetooth dongle address as you may wish to restore it later. | + | # Die Verbindung auswählen und auf "Validate" klicken. |
| − | # Select the bluetooth dongle, and click on "Validate". | + | # Wie gefordert, einen Bluetooth-Adapter anschliessen und auf "Yes" klicken. |
| − | # Make sure you saved the dongle address, and click on "Yes". | + | # Die Bluetooth-Adapter Adresse speichern, falls man diese später wiederherstellen möchte. |
| − | # The dongle address will be modified to match the address of the Sixaxis / Dualshock 3. | + | # Den Bluetooth-Adapter auswählen und auf "Validate" klicken. |
| − | # If you get an error message, buy a [[Bluetooth_dongle|compatible bluetooth dongle]]. | + | # Sich versichern, dass die Bluetooth-Adapter Adresse gespeichert wurde und auf "Yes" klicken. |
| − | # Unplug your sixaxis and if it doesn't power off by itself, press the PS button until it powers off. | + | # Die Bluetooth-Adapter Adresse wird modifiziert, dass diese mit der Adresse des Sixaxis / Dualshock 3 Controller übereinstimmt. |
| − | # In the "Config" drop-down menu, select the configuration file to use. | + | # Falls eine Fehlermeldung erscheint, muss ein kompatibler Adapter gekauft werden: [[Bluetooth_dongle|compatible bluetooth dongle]]. |
| − | # Click on "Start". | + | # Die Verbindung zum Sixaxis / Dualshock 3 Controller trennen, den Controller mit dem PS Button ausschalten, falls dieser noch läuft. |
| − | # Play. | + | # Die zu verwendende Konfiguration auswählen |
| − | # Press Left Shift + Escape to quit. | + | # Start anklicken |
| | + | # Spielen |
| | + | # Linke Shift + Escape Taste zum beenden von GIMX drücken |
| | + | |
| | + | </div> |
| | | | |
| | ====PS4==== | | ====PS4==== |
| | | | |
| − | The PS4 only takes inputs from licensed controller.<br />
| + | <div class="mw-collapsible mw-collapsed"> |
| − | In order to authenticate itself as a licensed controller, GIMX needs to be connected over bluetooth to a real Dualshock 4 all the time.
| + | |
| | + | Die PS4 nimmt nur eingaben von einem lizenzierten Controller an.<br /> |
| | + | Damit sich GIMX als lizenzierten Controller benutzen lässt, muss es ständig via Bluetooth mit einem echten DualShock 4 Controller verbunden sein. |
| | | | |
| − | * Raspbian-specific instructions | + | * Raspbian-spezifische Instruktionen |
| | | | |
| − | The bluetooth service is automatically started when a device tries to connect.<br />
| + | Der Bluetooth Dienst wird automatisch gestartet, wenn sich ein Gerät zu verbinden versucht.<br /> |
| − | This is annoying since it will intercept the connection requests.<br />
| + | Dies ist störend, da es die Verbindungsanfragen unterbricht.<br /> |
| − | To disable the service, run the following command '''and reboot''':<br />
| + | Um den Dienst zu beenden, folgenden Befehl ausführen '''und neustarten''':<br /> |
| | | | |
| | sudo update-rc.d bluetooth disable | | sudo update-rc.d bluetooth disable |
| | | | |
| − | Alternatively, you can stop the bluetooth service and move the bluetoothd binary:<br />
| + | Alternativ kann man den Bluetooth Dienst stoppen und die bluetoothd Bibliothek umbenennen:<br /> |
| | | | |
| | sudo service bluetooth stop | | sudo service bluetooth stop |
| Line 108: |
Line 168: |
| | sudo mv bluetoothd bluetoothd.bk | | sudo mv bluetoothd bluetoothd.bk |
| | | | |
| − | The drawback of this second method is that it will need to be performed again after each update of the bluez package.
| + | Der Nachteil von diesem Verfahren ist, dass dieser Schritt nach jeder Aktualisierung des bluez-Pakets erneut ausgeführt werden muss. |
| | | | |
| − | * AVR USB development board | + | * AVR USB Entwicklungs-Board |
| | | | |
| − | An [[DIY_USB_adapter#AVR_USB_development_board|AVR USB development board]] is required for pairing the bluetooth dongle with the PS4.<br />
| + | Ein wird ein [[DIY_USB_adapter#AVR_USB_development_board|AVR USB development board]] benötigt um den Bluetooth Adapter mit der PS4 zu koppeln.<br /> |
| − | The same board can be used to build a DIY USB adapter, but no USB to serial TTL converter is needed here.<br />
| + | Dasselbe Board kann benutzt werden um einen DIY USB-Adapter zu bauen. Aber hierfür wird kein USB zu seriell TTL-Converter benötigt.<br /> |
| − | The firmware with the needed "atmega32u4.hex" file is available at: https://gimx.fr/download/EMUPS4PAIRING.7z<br />
| + | Die benötigte Firmware "atmega32u4.hex" ist hier erhältlich: https://gimx.fr/download/EMUPS4PAIRING.7z<br /> |
| − | Load this firmware as explained in the [[DIY_USB_adapter#Firmware_loading|Firmware loading]] instructions.
| + | Die Firmware nach dieser Anleitung aufspielen: [[DIY_USB_adapter#Firmware_loading|Firmware loading]] |
| | | | |
| − | * First-start instructions | + | *Erst-start Instruktionen |
| | | | |
| − | # Open gimx-launcher. | + | # GIMX-Launcher öffnen. |
| − | # In the "Output" drop-down menu, select "Bluetooth / PS4". | + | # Im "Output" Drop-Down Menü, "Bluetooth / PS4" auswählen". |
| − | # If no previous pairing was defined, you will be asked to create a new pairing. Click on "Yes". | + | # Wenn keine vorgängigen Verbindungen vorhanden sind, wird GIMX eine neue erstellen wollen: Auf "Yes" klicken. |
| − | # As requested, connect a [[Bluetooth_dongle|compatible bluetooth dongle]], and click on "Yes". | + | # Wie gefordert, einen Bluetooth-Adapter anschliessen und auf "Yes" klicken ([[Bluetooth_dongle|compatible bluetooth dongle]]). |
| − | # As requested, connect a Dualshock 4 with a micro USB cable, and click on "Yes". | + | # Wie gefordert, einen Dualshock 4 mit Micro-USB Kabel anschliessen und auf "Yes" klicken. |
| − | # Select the pairing to use and click on "Validate". | + | # Die Verbindung auswählen und auf "Validate" klicken. |
| − | # Connect the AVR USB board (e.g. Teensy 2.0) and click on "Yes". | + | # Das AVR USB-Board verbinden (z.B. Teensy 2.0) und auf "Yes" klicken. |
| − | # As requested, connect the AVR USB board to the PS4, and wait a few seconds. | + | # Wie gefordert, das AVR USB-Board mit der PS4 verbinden und einige Sekunden warten. |
| − | # Connect the AVR USB board back to the computer, and click on "Yes". | + | # Das AVR USB-Board wieder am Computer anschliessen und auf "Yes" klicken. |
| − | # A new pairing should appear in the "Pairing" drop-down menu. | + | # Eine Neue Kopplung/Verbindung sollte nun im "Pairing" Drop-Down Menü erscheinen. |
| − | # Unplug the Dualshock 4. | + | # Den Dualshock 4 Controller ausstecken. |
| − | # In the "Config" drop-down menu, select the configuration file to use. | + | # Im "Config" Drop-Down Menü, die zu verwendende Konfiguration auswählen. |
| − | # Click on "Start". | + | # "Start" anklicken. |
| − | # Press on the PS button of the Dualshock 4. | + | # Den "PS Button" auf dem Dualshock 4 Controller drücken |
| − | # Play. | + | # Spielen |
| − | # Press Left Shift + Escape to quit. | + | # Linke Shift + Escape Taste zum beenden von GIMX drücken |
| | | | |
| − | ===Ubuntu or Windows + DIY USB adapter===
| + | </div> |
| | | | |
| − | ====Controller authentication==== | + | </div> |
| | + | |
| | + | ===Ubuntu oder Windows + DIY USB-Adapter=== |
| | + | |
| | + | <div class="mw-collapsible mw-collapsed"> |
| | + | |
| | + | ====Controller Authentifizierung==== |
| | | | |
| | * Xbox 360: it is required to have a genuine wired controller (the play and charge cable won't work) wired to the PC at startup. In Windows, the 360 controller has to be unplugged/replugged before each spoof attempt.<br /> | | * Xbox 360: it is required to have a genuine wired controller (the play and charge cable won't work) wired to the PC at startup. In Windows, the 360 controller has to be unplugged/replugged before each spoof attempt.<br /> |
| | * Xbox One: it is required to have a genuine controller wired to the PC at startup. In Windows, the Xbox One controller has to be unplugged/replugged each time the AVR USB board or the console are power-cycled.<br /> | | * Xbox One: it is required to have a genuine controller wired to the PC at startup. In Windows, the Xbox One controller has to be unplugged/replugged each time the AVR USB board or the console are power-cycled.<br /> |
| − | * PS4: it is required to have a genuine DS4 wired to the PC all the time.<br /> | + | * PS4: it is required to have a genuine Dualshock 4 wired to the PC all the time.<br /> |
| | | | |
| − | '''Note: when using a console that requires authentication, make sure to turn off the controller before connecting it to the PC.''' | + | '''Achtung: Wenn eine Konsole verwendet wird die Authentifizierung benötigt, den Controller ausschalten bevor er am Computer angeschlossen wird.''' |
| | | | |
| − | ====Connexion==== | + | ====Verbindung==== |
| | | | |
| − | Plug the AVR USB board (e.g. Teensy, Arduino Leonardo, Micro Pro...) to the console.<br />
| + | Das AVR USB-Board (z.B. Teensy, Arduino Leonardo, Micro Pro, etc.) an die Konsole anschliessen.<br /> |
| − | Plug the USB to UART adapter (e.g. CP2102, FT232RL...) to the computer.<br />
| + | Den USB zu UAR-Adapter (z.B. CP2102, FT232RL, etc.) an den Computer anschliessen.<br /> |
| | | | |
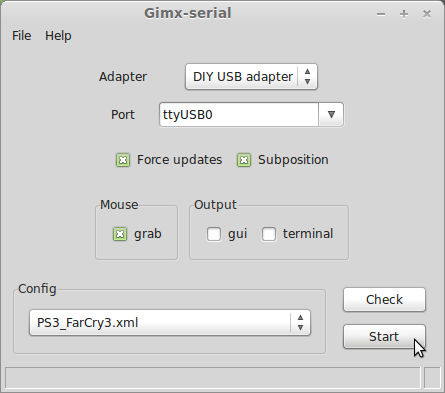
| | ====Start==== | | ====Start==== |
| Line 155: |
Line 221: |
| | <div class="image200px">[https://gimx.fr/img/screenshots/tuto/2.4_2_gimx-serial.png https://gimx.fr/img/screenshots/tuto/2.4_2_gimx-serial.png]</div> | | <div class="image200px">[https://gimx.fr/img/screenshots/tuto/2.4_2_gimx-serial.png https://gimx.fr/img/screenshots/tuto/2.4_2_gimx-serial.png]</div> |
| | | | |
| − | # Turn on the console | + | # Konsole einschalten |
| − | # Select the adapter | + | # Adapter auswählen |
| − | # Select the serial port | + | # Seriellen Port auswählen |
| − | # Select the configuration file to use | + | # Die zu verwendende Konfiguration auswählen |
| − | # Click on Start | + | # Start anklicken |
| − | # Press the PS button on Playstation consoles, or the Home button on Xbox consoles. | + | # Den PS-Knopf auf Playstation Konsolen, oder den Home Knopf auf XBOX Konsolen drücken |
| − | # Play | + | # Spielen |
| − | # Press Left Shift + Escape to quit | + | # Linke Shift + Escape Taste zum beenden von GIMX drücken |
| | + | |
| | + | </div> |