|
|
(25 intermediate revisions by the same user not shown)
|
| Line 93: |
Line 93: |
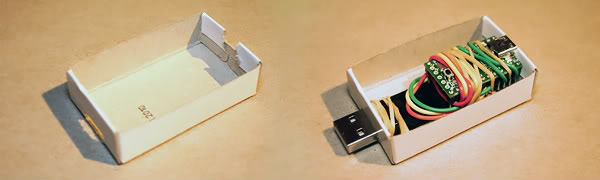
| | 2. 为了更好的理线,我把多余的线缠绕在了Teensy板上。当然你可能有更好的方法。 | | 2. 为了更好的理线,我把多余的线缠绕在了Teensy板上。当然你可能有更好的方法。 |
| | | | |
| − | Remember not to cover up the button on the Teensy as we need to press it later on.
| + | !注意:记得别把Teensy板有按钮的这面给盖上,上面那个按钮要用的。 |
| − | (Also, this is where the rubber band will come in handy!)
| |
| | | | |
| | https://gimx.fr/img/screenshots/tuto/gfd/gfd-bundle.jpg | | https://gimx.fr/img/screenshots/tuto/gfd/gfd-bundle.jpg |
| | | | |
| − | If you want, you can also place the serial converter so that the pins and jumper cables go in between the rows of pins on the Teensy.
| + | 无所谓,线可以缠在多余的针之间,还能减少短路的可能性。 |
| − | It's a very snug fit though so you should use some electrical tape to insulate the pins on the serial converter because they will touch the Teensy ones if you don't.
| |
| | | | |
| | https://gimx.fr/img/screenshots/tuto/gfd/gfd-insulate2.jpg | | https://gimx.fr/img/screenshots/tuto/gfd/gfd-insulate2.jpg |
| | | | |
| − | Cut some holes in your project box of choice to match the Mini USB plug on one side and regular USB plug on the other side.
| + | 在外壳上的两个方向分别切割出 Mini USB 和 USB 的开口。 |
| − | Do some tests and make sure everything aligns up before securing everything in place. In the picture below I've bundled everything up using the rubber band and secured it to the box with some electrical tape (double sided tape or hot glue works wonders too if you have it)
| |
| | | | |
| | https://gimx.fr/img/screenshots/tuto/gfd/gfd-matchdapter.jpg | | https://gimx.fr/img/screenshots/tuto/gfd/gfd-matchdapter.jpg |
| | | | |
| − | Voilà! You're done building the adapter.
| + | 完工! |
| | | | |
| − | =Load the firmware onto the adapter= | + | =刷机= |
| | | | |
| − | Connect the adapter to your computer using the USB Mini-B cable and a LED on the Teensy should turn on or start blinking.
| + | 用Mini USB线把Teensy开发板和电脑连上后,Teensy板上的小LED灯应该会开始闪烁。 |
| | | | |
| | https://gimx.fr/img/screenshots/tuto/gfd/gfd-loadfirmware.png | | https://gimx.fr/img/screenshots/tuto/gfd/gfd-loadfirmware.png |
| | | | |
| − | Now start up Teensy Loader (teensy.exe on your desktop) and follow these steps:
| + | 再在电脑上打开Teensy Loader软件: |
| | | | |
| − | Press the button on the Teensy and the LED should turn off.
| + | - 按一下Teensy上的按钮,LED灯应该会灭掉。 |
| − | In Teensy Loader, open atmega32u4.hex from the firmwares folder on your desktop.
| + | - 在电脑上的Teensy软件里,打开固件(firmware)文件夹里的 atmega32u4.hex 文件。 |
| − | Click the Program button and you should get the message "Download Complete"
| + | - 点击 "Program"(运行程序) 按钮,软件应该会显示"Download Complete"(下载完成) |
| − | Now click the Reboot button and your GIMX USB adapter is ready for use!
| + | - 再点一下重启按钮,你的GIMX USB转接器应该就可以使用了。 |
| | | | |
| − | If the Teensy loader does not detect the device, try with another USB cable, and another USB port.
| + | 如果Teensy Loader软件无法检测到硬件的话,试试别的USB线或者电脑上别的USB口。 |
| | | | |
| | https://gimx.fr/img/screenshots/tuto/gfd/gfd-connect.jpg | | https://gimx.fr/img/screenshots/tuto/gfd/gfd-connect.jpg |
| | | | |
| − | NOTE! You can now unplug the USB Mini-B cable from your computer.
| + | 现在,你就可以把Mini USB线从电脑拔掉了。 |
| − | The USB Mini-B cable will only be connected to your computer when upgrading the firmware from now on.
| |
| − | When in use, the USB Mini-B cable is connected to your console.
| |
| | | | |
| − | =Install the GIMX software=
| + | 以后,Mini USB线就代表者你的“特殊设备”,用来插到PS3,PS4等机器上使用了。另一头USB则连着你的电脑。 |
| | | | |
| − | This step is pretty straight forward.
| + | =安装GIMX软件= |
| − | Simply run setup-X.YZ.exe from your desktop and follow the installation steps, preferably with the default installation location.
| + | |
| | + | 很正常的安装,双击exe安装文件,一路到完成就行了。 |
| | | | |
| | https://gimx.fr/img/screenshots/tuto/gfd/gfd-setupgimx2.jpg | | https://gimx.fr/img/screenshots/tuto/gfd/gfd-setupgimx2.jpg |
| | | | |
| − | When the installation is done you should have three GIMX icons on your desktop.
| + | 安装完后,桌面上应该会出现GIMX软件的图标。 |
| | | | |
| | --todo: update screenshot (gimx-serial was renamed to gimx-launcher) | | --todo: update screenshot (gimx-serial was renamed to gimx-launcher) |
| | https://gimx.fr/img/screenshots/tuto/gfd/gfd-icons.png | | https://gimx.fr/img/screenshots/tuto/gfd/gfd-icons.png |
| | | | |
| − | '''Configuration basics''' | + | '''基础配置''' |
| | | | |
| − | GIMX comes pre-loaded with a few configurations, but let's take a quick look on how you can make your own configurations using the GIMX FPS Config Tool (As you can tell by the name, this is mainly meant for setting up a basic FPS configuration.)
| + | GIMX软件自带了一些配置文件。但我们这儿来试试自定义配置的工具吧。 |
| | | | |
| | [https://www.youtube.com/watch?feature=player_embedded&v=2cxBGMWBpzM Youtube video] | | [https://www.youtube.com/watch?feature=player_embedded&v=2cxBGMWBpzM Youtube video] |
| | | | |
| − | You can also check out the Configuration Requests and Index thread for other configurations available for download, or post requests that we or the community might be able to fulfill.
| + | 你也可以去论坛里找别人分享的配置文件,或者可以制作并分享配置文件。 |
| | | | |
| − | NOTE! To open the configuration directory, click on File>Open config directory in gimx-config, gimx-fpsconfig, or gimx-launcher.
| + | 注意:要查看配置文件的话,在GIMX软件里,打开左上角File > "Open config directory"(打开配置文件夹) |
| | | | |
| − | =Good to go!= | + | =玩儿去吧= |
| | | | |
| − | That's it. You're ready to start using the GIMX USB adapter!
| + | 就是这样,你的GIMX USB转接器已经可以使用了。 |
| | | | |
| − | *Connect the regular USB side to your PC | + | *把普通USB-A口插入你的PC |
| | | | |
| | https://gimx.fr/img/screenshots/tuto/gfd/gfd-contopc.jpg | | https://gimx.fr/img/screenshots/tuto/gfd/gfd-contopc.jpg |
| | | | |
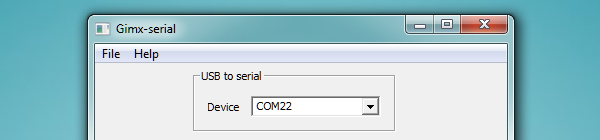
| − | *Connect the USB Mini-B side to your console, run gimx-launcher and make sure the adapter is recognized on a COM port.
| + | - 把Mini-USB线对应的USB口插入你的主机/PC |
| − | :(If the Device box is blank, refer to the Support section and report the problem if a solution isn't found)<br />
| + | - 打开GIMX软件以确保它被正确的识别了。 |
| | + | |
| | + | *如果GIMX软件里没显示设备,可能是软件问题。想办法求助吧。 |
| | | | |
| | https://gimx.fr/img/screenshots/tuto/gfd/gfd-comport.jpg | | https://gimx.fr/img/screenshots/tuto/gfd/gfd-comport.jpg |
| | | | |
| − | *Read the [[Quick_Start|Quick Start page]] to learn how to download a pre-made configuration, and how to install the libusbk driver (needed for consoles that require authentication). | + | *阅读 [[Quick_Start|Quick Start page快速开始说明]] 学习如何加载配置文件, 和如何安装libusbk驱动 (有些主机需要安全验证). |
| | + | |
| | + | *下拉菜单中,选择你配置/下载的配置文件。点击“start”开始按钮。可能会跳出几个窗口来捕捉你的鼠标键盘操作。 |
| | | | |
| − | *Select the config you made/downloaded from the drop down menu, click the Start button and a couple of windows should pop up to start capturing your mouse and keyboard input!
| + | 如果打开GIMX软件时显示“No controller detected”(没检测到设备)的错误消息。检查你的接线,比如可能TX和RX的线口接反了。 |
| − | If there is a "No controller detected." error message when you start GIMX, double check you wiring, and try to invert TX and RX in case it's still not working.
| |
| | | | |
| | https://gimx.fr/img/screenshots/tuto/gfd/gfd-selconfig.png | | https://gimx.fr/img/screenshots/tuto/gfd/gfd-selconfig.png |
| | | | |
| − | Now if you're in the menus of your console and press the WASD or arrow keys on your keyboard, you should be able to navigate through the menus, meaning you've succeeded! If not, or if something went wrong elsewhere, go back and make sure you followed every step to the letter and try again, then let us know if nothing you try works.
| + | 现在,你在电脑上按WASD或者键盘按键,主机里应该有上下左右的操作效果了。如果没有的话,什么地方弄错了,重新检查一遍。 |
| | | | |
| − | Enjoy!
| + | 玩的开心! |

这篇教程是一个简易入门教程。如果需要专业信息,请去隔壁DIY_USB_adapter页面查看。
欢迎来到GIMX USB转接器制作指南!不需要焊电路板的那种。
认真阅读此文,足够你制作且开始使用转接器。
建议先粗读一遍,然后再开始一步一步的制作。
购买需要的硬件
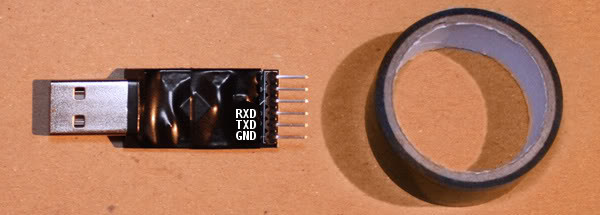
CP2102模块 USB 2.0 转 TTL
- 买的时候通常会送杜邦线(如果没有,跟老板要3根吧):

- 如果不想焊电路板,你需要买个有针头的板才行。
- 这两种开发板都可以: Teensy 2.0 或者 Teensy ++ 2.0。
- 但其他的 Teensy 开发板 (3.x, LC, ...) 是不支持的!注意别买错了
如果没有的话,你可能还要准备一两根USB线:
一个是延长CP2102的USB延长线(不用延长的话可以不买),
一个是连接 Teensy 开发板的 mini-usb 线(Teensy可能有不同的接口,而且买Teensy的时候常常送一根很短的mini-usb线)
可选:
- 这个教程里,我将使用一个火柴盒替代。你也可以考虑用大的热缩管,或者3D打印个合适的外壳。
- 为了防止电路板触碰到别的金属部分东西发生短路什么的,普通胶带也行。
- 用来把东西绑到一起,没弄好也能拆开。
当然估计会用到剪刀小刀什么的常用小工具。

注意:别用上面图中展示的伸缩USB延长线,最好用抗干扰的USB线
下载所需的软件和固件
Windows
- EMUJOYSTICKPS3: HID joystick emulation, with 16bit stick axes, for PS3
- EMUPS3: Sixaxis emulation, for PS3
- EMU360: 360 pad emulation, for Xbox 360
- EMUPS4: Hori Pad FPS Plus emulation, for PS4 (with touchpad support)
- EMUXONE: Xbox One pad emulation, for Xbox One
- EMUG29PS4: Logitech G29 gaming wheel emulation, for PS4, with force feedback support
- EMUG27PS3: Logitech G27 gaming wheel emulation, for PS3, with force feedback support
- EMUGTFPS2: Logitech GT Force emulation, for PS2, with force feedback support
- EMUDFPS2: Logitech Driving Force emulation, for PS2, with force feedback support
- EMUDFPPS2: Logitech Driving Force Pro emulation, for PS2, with force feedback support
- EMUG27PC: Logitech G27 gaming wheel emulation, for PC, force feedback support
为了方便,把文件放到桌面上(或者专门的一个文件夹里)
注意:CP2102的驱动已经放在GIMX软件里了,图里那个文件请无视。
Ubuntu
- EMUJOYSTICKPS3: HID joystick emulation, with 16bit stick axes, for PS3
- EMUPS3: Sixaxis emulation, for PS3
- EMU360: 360 pad emulation, for Xbox 360
- EMUPS4: Hori Pad FPS Plus emulation, for PS4 (with touchpad support)
- EMUXONE: Xbox One pad emulation, for Xbox One
- EMUG29PS4: Logitech G29 gaming wheel emulation, for PS4, with force feedback support
- EMUG27PS3: Logitech G27 gaming wheel emulation, for PS3, with force feedback support
- EMUGTFPS2: Logitech GT Force emulation, for PS2, with force feedback support
- EMUDFPS2: Logitech Driving Force emulation, for PS2, with force feedback support
- EMUDFPPS2: Logitech Driving Force Pro emulation, for PS2, with force feedback support
- EMUG27PC: Logitech G27 gaming wheel emulation, for PC, force feedback support
- (如果要Ubuntu操作的话,你得去读读上面那页里的操作手册)
组装硬件
仔细检查你的电路板上的接口
我文章(图)里用到的电路板标错了,别理它(图),按表格来
你的电路板接口可能不一样,按下面表格上指示的弄
| Teensy 开发板的接口 |
对应的 CP2102 板的接口
|
| GND |
GND
|
| D2 |
TX / TXO / TXD
|
| D3 |
RX / RXI / RXD
|
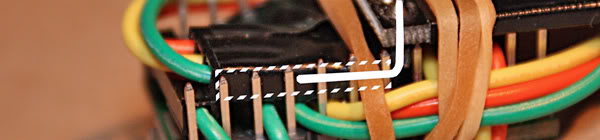
然后,我推荐用电工胶带把CP2102电路板给包起来,防止把它根Teensy开发板绑在一起后,与Teensy上的金属接触在一起发生短路之类的问题。
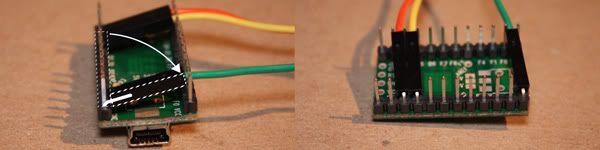
像图上这样接上线。

下面两步不必要,我只是为了尽可能缩小包装。
1. 把Teensy上的金属针掰弯,但别掰断。接上线。
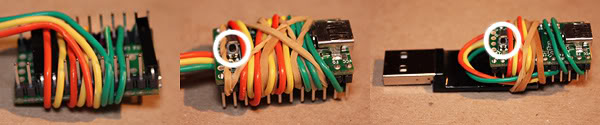
2. 为了更好的理线,我把多余的线缠绕在了Teensy板上。当然你可能有更好的方法。
!注意:记得别把Teensy板有按钮的这面给盖上,上面那个按钮要用的。
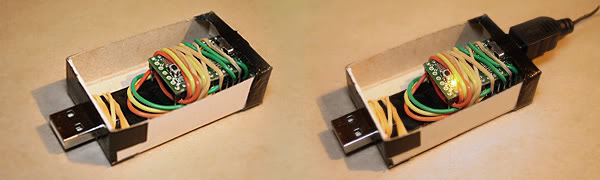
无所谓,线可以缠在多余的针之间,还能减少短路的可能性。
在外壳上的两个方向分别切割出 Mini USB 和 USB 的开口。
完工!
刷机
用Mini USB线把Teensy开发板和电脑连上后,Teensy板上的小LED灯应该会开始闪烁。
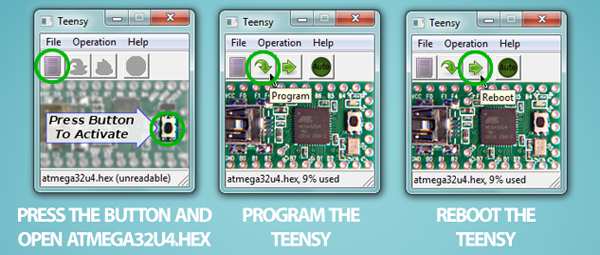
再在电脑上打开Teensy Loader软件:
- 按一下Teensy上的按钮,LED灯应该会灭掉。
- 在电脑上的Teensy软件里,打开固件(firmware)文件夹里的 atmega32u4.hex 文件。
- 点击 "Program"(运行程序) 按钮,软件应该会显示"Download Complete"(下载完成)
- 再点一下重启按钮,你的GIMX USB转接器应该就可以使用了。
如果Teensy Loader软件无法检测到硬件的话,试试别的USB线或者电脑上别的USB口。
现在,你就可以把Mini USB线从电脑拔掉了。
以后,Mini USB线就代表者你的“特殊设备”,用来插到PS3,PS4等机器上使用了。另一头USB则连着你的电脑。
安装GIMX软件
很正常的安装,双击exe安装文件,一路到完成就行了。
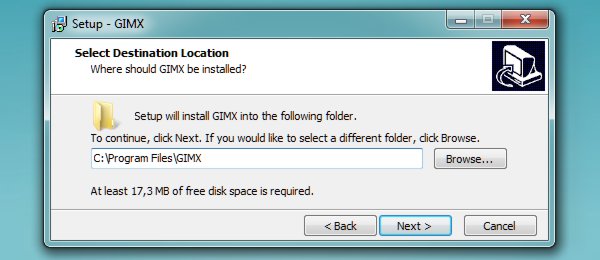
安装完后,桌面上应该会出现GIMX软件的图标。
--todo: update screenshot (gimx-serial was renamed to gimx-launcher)

基础配置
GIMX软件自带了一些配置文件。但我们这儿来试试自定义配置的工具吧。
Youtube video
你也可以去论坛里找别人分享的配置文件,或者可以制作并分享配置文件。
注意:要查看配置文件的话,在GIMX软件里,打开左上角File > "Open config directory"(打开配置文件夹)
玩儿去吧
就是这样,你的GIMX USB转接器已经可以使用了。

- 把Mini-USB线对应的USB口插入你的主机/PC
- 打开GIMX软件以确保它被正确的识别了。
- 如果GIMX软件里没显示设备,可能是软件问题。想办法求助吧。
- 下拉菜单中,选择你配置/下载的配置文件。点击“start”开始按钮。可能会跳出几个窗口来捕捉你的鼠标键盘操作。
如果打开GIMX软件时显示“No controller detected”(没检测到设备)的错误消息。检查你的接线,比如可能TX和RX的线口接反了。

现在,你在电脑上按WASD或者键盘按键,主机里应该有上下左右的操作效果了。如果没有的话,什么地方弄错了,重新检查一遍。
玩的开心!