Adaptateur USB à faire soi même, pour les nuls
http://gimx.fr/img/screenshots/tuto/gfd/gfd-header.png
Ce tutoriel vise la simplicité et la facilité. Si vous voulez plus de détails, veuillez lire la page DIY_USB_adapter.
Bienvenue sur ce tutoriel qui explique de manière simple comment fabriquer l'adaptateur USB pour GIMX, et sans soudure !
Tout ce que vous devez savoir pour construire et commencer à utiliser l'adaptateur est ici, lisez avec attention !
Il est conseillé de lire le tutoriel en entier avant de commencer, pour avoir une idée de ce qui vous attend.
Contents
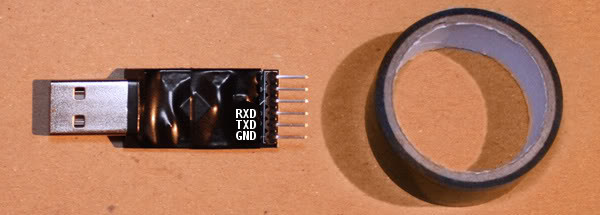
Obtenir le matériel
- il devrait être livré avec des câbles et ressembler à ceci.
- les connecteurs permettent un montage sans soudure.
Et si vous n'en disposez pas déjà, procurez vous les câbles USB suivants :
Optionnel :
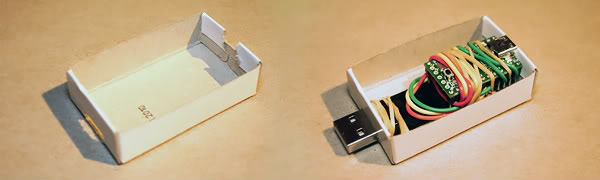
- une boîte dans laquelle protéger le montage.
- une boîte d'allumette est utilisée dans ce tutoriel.
- Ruban adhésif spécial électricité
- Pour isoler les composants ou maintenir les câbles.
- Élastiques
- Pour entourer le montage..
Et une paire de ciseaux ou un cutter.
http://gimx.fr/img/screenshots/tuto/gfd/gfd-parts.jpg
Télécharger les logiciels, le firmware, et le driver
Windows
De manière à y accéder facilement, sauvez/extrayez les fichiers sur votre bureau.
http://gimx.fr/img/screenshots/tuto/gfd/gfd-files.png
Ubuntu
- GIMX 32bit / GIMX 64bit
- Voir cette vidéo concernant l'installation !
- firmware
- Teensy loader
- (Vous devez suivre les instructions sur cette page si vous voulez utiliser le Teensy loader sous Ubuntu)
Monter l'adaptateur
Pour commencer, si le montage sera enfermé dans une boîte étroite, il est préconisé d'isoler le convertisseur USB série en utilisant le ruban isolant, afin d'éviter les courts circuits.
http://gimx.fr/img/screenshots/tuto/gfd/gfd-insulate.jpg
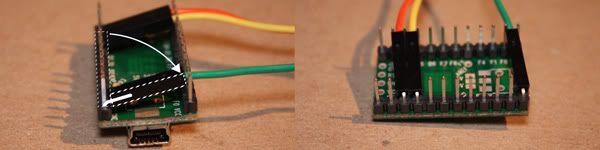
Ensuite connecter les câbles comme montré dans l'image ci-dessous. (Notez comment le Teensy est positionné! Les connecteurs doivent être positionnés vers la gauche, alors que la prise USB doit être à l'opposé.)
http://gimx.fr/img/screenshots/tuto/gfd/gfd-cablesgohere.jpg
Les deux prochaines étapes ne sont requises que si vous souhaitez protéger l'adaptateur dans une boîte très étroite, et faire un montage le plus compact possible.
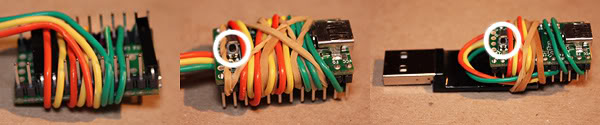
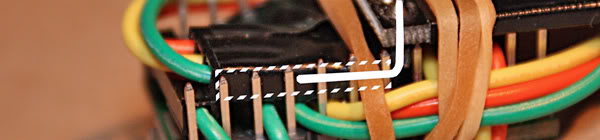
1. Pliez les connecteurs avec les câbles vers l'intérieur, doucement de manière à ne pas les casser, et passer les câbles entre les connecteurs du côté opposé.
http://gimx.fr/img/screenshots/tuto/gfd/gfd-bend-1.jpg
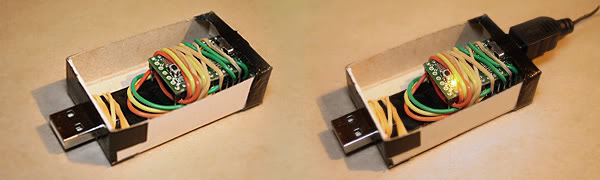
2. Afin de gagner de la place, il est possible d'enrouler les câbles autour du Teensy. Il n'y a pas de manière particulière pour le faire, voyez ce qui va le mieux pour votre montage.
Veuillez ne pas couvrir le bouton sur le Teensy, il sera nécessaire d'y accéder plus tard. (C'est ici que la bande isolante est utile !)
http://gimx.fr/img/screenshots/tuto/gfd/gfd-bundle.jpg
Si vous le souhaitez, vous pouvez aussi placer le convertisseur USB série entre les connecteurs du Teensy. Cela rentre tout juste, vous devriez utiliser de la bande isolante pour isoler les connecteurs.
http://gimx.fr/img/screenshots/tuto/gfd/gfd-insulate2.jpg
Découpez des trous dans votre boîte en face des connecteurs USB. Faites des tests et assurez vous que tout s'aligne bien avant de tout mettre en place. Dans l'image ci dessous, le montage a été sécurisé avec des élastiques, et fixé à la boîte (utilisez du scotch double face ou un pistolet à colle).
http://gimx.fr/img/screenshots/tuto/gfd/gfd-matchdapter.jpg
Voilà ! Vous avez fini de monter l'adaptateur.
Charger le firmware dans l'adaptateur
Connect the adapter to your computer using the USB Mini-B cable and a LED on the Teensy should turn on or start blinking.
http://gimx.fr/img/screenshots/tuto/gfd/gfd-loadfirmware.png
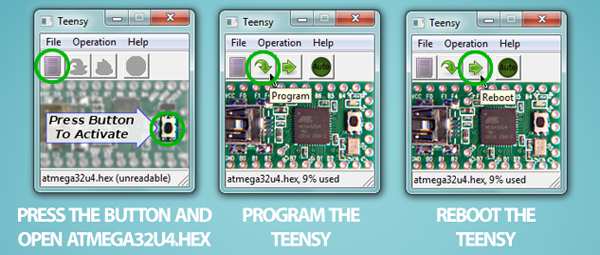
Now start up Teensy Loader (teensy.exe on your desktop) and follow these steps:
Press the button on the Teensy and the LED should turn off. In Teensy Loader, open atmega32u4.hex from the firmwares folder on your desktop. Click the Program button and you should get the message "Download Complete" Now click the Reboot button and your GIMX USB adapter is ready for use!
http://gimx.fr/img/screenshots/tuto/gfd/gfd-connect.jpg
NOTE! You can now unplug the USB Mini-B cable from your computer. The USB Mini-B cable will only be connected to your computer when upgrading the firmware from now on. When in use, the USB Mini-B cable is connected to your console.
Install the GIMX software
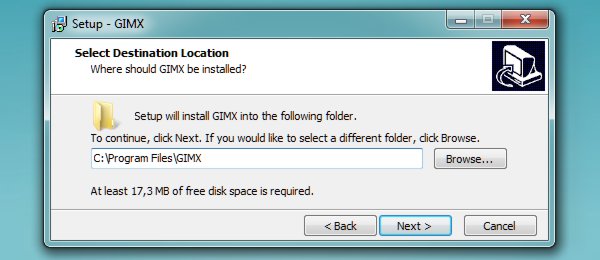
This step is pretty straight forward. Simply run setup-X.YZ.exe from your desktop and follow the installation steps, preferably with the default installation location.
http://gimx.fr/img/screenshots/tuto/gfd/gfd-setupgimx2.jpg
When the installation is done you should have three GIMX icons on your desktop.
http://gimx.fr/img/screenshots/tuto/gfd/gfd-icons.png
Configuration basics
GIMX comes pre-loaded with a few configurations, but let's take a quick look on how you can make your own configurations using the GIMX FPS Config Tool (As you can tell by the name, this is mainly meant for setting up a basic FPS configuration.)
You can also check out the Configuration Requests and Index thread for other configurations available for download, or post requests that we or the community might be able to fulfill.
NOTE!
- For Windows 32bit, downloaded configurations go in the C:\Program Files\GIMX\config folder.
- For Windows 64bit, downloaded configurations go in the C:\Program Files (x86)\GIMX\config folder.
Good to go!
That's it. You're ready to start using the GIMX USB adapter!
- Connect the regular USB side to your PC and install the serial converter drivers (CP210x_VCP_Win_XP_S2K3_Vista_7.exe on your desktop)
- This is of course only required the very first time you use the adapter!
http://gimx.fr/img/screenshots/tuto/gfd/gfd-contopc.jpg
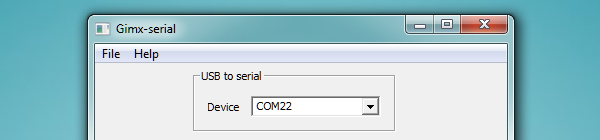
- Connect the USB Mini-B side to your console, run gimx-serial and make sure the adapter is recognized on a COM port.
- (If the Device box is blank, refer to the Support section and report the problem if a solution isn't found)
http://gimx.fr/img/screenshots/tuto/gfd/gfd-comport.jpg
- Select the config you made/downloaded from the drop down menu, click the Start button and a couple of windows should pop up to start capturing your mouse and keyboard input!
http://gimx.fr/img/screenshots/tuto/gfd/gfd-selconfig.png
Now if you're in the menus of your console and press the WASD or arrow keys on your keyboard, you should be able to navigate through the menus, meaning you've succeeded! If not, or if something went wrong elsewhere, go back and make sure you followed every step to the letter and try again, then let us know if nothing you try works.
Enjoy!
NB! Xbox 360 support
Please note, as Xbox 360 support is in early experimental stages, this tutorial does not cover the usage of GIMX firmware version 0.30 The adapter in itself is however exactly the same, so if you would like to try out Xbox 360 support read this thread (currently only for Ubuntu)