Difference between revisions of "DIY USB adapter for dummies/de"
(Created page with "Viel Spass!") |
(Created page with "'''Bevor begonnen wird, überprüfen ob der Serielle-Konverter genau der gleiche wie in dieser Anleitung ist.'''<br /> '''Der Adapter in dieser Anleitung ist falsch angeschrie...") |
||
| Line 62: | Line 62: | ||
=Adapter zusammenbauen= | =Adapter zusammenbauen= | ||
| − | ''' | + | '''Bevor begonnen wird, überprüfen ob der Serielle-Konverter genau der gleiche wie in dieser Anleitung ist.'''<br /> |
| − | ''' | + | '''Der Adapter in dieser Anleitung ist falsch angeschrieben: RXD und TXD sind vertauscht.'''<br /> |
| − | <span style="color:red">''' | + | <span style="color:red">'''Falls es nicht exakt der selbe Adapter ist, müssen möglicherweise die Pins anders verbunden werden:'''</span> |
{| class="wikitable" | {| class="wikitable" | ||
| − | | Teensy || USB | + | | Teensy || USB zu UART Board |
|- | |- | ||
| GND || GND | | GND || GND | ||
Revision as of 17:35, 29 December 2016

Diese Anleitung fokussiert sich nur auf das wesentliche und wird einfach gehalten. Für weitere Details DIY_USB_adapter.
Willkommen zur Schritt-für-Schritt Anleitung um einen GIMX DIY USB Adapter zu bauen, ohne zu löten!
Alles was man benötigt und wissen muss um um den Adapter zu bauen und bereit zu machen steht hier, wenn man es gut durch liest!
Es empfiehlt sich, die Anleitung zuerst einmal durch zu lesen, bevor man damit beginnt.
Contents
Die benötigten Teile besorgen
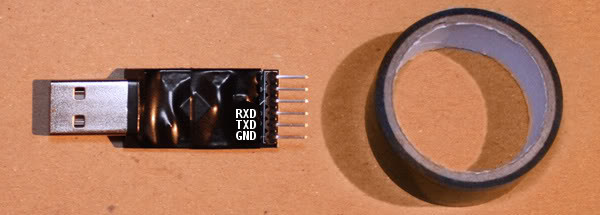
- Der Converter sollte mit einigen Kabeln geliefert werden und folgendermassen aussehen:

- Es wird zwingend ein Teensy-Board mit Pins benötigt, damit nichts gelötet werden muss.
- Es kann ein Teensy 2.0 oder ein Teensy ++ 2.0 verwendet werden.
- Die anderen Teensy Boards (3.x, LC, etc..) sind NICHT kompatibel.
Falls noch nicht vorhanden, werden noch USB-Kabel wie diese benötigt:
Optional:
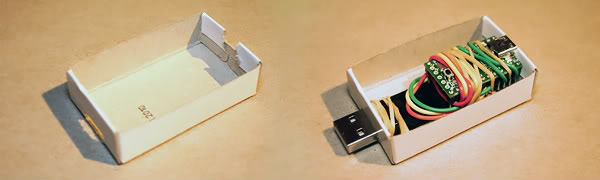
- A project box um alle Teile darin zu verstauen.
- Ich werde für diese Anleitung eine Zündholzschachtel verwenden.
- Isolierband
- Um die Teile zu isolieren resp. zu befestigen.
- Gummibänder
- Um alles zusammen zu halten - einfach wieder zu entfernen, falls etwas nicht stimmt.
Und Hoffentlich ist eine kleine Grundausstattung an Werkzeugen vorhanden. z.B. Messer oder Scheere.

Note: don't use retractable cables as shown in the above picture, use shielded USB cables instead.
Benötigte Software, Firmwares und Treiber herunterladen
Windows
- EMUJOYSTICKPS3: HID joystick emulation, with 16bit stick axes, for PS3
- EMUPS3: Sixaxis emulation, for PS3
- EMU360: 360 pad emulation, for Xbox 360
- EMUPS4: Hori Pad FPS Plus emulation, for PS4 (with touchpad support)
- EMUXONE: Xbox One pad emulation, for Xbox One
- EMUG29PS4: Logitech G29 gaming wheel emulation, for PS4, with force feedback support
- EMUG27PS3: Logitech G27 gaming wheel emulation, for PS3, with force feedback support
- EMUGTFPS2: Logitech GT Force emulation, for PS2, with force feedback support
- EMUDFPS2: Logitech Driving Force emulation, for PS2, with force feedback support
- EMUDFPPS2: Logitech Driving Force Pro emulation, for PS2, with force feedback support
- EMUG27PC: Logitech G27 gaming wheel emulation, for PC, force feedback support
Für die einfache Handhabung alles auf den Desktop speichern resp. entpacken.
--todo: update screenshot (CP210x drivers are included in the GIMX setup)

Ubuntu
- GIMX software, 32bit / GIMX software, 64bit
- See this video for some important installation instructions!
- Firmwares
- EMUJOYSTICKPS3: HID joystick emulation, with 16bit stick axes, for PS3
- EMUPS3: Sixaxis emulation, for PS3
- EMU360: 360 pad emulation, for Xbox 360
- EMUPS4: Hori Pad FPS Plus emulation, for PS4 (with touchpad support)
- EMUXONE: Xbox One pad emulation, for Xbox One
- EMUG29PS4: Logitech G29 gaming wheel emulation, for PS4, with force feedback support
- EMUG27PS3: Logitech G27 gaming wheel emulation, for PS3, with force feedback support
- EMUGTFPS2: Logitech GT Force emulation, for PS2, with force feedback support
- EMUDFPS2: Logitech Driving Force emulation, for PS2, with force feedback support
- EMUDFPPS2: Logitech Driving Force Pro emulation, for PS2, with force feedback support
- EMUG27PC: Logitech G27 gaming wheel emulation, for PC, force feedback support
- (Um Teensy Loader mit Ubuntu zu nutzen, folgende Anleitung verwenden:Teensy firmware loader)
Adapter zusammenbauen
Bevor begonnen wird, überprüfen ob der Serielle-Konverter genau der gleiche wie in dieser Anleitung ist.
Der Adapter in dieser Anleitung ist falsch angeschrieben: RXD und TXD sind vertauscht.
Falls es nicht exakt der selbe Adapter ist, müssen möglicherweise die Pins anders verbunden werden:
| Teensy | USB zu UART Board |
| GND | GND |
| D2 | TX / TXO / TXD |
| D3 | RX / RXI / RXD |
Next, I recommend you insulate the serial converter using the electrical tape if it's going to be in a tight enclosure, to avoid any shorts between it and the Teensy.
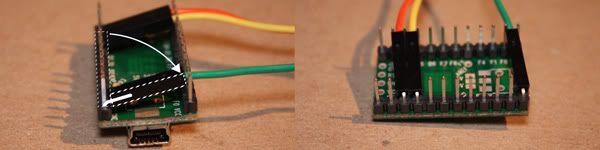
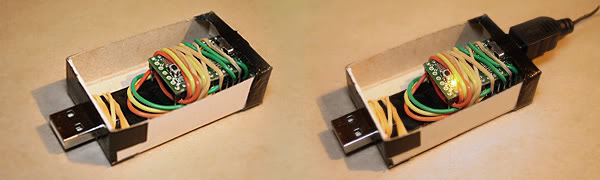
Now connect the cables as shown in the picture below. (Notice how the Teensy is placed! Pins should point left with the USB connector pointing away from you.)

The next two steps are only required if you're putting the parts in a very tight enclosure and need the parts to take up as little space as possible.
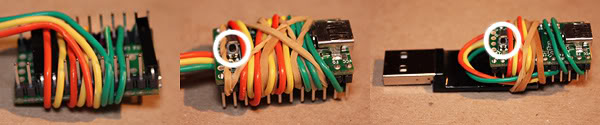
1. Bend the pins with the jumper cables attached to them inwards, slowly to prevent them from snapping, and tuck the cables between the pins on the opposite side.
2. To save some extra space, I usually wrap the cables around the Teensy. There's no special way of doing this, so you just need to figure out what works best for your build.
Remember not to cover up the button on the Teensy as we need to press it later on. (Also, this is where the rubber band will come in handy!)
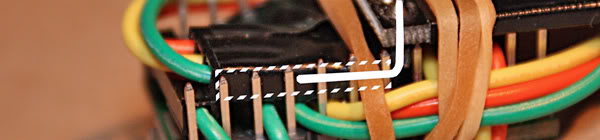
If you want, you can also place the serial converter so that the pins and jumper cables go in between the rows of pins on the Teensy. It's a very snug fit though so you should use some electrical tape to insulate the pins on the serial converter because they will touch the Teensy ones if you don't.
Cut some holes in your project box of choice to match the Mini USB plug on one side and regular USB plug on the other side. Do some tests and make sure everything aligns up before securing everything in place. In the picture below I've bundled everything up using the rubber band and secured it to the box with some electrical tape (double sided tape or hot glue works wonders too if you have it)
Voilà! You're done building the adapter.
Load the firmware onto the adapter
Connect the adapter to your computer using the USB Mini-B cable and a LED on the Teensy should turn on or start blinking.
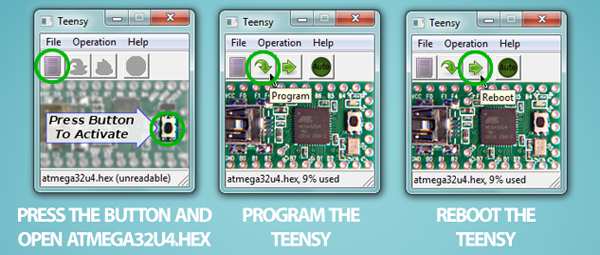
Now start up Teensy Loader (teensy.exe on your desktop) and follow these steps:
Press the button on the Teensy and the LED should turn off. In Teensy Loader, open atmega32u4.hex from the firmwares folder on your desktop. Click the Program button and you should get the message "Download Complete" Now click the Reboot button and your GIMX USB adapter is ready for use!
If the Teensy loader does not detect the device, try with another USB cable, and another USB port.
NOTE! You can now unplug the USB Mini-B cable from your computer. The USB Mini-B cable will only be connected to your computer when upgrading the firmware from now on. When in use, the USB Mini-B cable is connected to your console.
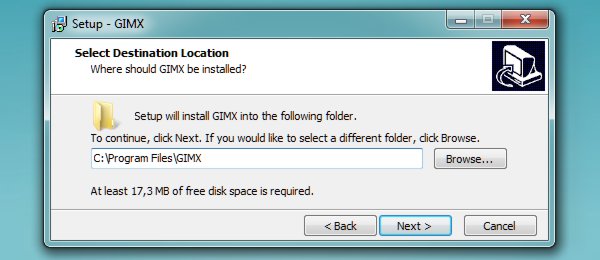
Install the GIMX software
This step is pretty straight forward. Simply run setup-X.YZ.exe from your desktop and follow the installation steps, preferably with the default installation location.
When the installation is done you should have three GIMX icons on your desktop.
--todo: update screenshot (gimx-serial was renamed to gimx-launcher)
![]()
Configuration basics
GIMX comes pre-loaded with a few configurations, but let's take a quick look on how you can make your own configurations using the GIMX FPS Config Tool (As you can tell by the name, this is mainly meant for setting up a basic FPS configuration.)
You can also check out the Configuration Requests and Index thread for other configurations available for download, or post requests that we or the community might be able to fulfill.
NOTE! To open the configuration directory, click on File>Open config directory in gimx-config, gimx-fpsconfig, or gimx-launcher.
Good to go!
That's it. You're ready to start using the GIMX USB adapter!
- Connect the regular USB side to your PC

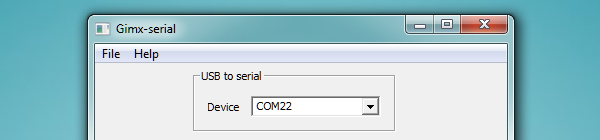
- Connect the USB Mini-B side to your console, run gimx-launcher and make sure the adapter is recognized on a COM port.
- (If the Device box is blank, refer to the Support section and report the problem if a solution isn't found)
- Read the Quick Start page to learn how to download a pre-made configuration, and how to install the libusbk driver (needed for consoles that require authentication).
- Select the config you made/downloaded from the drop down menu, click the Start button and a couple of windows should pop up to start capturing your mouse and keyboard input!
If there is a "No controller detected." error message when you start GIMX, double check you wiring, and try to invert TX and RX in case it's still not working.

Now if you're in the menus of your console and press the WASD or arrow keys on your keyboard, you should be able to navigate through the menus, meaning you've succeeded! If not, or if something went wrong elsewhere, go back and make sure you followed every step to the letter and try again, then let us know if nothing you try works.
Viel Spass!