Difference between revisions of "Quick Start/en"
(Updating to match new version of source page) |
(Updating to match new version of source page) |
||
| Line 21: | Line 21: | ||
The config file downloader is also available through the "Help>Get configs" menu entry.<br /> | The config file downloader is also available through the "Help>Get configs" menu entry.<br /> | ||
| − | <div class="image200px">[http://gimx.fr/img/screenshots/tuto/2.2_2_get_configs. | + | <div class="image200px">[http://gimx.fr/img/screenshots/tuto/2.2_2_get_configs.png http://gimx.fr/img/screenshots/tuto/2.2_2_get_configs.png]</div> |
The config file downloader displays all config files available to download:<br /> | The config file downloader displays all config files available to download:<br /> | ||
| − | <div class="image200px">[http://gimx.fr/img/screenshots/tuto/2.2_3_config_download. | + | <div class="image200px">[http://gimx.fr/img/screenshots/tuto/2.2_3_config_download.png http://gimx.fr/img/screenshots/tuto/2.2_3_config_download.png]</div> |
The config name syntax is: <CONSOLE>_<GAME>_<AUTHOR>.xml or <CONSOLE>_<OS>_<DEVICE>_<AUTHOR>.xml.<br /> | The config name syntax is: <CONSOLE>_<GAME>_<AUTHOR>.xml or <CONSOLE>_<OS>_<DEVICE>_<AUTHOR>.xml.<br /> | ||
| Line 44: | Line 44: | ||
===Gimx-config=== | ===Gimx-config=== | ||
In gimx-serial or gimx-bluetooth, select the config file, and click on the "File>Edit config" menu item.<br /> | In gimx-serial or gimx-bluetooth, select the config file, and click on the "File>Edit config" menu item.<br /> | ||
| − | <div class="image200px">[http://gimx.fr/img/screenshots/tuto/2.3_1_edit_config. | + | <div class="image200px">[http://gimx.fr/img/screenshots/tuto/2.3_1_edit_config.png http://gimx.fr/img/screenshots/tuto/2.3_1_edit_config.png]</div><br /> |
This opens the config file with the gimx-config editor.<br /> | This opens the config file with the gimx-config editor.<br /> | ||
Click on the "Edit>Convert mouse sensitivity".<br /> | Click on the "Edit>Convert mouse sensitivity".<br /> | ||
| − | <div class="image200px">[http://gimx.fr/img/screenshots/tuto/2.3_2_replace_mouse_dpi. | + | <div class="image200px">[http://gimx.fr/img/screenshots/tuto/2.3_2_replace_mouse_dpi.png http://gimx.fr/img/screenshots/tuto/2.3_2_replace_mouse_dpi.png]</div><br /> |
If the config contains no DPI value, a first dialog box is displayed. Enter the source DPI and validate.<br /> | If the config contains no DPI value, a first dialog box is displayed. Enter the source DPI and validate.<br /> | ||
A dialog box is displayed. Enter the destination DPI and validate.<br /> | A dialog box is displayed. Enter the destination DPI and validate.<br /> | ||
| − | <div class="image200px">[http://gimx.fr/img/screenshots/tuto/2.3_4_new_dpi. | + | <div class="image200px">[http://gimx.fr/img/screenshots/tuto/2.3_4_new_dpi.png http://gimx.fr/img/screenshots/tuto/2.3_4_new_dpi.png]</div><br /> |
The sensitivity is converted in all profiles (hip fire = profile 1, ADS = profile 2).<br /> | The sensitivity is converted in all profiles (hip fire = profile 1, ADS = profile 2).<br /> | ||
| − | <div class="image200px">[http://gimx.fr/img/screenshots/tuto/2.3_5_multiplier_changed. | + | <div class="image200px">[http://gimx.fr/img/screenshots/tuto/2.3_5_multiplier_changed.png http://gimx.fr/img/screenshots/tuto/2.3_5_multiplier_changed.png]</div><br /> |
Click on the "File>Save". | Click on the "File>Save". | ||
===Gimx-fpsconfig=== | ===Gimx-fpsconfig=== | ||
In gimx-serial or gimx-bluetooth, select the config file, and click on the "File>Edit FPS config" menu item.<br /> | In gimx-serial or gimx-bluetooth, select the config file, and click on the "File>Edit FPS config" menu item.<br /> | ||
| − | <div class="image200px">[http://gimx.fr/img/screenshots/tuto/2.3_6_edit_fps_config. | + | <div class="image200px">[http://gimx.fr/img/screenshots/tuto/2.3_6_edit_fps_config.png http://gimx.fr/img/screenshots/tuto/2.3_6_edit_fps_config.png]</div><br /> |
This opens the config file with the gimx-fpsconfig editor.<br /> | This opens the config file with the gimx-fpsconfig editor.<br /> | ||
If the source DPI was saved into the config file, the mouse DPI should be different from 0.<br /> | If the source DPI was saved into the config file, the mouse DPI should be different from 0.<br /> | ||
Click on the "Convert sensitivity" button. A dialog box is displayed. Enter the destination DPI and validate.<br /> | Click on the "Convert sensitivity" button. A dialog box is displayed. Enter the destination DPI and validate.<br /> | ||
| − | <div class="image200px">[http://gimx.fr/img/screenshots/tuto/2.3_7_convert_sensitivity. | + | <div class="image200px">[http://gimx.fr/img/screenshots/tuto/2.3_7_convert_sensitivity.png http://gimx.fr/img/screenshots/tuto/2.3_7_convert_sensitivity.png]</div><br /> |
| − | <div class="image200px">[http://gimx.fr/img/screenshots/tuto/2.3_4_new_dpi. | + | <div class="image200px">[http://gimx.fr/img/screenshots/tuto/2.3_4_new_dpi.png http://gimx.fr/img/screenshots/tuto/2.3_4_new_dpi.png]</div><br /> |
The sensitivity is converted for both hip fire and ADS.<br /> | The sensitivity is converted for both hip fire and ADS.<br /> | ||
| − | <div class="image200px">[http://gimx.fr/img/screenshots/tuto/2.3_7_sensitivity_converted. | + | <div class="image200px">[http://gimx.fr/img/screenshots/tuto/2.3_7_sensitivity_converted.png http://gimx.fr/img/screenshots/tuto/2.3_7_sensitivity_converted.png]</div><br /> |
Click on the "File>Save". | Click on the "File>Save". | ||
| Line 86: | Line 86: | ||
===Ubuntu or Windows + DIY USB adapter=== | ===Ubuntu or Windows + DIY USB adapter=== | ||
| − | <div class="image200px">[http://gimx.fr/img/screenshots/tuto/2.4_2_gimx-serial. | + | <div class="image200px">[http://gimx.fr/img/screenshots/tuto/2.4_2_gimx-serial.png http://gimx.fr/img/screenshots/tuto/2.4_2_gimx-serial.png]</div> |
| − | # Select the | + | # Turn the console on |
| − | # Select the | + | # Select the adapter |
| + | # Select the serial port | ||
# Select the configuration file to use | # Select the configuration file to use | ||
# Start emuclient | # Start emuclient | ||
# Play (press Left Shift + Escape to quit emuclient) | # Play (press Left Shift + Escape to quit emuclient) | ||
Revision as of 13:06, 7 November 2013
Contents
Start GIMX
GIMX+Ubuntu+bluetooth
Plug your sixaxis (and the bt dongle, if external) to your PC. Launch gimx-bluetooth.
Ubuntu or Windows + DIY USB adapter
Plug the USB to serial TTL adapter to the PC. Launch gimx-serial.
Config file download
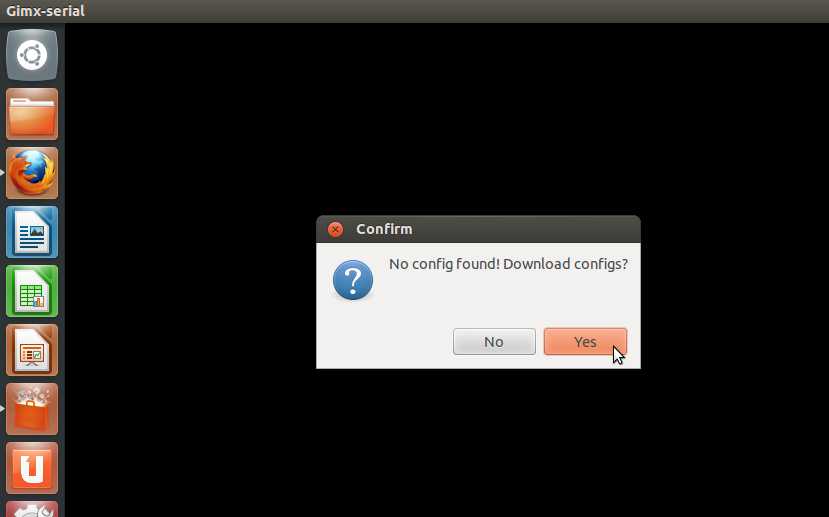
A few config files are shared by users of the GIMX community, and can be downloaded from gimx-bluetooth or gimx-serial.
Please contribute by sharing your own configs in the Configuration and Requests forum section.
The first time gimx-bluetooth (GIMX + Ubuntu + bluetooth) or gimx-serial (Linux or Windows + DIY USB adapter) are started, if there is no config file present on the PC, a message box will ask you if config files should be downloaded.
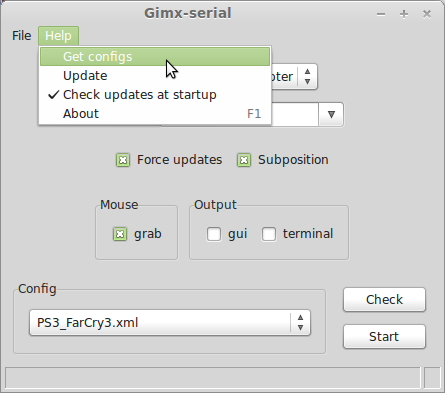
The config file downloader is also available through the "Help>Get configs" menu entry.
The config file downloader displays all config files available to download:
The config name syntax is: <CONSOLE>_<GAME>_<AUTHOR>.xml or <CONSOLE>_<OS>_<DEVICE>_<AUTHOR>.xml.
Examples:
- PS3_Battlefield3_McKack.xml: config file built by McKack for the PS3 version of Battlefiled 3.
- PS3_LINUX_X360Pad.xml: config file to use in Linux with a 360 pad and a PS3.
Mouse sensitivity conversion
This part is for the FPS gamers.
Before using a prebuilt config file, you have to convert the sensitivity so that it matches your own mouse DPI.
Make sure to set the in-game sensitivity to the highest, and make sure to have your mouse tracking at its highest DPI setting (examples: Logitech G5 @2000DPI, Logitech G500 @5700DPI).
GIMX provides means to convert the sensitivity, knowing both the DPI of the source mouse (which can be embedded in the config file) and the DPI of the destination mouse.
If the source DPI and the destination DPI are the same, there is no need to convert anything.
It's possible to do this with gimx-config or gimx-fpsconfig. These tools are further detailed on this page.
Gimx-config
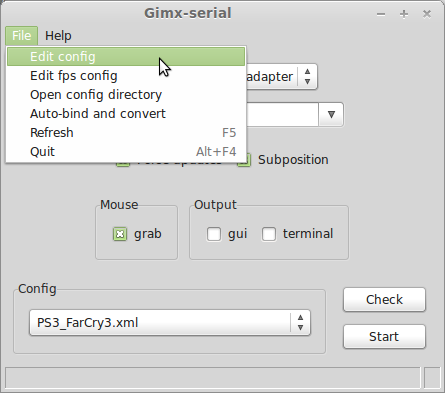
In gimx-serial or gimx-bluetooth, select the config file, and click on the "File>Edit config" menu item.
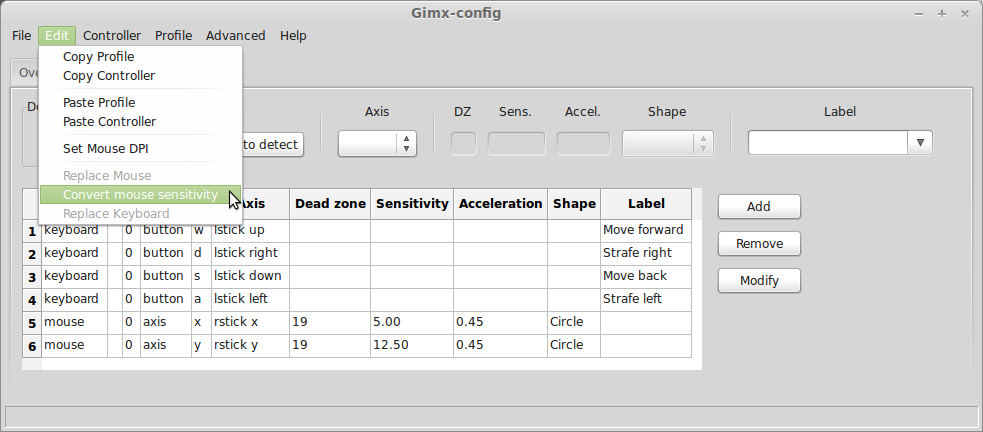
This opens the config file with the gimx-config editor.
Click on the "Edit>Convert mouse sensitivity".
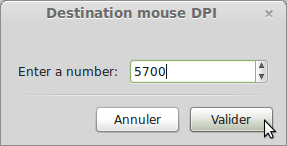
If the config contains no DPI value, a first dialog box is displayed. Enter the source DPI and validate.
A dialog box is displayed. Enter the destination DPI and validate.
The sensitivity is converted in all profiles (hip fire = profile 1, ADS = profile 2).
Click on the "File>Save".
Gimx-fpsconfig
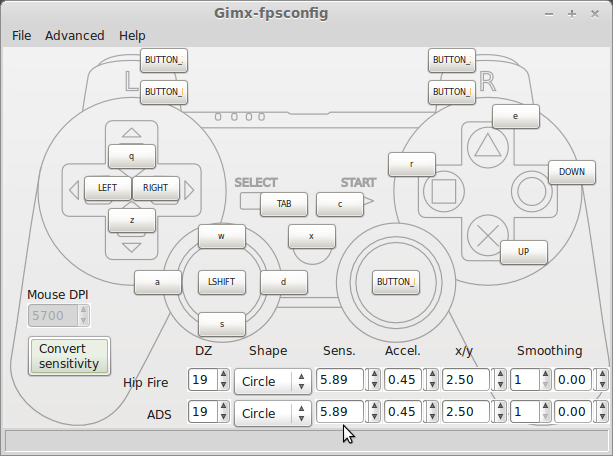
In gimx-serial or gimx-bluetooth, select the config file, and click on the "File>Edit FPS config" menu item.
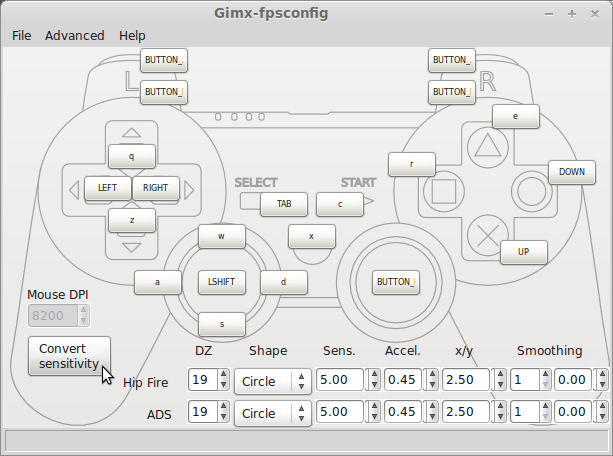
This opens the config file with the gimx-fpsconfig editor.
If the source DPI was saved into the config file, the mouse DPI should be different from 0.
Click on the "Convert sensitivity" button. A dialog box is displayed. Enter the destination DPI and validate.
The sensitivity is converted for both hip fire and ADS.
Click on the "File>Save".
Play
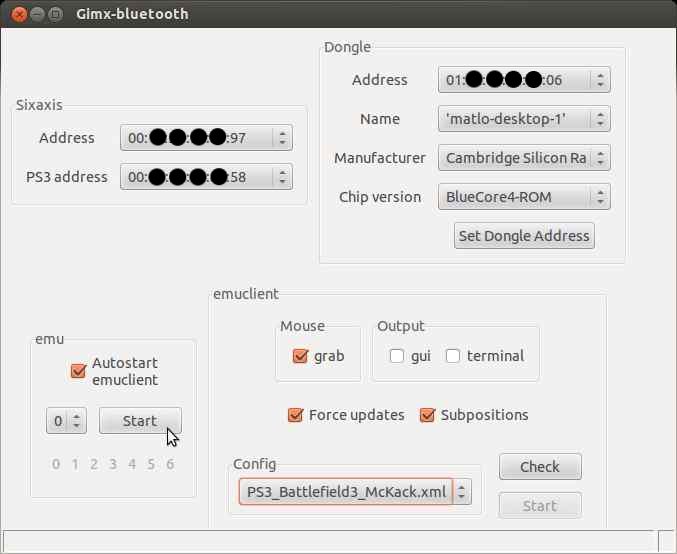
GIMX + Ubuntu + bluetooth
- Select the sixaxis
- Select the bt dongle
- Set the dongle address (don't forget to write the old one down)
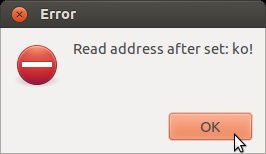
A message tells if it is successful or not:
In case it is not successful, buy a compatible bluetooth dongle. - Unplug your sixaxis and if it doesn't power off by itself, press the PS3 button until it powers off
- Select the configuration file to use
- Start emu (emuclient starts automatically if the connection is established)
- Play (press Left Shift + Escape to quit emuclient)
- Stop emu
Note: File>Save lets you save the sixaxis and PS3 addresses so that you don't require to plug the sixaxis anymore after that.
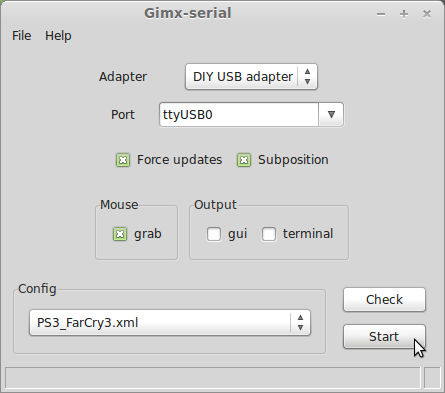
Ubuntu or Windows + DIY USB adapter
- Turn the console on
- Select the adapter
- Select the serial port
- Select the configuration file to use
- Start emuclient
- Play (press Left Shift + Escape to quit emuclient)