Difference between revisions of "Mouse Calibration/ja"
Blackwhite (talk | contribs) |
(Updating to match new version of source page) |
||
| Line 36: | Line 36: | ||
# F10 : 円運動テストを行います。もし必要なら、 F10, F11 で円運動の半径と速度を設定してください。照準の動きが真円を描くようなら x/y 軸の比率は適切に設定されています。もしそうでなければ、F12 で比率を変更して下さい。wheel. | # F10 : 円運動テストを行います。もし必要なら、 F10, F11 で円運動の半径と速度を設定してください。照準の動きが真円を描くようなら x/y 軸の比率は適切に設定されています。もしそうでなければ、F12 で比率を変更して下さい。wheel. | ||
# ctrl+F1 で保存して終了します。 | # ctrl+F1 で保存して終了します。 | ||
| + | |||
| + | =Pitfalls= | ||
| + | |||
| + | This summarizes all common errors you should avoid, and what you should do instead. | ||
| + | |||
| + | * Don't change the mouse dpi to adjust your aiming speed. Always let the mouse dpi setting to the max value. Adjust the GIMX sensitivity instead. | ||
| + | * Don't change the in-game sensitivity to adjust your aiming speed. Always let the in-game sensitivity to the max value. Adjust the GIMX sensitivity instead. | ||
| + | * Don't change the mouse parameters of the OS (Linux/Windows) to adjust your aiming speed. GIMX uses raw (unmodified) events from the mouse! | ||
| + | * Prefer editing the sensitivity with the calibration mode. The calibration mode keeps the x/y ratio. | ||
Revision as of 09:38, 7 September 2012
マウスのキャリブレーションをする前に
ゲーム内の感度を最高に設定してください。マウスのdpiも(選べるなら)一番高いものに設定してください。
キャリブレーションの開始
gimx-bluetooth (または gimx-serial) を起動し、Output の項にある GUI にチェックを入れ、エミュレーションを開始してください。
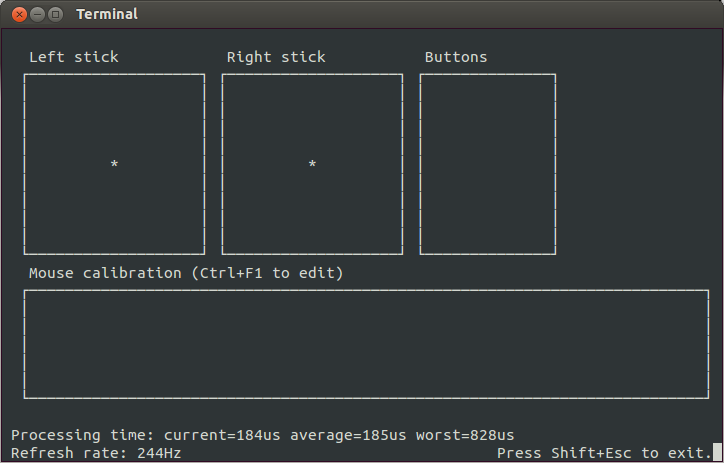
現在のマウス補正の設定が GUI 内の "Mouse calibration" に表示されています。
設定はコンフィグファイルから値が読み込まれます。
もし複数のマウスを使っている場合、必要に応じてそれぞれの設定を行うことができます。
全体的な手順
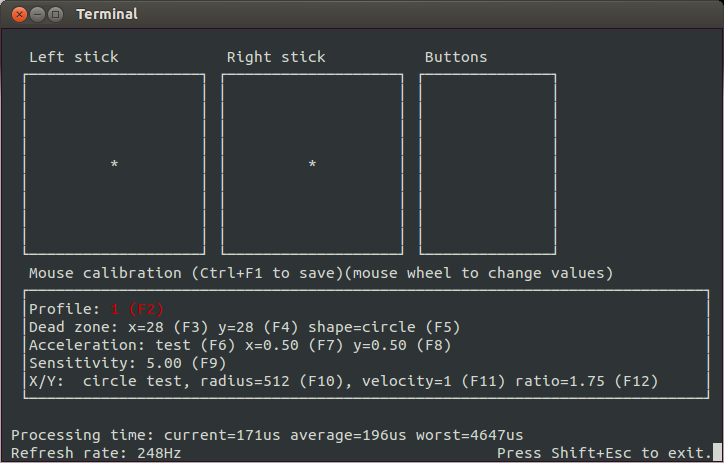
ctrl + F1 を押すと、補正の設定を開始します。
F1 ~ F12 のキーでパラメータを選び、マウスホイールで値が変更出来ます。
もう一度 ctrl + F1 を押すことで、値がセーブされ補正設定を終了します。
段階的な手順
- 全ての値はマウスホイールで上下します。
- ctrl+F1で設定を開始します。複数のマウスを使っている場合は、設定するマウスをホイールで選択することができます。
- F2 : 設定するプロファイルを選択します。(通常は、プロファイル1を腰だめに、プロファイル2を ADS に使用します)
- F3 : X 軸のデッドゾーンを設定します。照準が自動で動くので、動かなくなるまで値を下げ、次に、動くようになる最初の値まで上げてください。
- F4 : Y 軸のデッドゾーンを設定します。 X 軸と同様に設定してください。
- F5 : デッドゾーンの形状を設定します。「矩形(rectangle)」に設定して照準が動くようなら「円形(circle)」を選択してください。逆に「円形」で動くようなら「矩形」にしてください。
- F6 : マウスの変換テストを行います。左右に照準が動くので、元の位置に戻るかを確認してください。戻らないようなら F7, F8 の設定に進んでください。
- F7 : X 軸の加速を設定します。
- F8 : Y 軸の加速を設定します。
- F9 : 感度を設定します。好みの動きになるよう値を設定してください。
- F10 : 円運動テストを行います。もし必要なら、 F10, F11 で円運動の半径と速度を設定してください。照準の動きが真円を描くようなら x/y 軸の比率は適切に設定されています。もしそうでなければ、F12 で比率を変更して下さい。wheel.
- ctrl+F1 で保存して終了します。
Pitfalls
This summarizes all common errors you should avoid, and what you should do instead.
- Don't change the mouse dpi to adjust your aiming speed. Always let the mouse dpi setting to the max value. Adjust the GIMX sensitivity instead.
- Don't change the in-game sensitivity to adjust your aiming speed. Always let the in-game sensitivity to the max value. Adjust the GIMX sensitivity instead.
- Don't change the mouse parameters of the OS (Linux/Windows) to adjust your aiming speed. GIMX uses raw (unmodified) events from the mouse!
- Prefer editing the sensitivity with the calibration mode. The calibration mode keeps the x/y ratio.