Mouse Calibration
Contents
Before calibrating the mouse
Set the in-game sensitivity to the highest, and set the mouse dpi to the highest value.
If game allows adjusting the dead zone, set it to the lowest value.
Note: In rare cases some games may require leaving sensitivity at default value due to input bugs introduced at higher speeds.
Start calibration
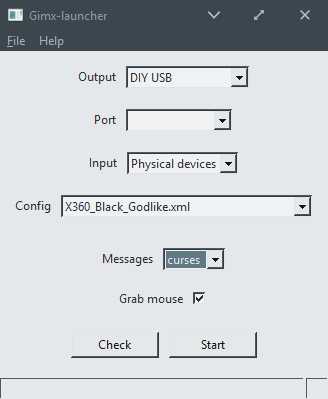
Select Messages>curses in gimx-launcher. Then click on Start.
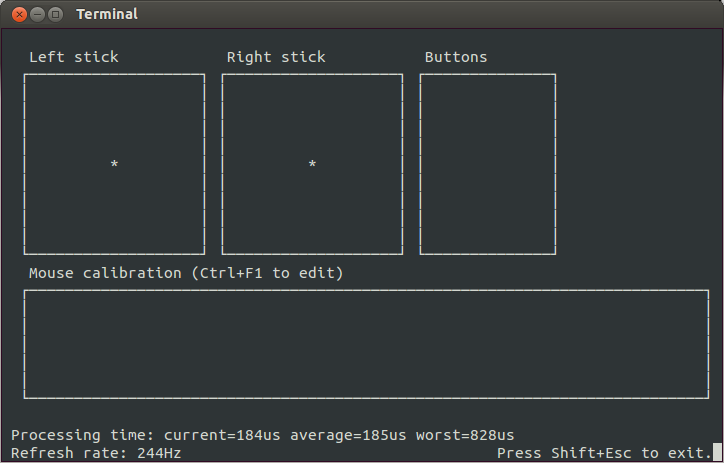
Current mouse calibration values appear in the "Mouse calibration" part of the gui.
This calibration mode reads values from the loaded configuration.
If you use multiple mice, it lets you calibrate each mouse independently.
General instructions
Press ctrl+F1 to enable the calibration.
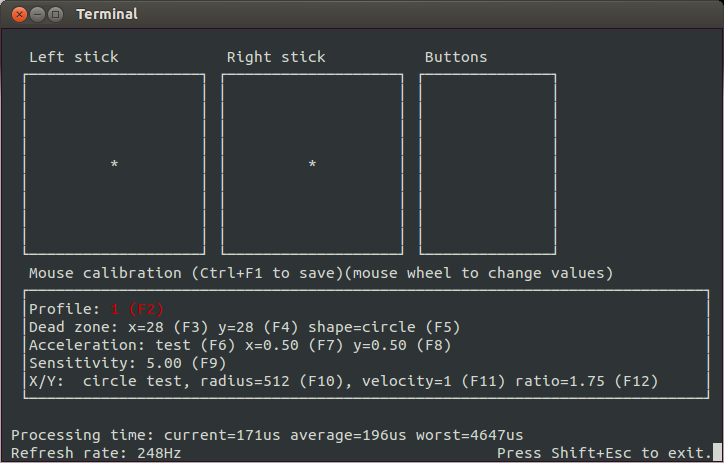
Press F1 ... F12 to select the parameter, and use the mouse wheel to change the value. Press ctrl+F1 to leave the calibration and save the parameters.
Step-by-step instructions
Make sure to perform the steps in order, and don't skip any step or you'll get it wrong.
- Press ctrl+F1. If you use multiple mice, select the mouse to calibrate with the mouse wheel.
- Press F2 and select the profile to calibrate with the mouse wheel (generally, profile 1 is for hip fire, and profile 2 is for aiming down the sight).
- Press F3. If the sight moves, decrease the x dead zone value with the mouse wheel until the sight does not move. Once the sight does not move, increase the x dead zone until the first moving position.
- Press F4. Set the same value as the x dead zone value.
- Press F5. Set the dead zone shape value to "rectangle". If the sight moves, set the dead zone shape to "circle", and let it set to "rectangle" otherwise.
- Press F6 to start a translation test. The sight will move horizontally at different speeds in both left and right directions. A 1:1 translation means the sight should come back near the start point. If it doesn't, use F7 and the mouse wheel to change the x acceleration value. Note that it's not always possible to get a 1:1 translation (this depends on the game).
- Press F8. Set the same value as the x acceleration value.
- Press F9. Adjust the x sensitivity to your liking.
- Press F10 to start a circle test. Adjust the circle radius and speed (F10/F11 + mouse wheel) if necessary. The x/y ratio is properly set if the sight moves in a perfect circle. If it doesn't, adjust the x/y ratio using F12 and the mouse wheel.
- Press ctrl+F1 to save.
Note: if the mouse has low DPI and if the acceleration value is well below 1, your sensitivity will probably be so high that it will result in low movements to be jerky. This is because a mouse movement of 1 dot results in a stick position far away from the dead zone. To compensate this you may subtract the sensitivity from your dead zone. For example with a dead zone of 32 and a sensitivity of 10, set the dead zone to 22. Using smoothing may also help with a low DPI mouse.
Smoothing
The mouse motion can be smoothed using previous mouse motion reports.
This is useful for lowering jerkiness, especially with a low DPI mouse (below 2000 DPI).
It is configurable with two parameters: a buffer size and a filter.
A deeper description of the smoothing technique used by GIMX is available there.
Note
Before adding smoothing, you should have properly set the other parameters.
Buffer size
The buffer size (in the 0..30 range) is the number of mouse motion reports that are used to smooth the mouse motion.
The smoothing window is the buffer size multiplied by the GIMX update period (inverse of the frequency).
Examples:
GIMX frequency = 250Hz, buffer size = 10
1000/250 * 10 = 40ms
GIMX frequency = 100Hz, buffer size = 10
1000/100 * 10 = 100ms
Keep in mind that increasing the buffer size makes motion smoother but increases the latency.
Filter
The filter (in the 0..1 range) defines how much the previous motion reports will count in the final motion.
Value 1 means that the final motion is an average of the buffered motion reports.
Value 0.5 means that the current motion report counts for 1, the previous one for 0.5, the next oldest one for 0.25 (=0.5x0.5), and so on.
Value 0 means that only the current motion report counts (resulting in an unfiltered motion).
So as to preserve a low latency, high filters (1) should only be used with low buffer sizes (2), and high buffer sizes (>10) should only be used with low filters (<0.75).
Pitfalls
This summarizes all common errors you should avoid, and what you should do instead.
- Don't change the mouse dpi to adjust your aiming speed. Always let the mouse dpi setting to the max value. Adjust the GIMX sensitivity instead.
- Don't change the in-game sensitivity to adjust your aiming speed. Always let the in-game sensitivity to the max value. Adjust the GIMX sensitivity instead.
- Don't change the mouse parameters of the OS (Linux/Windows) to adjust your aiming speed. GIMX uses raw (unmodified) events from the mouse!
- Prefer editing the sensitivity with the calibration mode. The calibration mode keeps the x/y ratio.