Difference between revisions of "Config Editors"
| Line 12: | Line 12: | ||
<!--T:4--> | <!--T:4--> | ||
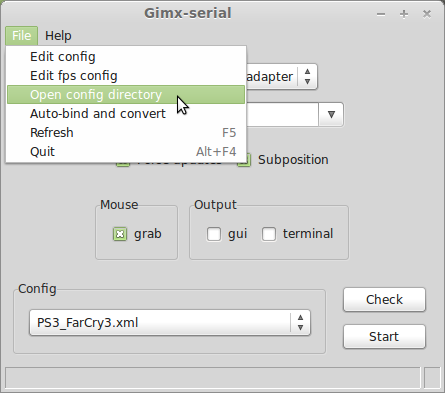
* To open the configuration directory, click on File>Open config directory in gimx-config, gimx-fpsconfig, or gimx-launcher. | * To open the configuration directory, click on File>Open config directory in gimx-config, gimx-fpsconfig, or gimx-launcher. | ||
| − | <div class="image200px">[ | + | <div class="image200px">[https://gimx.fr/img/screenshots/tuto/OpenConfigDirectory.png https://gimx.fr/img/screenshots/tuto/OpenConfigDirectory.png]</div> |
<!--T:30--> | <!--T:30--> | ||
| Line 28: | Line 28: | ||
===Start=== <!--T:23--> | ===Start=== <!--T:23--> | ||
| − | <div class="image200px">[ | + | <div class="image200px">[https://gimx.fr/img/screenshots/tuto/Start_gimx-fpsconfig.jpg https://gimx.fr/img/screenshots/tuto/Start_gimx-fpsconfig.jpg]</div> |
===Bind controls=== <!--T:24--> | ===Bind controls=== <!--T:24--> | ||
To bind a button to a button or a direction of the left stick, click on the GUI button (cross, l1, select, left stick up, etc), and click on the button (w, space, left button, etc).<br > | To bind a button to a button or a direction of the left stick, click on the GUI button (cross, l1, select, left stick up, etc), and click on the button (w, space, left button, etc).<br > | ||
| − | <div class="image200px">[ | + | <div class="image200px">[https://gimx.fr/img/screenshots/tuto/Bind_button.jpg https://gimx.fr/img/screenshots/tuto/Bind_button.jpg]</div> |
===Set mouse translation parameters=== <!--T:25--> | ===Set mouse translation parameters=== <!--T:25--> | ||
The mouse translation parameters can be edited in the bottom part of the GUI. It is advised to calibrate these parameters through the [[Mouse_Calibration|Mouse Calibration]] tool.<br /> | The mouse translation parameters can be edited in the bottom part of the GUI. It is advised to calibrate these parameters through the [[Mouse_Calibration|Mouse Calibration]] tool.<br /> | ||
| − | <div class="image200px">[ | + | <div class="image200px">[https://gimx.fr/img/screenshots/tuto/mouse_translation-gimx-fpsconfig.jpg https://gimx.fr/img/screenshots/tuto/mouse_translation-gimx-fpsconfig.jpg]</div> |
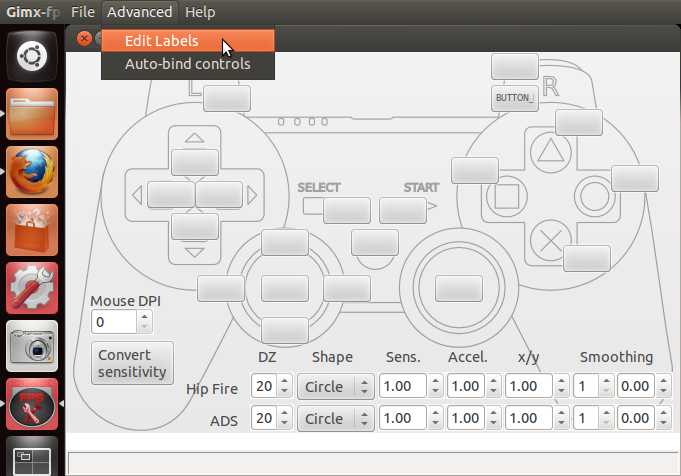
===Set control labels=== <!--T:26--> | ===Set control labels=== <!--T:26--> | ||
To set a label, click on menu 'Advanced>Edit Label', click on the GUI button, and set the label.<br /> | To set a label, click on menu 'Advanced>Edit Label', click on the GUI button, and set the label.<br /> | ||
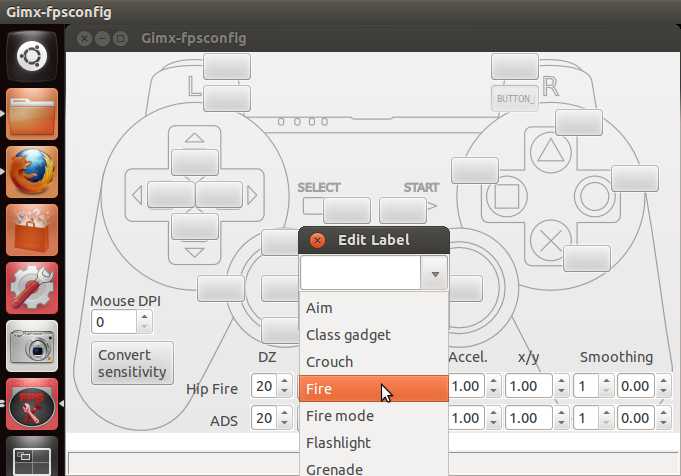
| − | <div class="image200px">[ | + | <div class="image200px">[https://gimx.fr/img/screenshots/tuto/Edit_labels-gimx-fpsconfig.jpg https://gimx.fr/img/screenshots/tuto/Edit_labels-gimx-fpsconfig.jpg]</div> |
| − | <div class="image200px">[ | + | <div class="image200px">[https://gimx.fr/img/screenshots/tuto/edit_label_select-gimx-fpsconfig.jpg https://gimx.fr/img/screenshots/tuto/edit_label_select-gimx-fpsconfig.jpg]</div> |
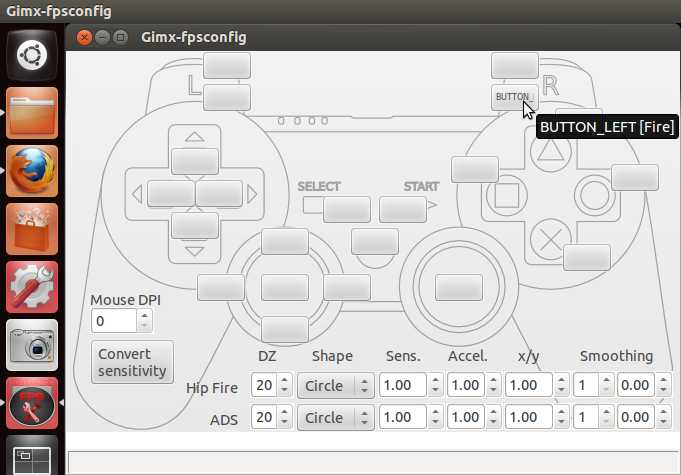
The label will appear in the GUI button tooltip.<br /> | The label will appear in the GUI button tooltip.<br /> | ||
| − | <div class="image200px">[ | + | <div class="image200px">[https://gimx.fr/img/screenshots/tuto/Label-gimx-fpsconfig.jpg https://gimx.fr/img/screenshots/tuto/Label-gimx-fpsconfig.jpg]</div> |
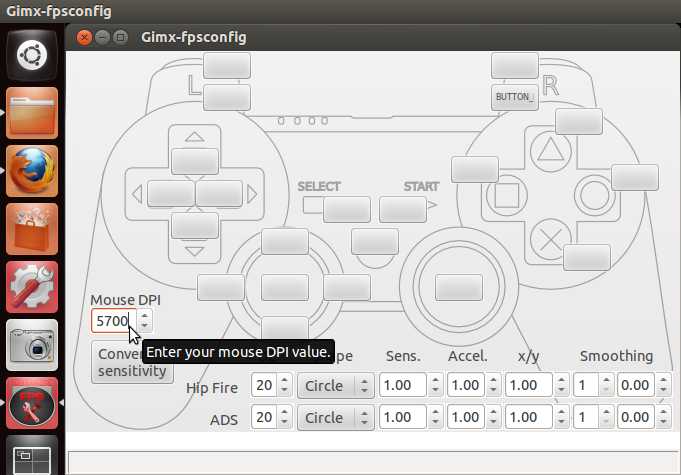
===Set the mouse DPI=== <!--T:27--> | ===Set the mouse DPI=== <!--T:27--> | ||
In case the config is built from scratch (menu 'File>New'), the mouse DPI has to be set.<br /> | In case the config is built from scratch (menu 'File>New'), the mouse DPI has to be set.<br /> | ||
The value is used by the calibration tests that are run by the [[Mouse_Calibration|Mouse Calibration]] tool.<br /> | The value is used by the calibration tests that are run by the [[Mouse_Calibration|Mouse Calibration]] tool.<br /> | ||
| − | <div class="image200px">[ | + | <div class="image200px">[https://gimx.fr/img/screenshots/tuto/Mouse_DPI-gimx-fpsconfig.jpg https://gimx.fr/img/screenshots/tuto/Mouse_DPI-gimx-fpsconfig.jpg]</div> |
===Convert the mouse sensitivity=== <!--T:28--> | ===Convert the mouse sensitivity=== <!--T:28--> | ||
The "Convert sensitivity" GUI button allows to adjust the mouse sensitivity according to source/destination DPI values.<br /> | The "Convert sensitivity" GUI button allows to adjust the mouse sensitivity according to source/destination DPI values.<br /> | ||
It is useful to convert a config that was built for a mouse that runs at a different DPI setting.<br /> | It is useful to convert a config that was built for a mouse that runs at a different DPI setting.<br /> | ||
| − | <div class="image200px">[ | + | <div class="image200px">[https://gimx.fr/img/screenshots/tuto/Convert_mouse_sens-gimx-fpsconfig.jpg https://gimx.fr/img/screenshots/tuto/Convert_mouse_sens-gimx-fpsconfig.jpg]</div> |
===Auto-bind controls=== <!--T:29--> | ===Auto-bind controls=== <!--T:29--> | ||
To auto bind controls according to the labels defined in a reference configuration, click on menu 'Advanced>Auto-bind controls'. The configuration to modify and the reference configuration should have labels configured.<br /> | To auto bind controls according to the labels defined in a reference configuration, click on menu 'Advanced>Auto-bind controls'. The configuration to modify and the reference configuration should have labels configured.<br /> | ||
| − | <div class="image200px">[ | + | <div class="image200px">[https://gimx.fr/img/screenshots/tuto/Auto_bind-gimx-fpsconfig.jpg https://gimx.fr/img/screenshots/tuto/Auto_bind-gimx-fpsconfig.jpg]</div> |
| − | <div class="image200px">[ | + | <div class="image200px">[https://gimx.fr/img/screenshots/tuto/SelectReferenceConfig.png https://gimx.fr/img/screenshots/tuto/SelectReferenceConfig.png]</div> |
| − | <div class="image200px">[ | + | <div class="image200px">[https://gimx.fr/img/screenshots/tuto/Auto_bind_done-gimx-fpsconfig.jpg https://gimx.fr/img/screenshots/tuto/Auto_bind_done-gimx-fpsconfig.jpg]</div> |
Controls not found or in conflict are colored in red. | Controls not found or in conflict are colored in red. | ||
| Line 66: | Line 66: | ||
===Start=== <!--T:6--> | ===Start=== <!--T:6--> | ||
| − | <div class="image200px">[ | + | <div class="image200px">[https://gimx.fr/img/screenshots/tuto/Start_gimx-config.jpg https://gimx.fr/img/screenshots/tuto/Start_gimx-config.jpg]</div> |
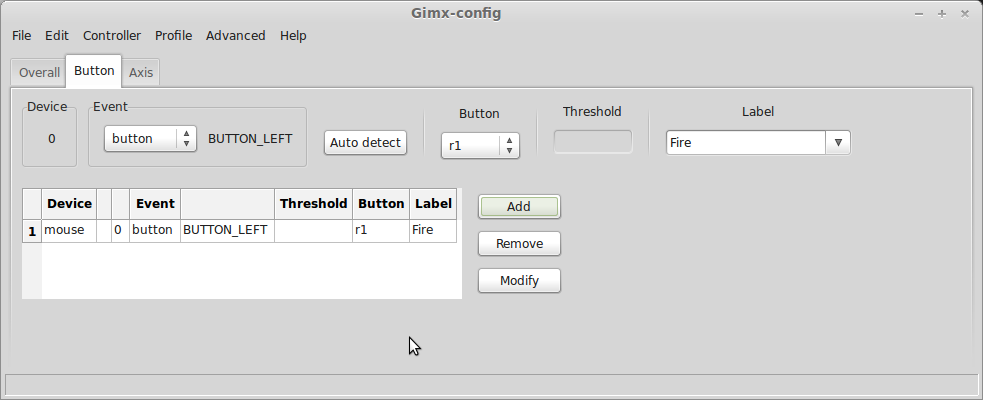
===Button tab=== <!--T:7--> | ===Button tab=== <!--T:7--> | ||
Bind controls (button or axis, from any device) to controller buttons (cross, select, etc.). | Bind controls (button or axis, from any device) to controller buttons (cross, select, etc.). | ||
| − | <div class="image200px">[ | + | <div class="image200px">[https://gimx.fr/img/screenshots/tuto/Button_tab-gimx-config.png https://gimx.fr/img/screenshots/tuto/Button_tab-gimx-config.png]</div> |
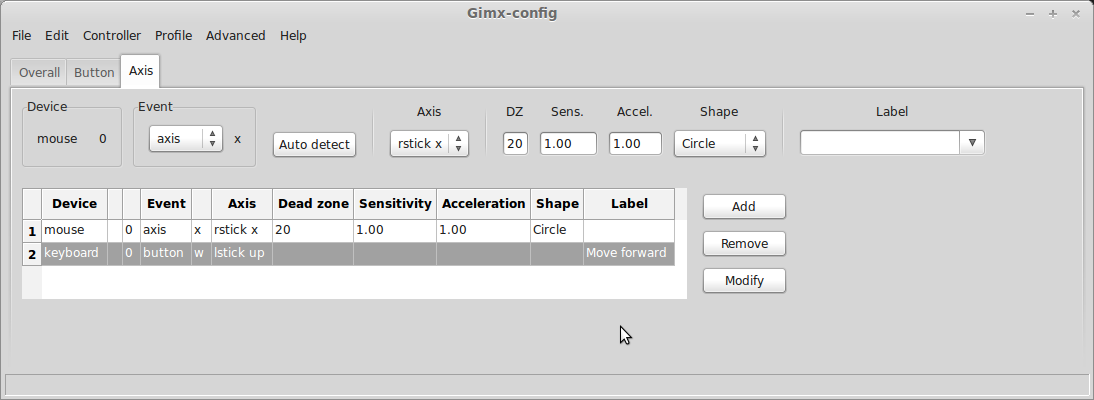
===Axis tab=== <!--T:8--> | ===Axis tab=== <!--T:8--> | ||
Bind controls (button or axis, from any device) to controller axes (left stick x, left stick y, pressure sensitive buttons, etc.). | Bind controls (button or axis, from any device) to controller axes (left stick x, left stick y, pressure sensitive buttons, etc.). | ||
| − | <div class="image200px">[ | + | <div class="image200px">[https://gimx.fr/img/screenshots/tuto/Axis_tab-gimx-config.png https://gimx.fr/img/screenshots/tuto/Axis_tab-gimx-config.png]</div> |
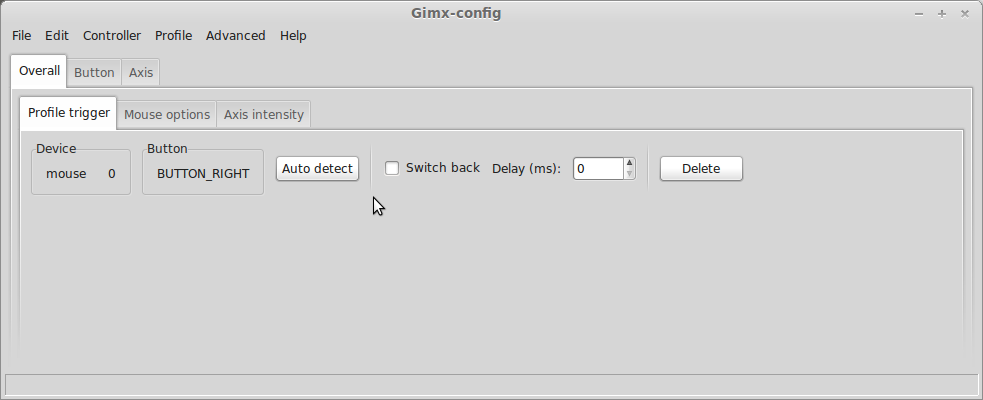
===Overall tab=== <!--T:9--> | ===Overall tab=== <!--T:9--> | ||
This is the place to configure: | This is the place to configure: | ||
* the profile trigger, which is the button that activate the profile | * the profile trigger, which is the button that activate the profile | ||
| − | <div class="image200px">[ | + | <div class="image200px">[https://gimx.fr/img/screenshots/tuto/ProfileTrigger.png https://gimx.fr/img/screenshots/tuto/ProfileTrigger.png]</div> |
:The profile activation can be delayed (for ex. 100ms).<br /> | :The profile activation can be delayed (for ex. 100ms).<br /> | ||
:If the switch back checkbox is enabled, GIMX will switch back to the previous profile when the button is released.<br /> | :If the switch back checkbox is enabled, GIMX will switch back to the previous profile when the button is released.<br /> | ||
| Line 86: | Line 86: | ||
:# first and second profiles with right mouse button as trigger, and switch back disabled; right mouse button is bind to the ADS button (for ex. l1) in the first profile only ("toggle mode")<br /> | :# first and second profiles with right mouse button as trigger, and switch back disabled; right mouse button is bind to the ADS button (for ex. l1) in the first profile only ("toggle mode")<br /> | ||
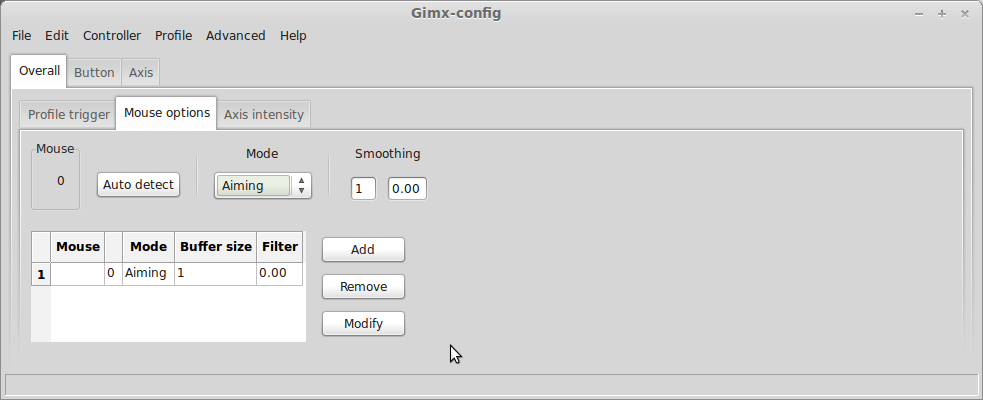
* mouse options | * mouse options | ||
| − | <div class="image200px">[ | + | <div class="image200px">[https://gimx.fr/img/screenshots/tuto/MouseOptions.png https://gimx.fr/img/screenshots/tuto/MouseOptions.png]</div> |
[[Mouse_Calibration#Smoothing|Mouse smoothing]] can be configured there if needed.<br /> | [[Mouse_Calibration#Smoothing|Mouse smoothing]] can be configured there if needed.<br /> | ||
The mouse mode can be either "aiming" or "driving/flying". | The mouse mode can be either "aiming" or "driving/flying". | ||
* axis intensities | * axis intensities | ||
| − | <div class="image200px">[ | + | <div class="image200px">[https://gimx.fr/img/screenshots/tuto/AxisIntensity.png https://gimx.fr/img/screenshots/tuto/AxisIntensity.png]</div> |
:This can be used to have a precise control over a stick with buttons, or over a pressure-sensitive button with buttons.<br /> | :This can be used to have a precise control over a stick with buttons, or over a pressure-sensitive button with buttons.<br /> | ||
:Typical use case for FPS games:<br /> | :Typical use case for FPS games:<br /> | ||
| Line 104: | Line 104: | ||
<!--T:12--> | <!--T:12--> | ||
| − | <div class="image200px">[ | + | <div class="image200px">[https://gimx.fr/img/screenshots/tuto/Controllers-gimx-config.png https://gimx.fr/img/screenshots/tuto/Controllers-gimx-config.png]</div> |
===Profiles=== <!--T:13--> | ===Profiles=== <!--T:13--> | ||
| Line 111: | Line 111: | ||
<!--T:14--> | <!--T:14--> | ||
| − | <div class="image200px">[ | + | <div class="image200px">[https://gimx.fr/img/screenshots/tuto/Profiles-gimx-config.png https://gimx.fr/img/screenshots/tuto/Profiles-gimx-config.png]</div> |
===Config conversion=== <!--T:15--> | ===Config conversion=== <!--T:15--> | ||
| Line 117: | Line 117: | ||
<!--T:16--> | <!--T:16--> | ||
| − | <div class="image200px">[ | + | <div class="image200px">[https://gimx.fr/img/screenshots/tuto/2.3_2_replace_mouse_dpi.png https://gimx.fr/img/screenshots/tuto/2.3_2_replace_mouse_dpi.png]</div> |
<!--T:17--> | <!--T:17--> | ||
Revision as of 12:50, 27 August 2016
- gimx-config is the general purpose config editor, and the most complete of the 2 editors.
- gimx-fpsconfig is the config editor for FPS games, easier to use, but far less complete.
Contents
Notes
- gimx-config can edit configs produced by gimx-fpsconfig, and vice-versa.
- To open the configuration directory, click on File>Open config directory in gimx-config, gimx-fpsconfig, or gimx-launcher.
- In GIMX 0.51 and earlier, configurations were saved in C:\Program Files\GIMX\config (Windows 32bits) or C:\Program Files (x86)\GIMX\config (Windows 64bits).
gimx-fpsconfig
gimx-fpsconfig is a config editor that helps to use a keyboard and a mouse in FPS games.
This means it only allows to:
- bind mouse and keyboard buttons to buttons
- bind mouse and keyboard buttons to the left stick
- bind the mouse axes to the right stick and edit the translation parameters
- use 2 profiles (first = hip fire, second = aiming down the sights, second profile trigger is the mouse right button, with switch back enabled)
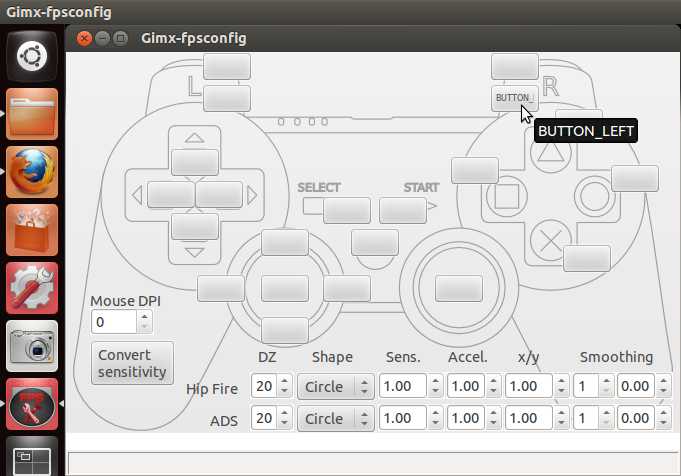
Start
Bind controls
To bind a button to a button or a direction of the left stick, click on the GUI button (cross, l1, select, left stick up, etc), and click on the button (w, space, left button, etc).
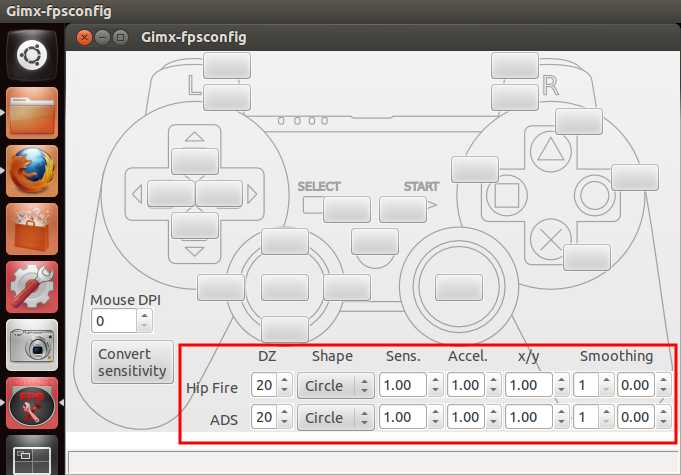
Set mouse translation parameters
The mouse translation parameters can be edited in the bottom part of the GUI. It is advised to calibrate these parameters through the Mouse Calibration tool.
Set control labels
To set a label, click on menu 'Advanced>Edit Label', click on the GUI button, and set the label.
The label will appear in the GUI button tooltip.
Set the mouse DPI
In case the config is built from scratch (menu 'File>New'), the mouse DPI has to be set.
The value is used by the calibration tests that are run by the Mouse Calibration tool.
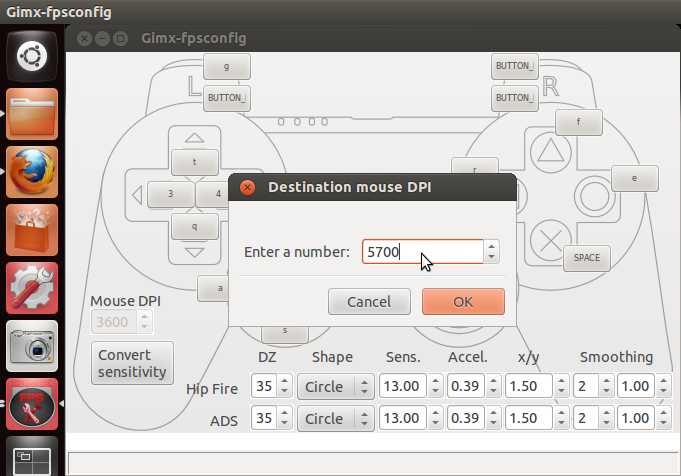
Convert the mouse sensitivity
The "Convert sensitivity" GUI button allows to adjust the mouse sensitivity according to source/destination DPI values.
It is useful to convert a config that was built for a mouse that runs at a different DPI setting.
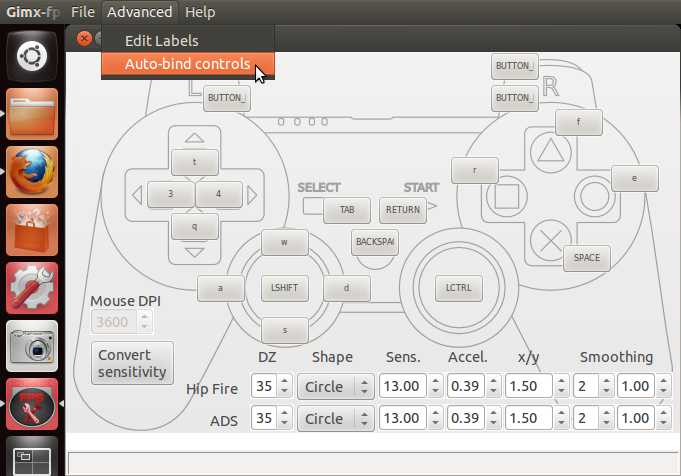
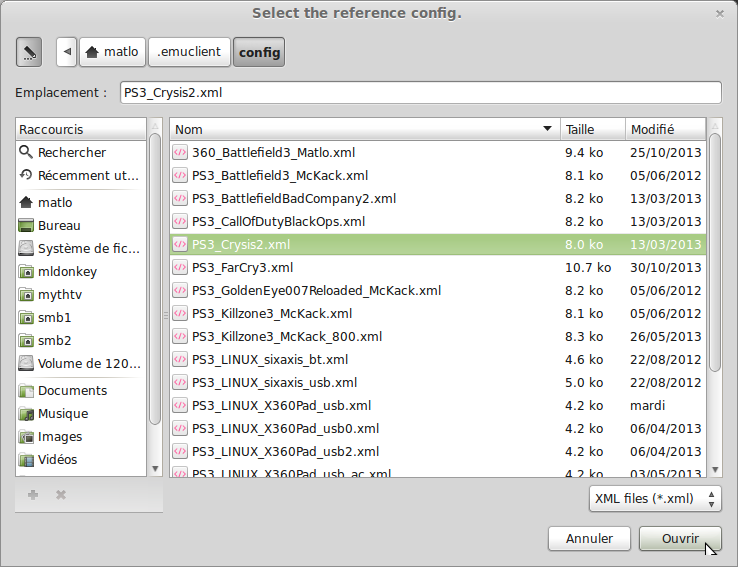
Auto-bind controls
To auto bind controls according to the labels defined in a reference configuration, click on menu 'Advanced>Auto-bind controls'. The configuration to modify and the reference configuration should have labels configured.
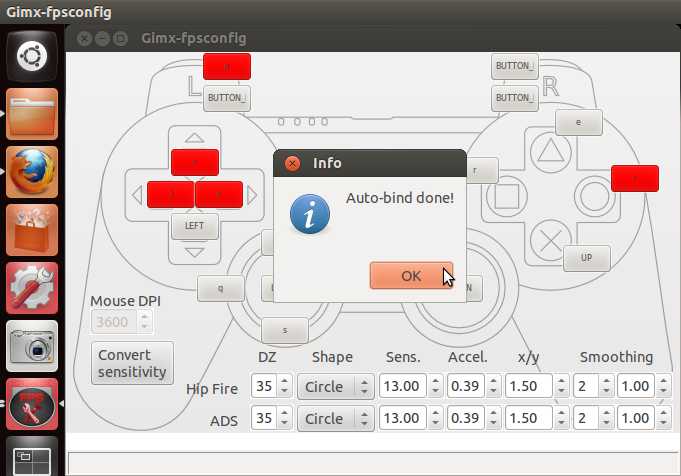
Controls not found or in conflict are colored in red.
--todo: update
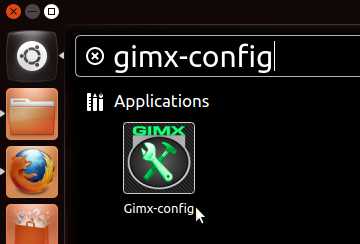
gimx-config
Start
Button tab
Bind controls (button or axis, from any device) to controller buttons (cross, select, etc.).
Axis tab
Bind controls (button or axis, from any device) to controller axes (left stick x, left stick y, pressure sensitive buttons, etc.).
Overall tab
This is the place to configure:
- the profile trigger, which is the button that activate the profile
- The profile activation can be delayed (for ex. 100ms).
- If the switch back checkbox is enabled, GIMX will switch back to the previous profile when the button is released.
- Typical use cases that allow to tweak the ADS mouse parameters in FPS games:
- second profile with right mouse button as trigger, and switch back enabled; right mouse button is bind to the ADS button (for ex. l1) in both profiles
- first and second profiles with right mouse button as trigger, and switch back disabled; right mouse button is bind to the ADS button (for ex. l1) in the first profile only ("toggle mode")
- second profile with right mouse button as trigger, and switch back enabled; right mouse button is bind to the ADS button (for ex. l1) in both profiles
- mouse options
Mouse smoothing can be configured there if needed.
The mouse mode can be either "aiming" or "driving/flying".
- axis intensities

- This can be used to have a precise control over a stick with buttons, or over a pressure-sensitive button with buttons.
- Typical use case for FPS games:
- WASD is bind to the left stick
- mouse wheel down and up resp. decrease and increase the left stick intensity
- dead zone = 20 (lowest stick position along each axis)
- steps = 3 (number of stick positions along each axis)
- WASD is bind to the left stick
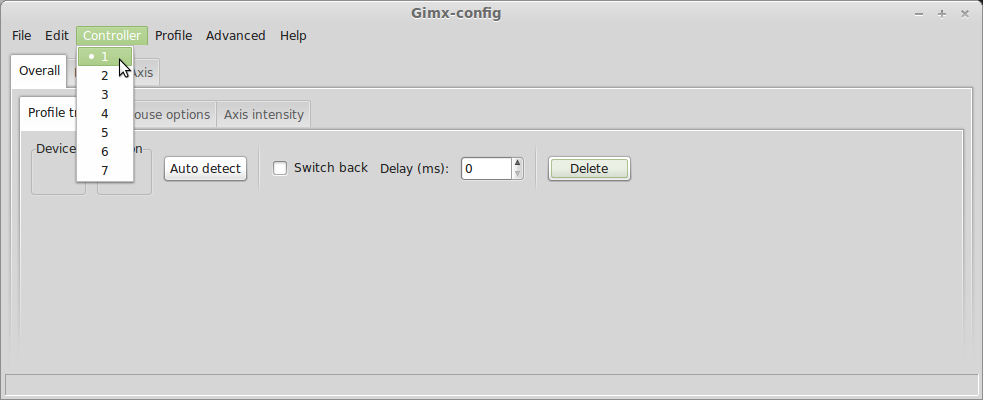
Controllers
This part is only applicable for bluetooth.
Up to 7 sixaxis controllers, each using a different bluetooth dongle, can be emulated by GIMX.
Each controller can be configured independently.
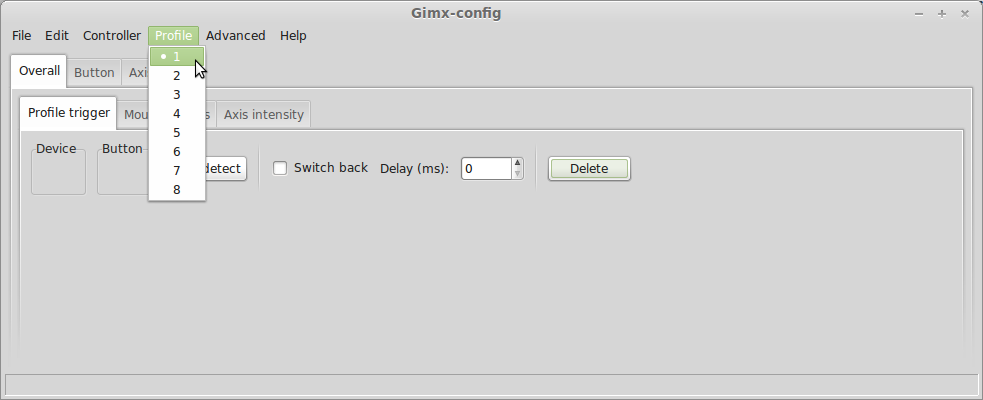
Profiles
There are up to 8 profiles per controller.
For example, it's possible to define a profile for aiming: copy-paste the profile #1 to profile #2, define the right mouse click as profile #2 trigger with switch back (Overall tab), and adjust the mouse sensitivity & acceleration (Axis tab).
Config conversion
Items of the "Edit" menu that allow to convert a configuration:
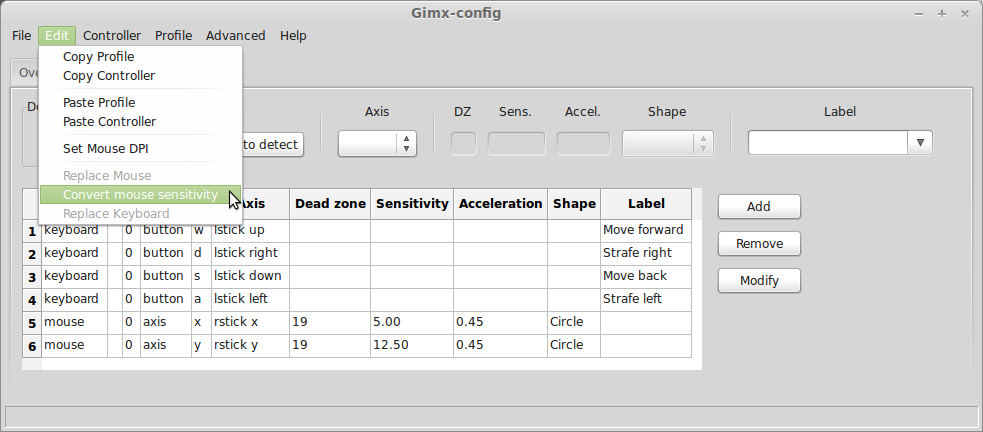
The "Replace Mouse" item allows to change the mouse name and id.
The "Convert mouse sensitivity" item allows to adjust the mouse sensitivity according to source/destination DPI values.
The "Replace Keyboard" item allows to change the keyboard name and id.
Advanced
- Multiple mice and keyboards: check this box if you want two mice or two keyboards to be independent.
- Use case: use the mouse wheel of a keypad (such as the n52te) independently from the mouse wheel.
- Link controls: updates bindings in all controller profiles.
- Use case: a same binding is defined in profiles 1 & 2; modify the binding in profile 1: the binding in profile 2 is updated.
- Auto-bind controls: remap bindings according to the labels; the configuration to modify and the reference configuration should have labels configured (column 'Label' in Button and Axis tabs).