Difference between revisions of "Axis translation parameters"
(→Note) |
|||
(41 intermediate revisions by 2 users not shown) | |||
| Line 1: | Line 1: | ||
| − | + | TODO: Give simple use cases such as: how to bind a joystick axis to an axis | |
| − | |||
| − | |||
| − | + | <languages /> | |
| + | <translate> | ||
| − | =Dead zone= | + | <!--T:1--> |
| + | This page explains the purpose of each axis translation parameter. | ||
| + | |||
| + | =Dead zone= <!--T:2--> | ||
| + | |||
| + | <!--T:3--> | ||
| + | [[File:DZShapeCircle.gif|left|frame|Visual Demonstration]] '''The dead zone parameter allows to shift the stick positions away from the stick center. Higher the DZ (Dead zone) is, larger mouse moves need to be done in order to aim.''' | ||
| + | |||
| + | This allows to skip all the stick positions around the stick center that do not generate in-game movement (these positions are called the dead zone of the stick). | ||
| − | |||
| − | |||
If lowest input motion do not generate enough movement, increase the dead zone parameter. | If lowest input motion do not generate enough movement, increase the dead zone parameter. | ||
| − | =Dead zone shape= | + | When you calibrate the dead zone you want the aim to move as slowly and smoothly as possible (no jitters or random jumps) |
| + | The aim should start moving by itself when you increase the dead zone using the mouse wheel, so all you need to do is fine tune it until the speed of the aim is slow and fluid. | ||
| + | |||
| + | Remember to go out of dead zone calibration to test the results of your adjustments. If the aim lags in calibration mode you'll need to save your configuration and run the emulator in normal Grab mode to test any changes you've made. | ||
| + | |||
| + | '''''Tip''''': ''To get rid of potential jerky aim when aiming slowly you need to increase DZ slightly above the game setting. So if you find through dead zone calibration that the aim starts moving by itself at '''22''', increase it to '''25'''-'''30''' instead.'' | ||
| + | <br/><br/> | ||
| + | |||
| + | =Dead zone shape= <!--T:4--> | ||
| + | |||
| + | <!--T:5--> | ||
| + | The dead zone shape can be set to: | ||
| + | |||
| + | <div style="margin-top: 10px; "><ul style="margin-left:0px;"> | ||
| + | <li style="display: inline-block;"> [[File:DZShapeCircle.gif|frame|none|Circle]] </li> | ||
| + | <li style="margin-left: 10px;display: inline-block;"> [[File:DZShapeRectangle.gif|frame|none|Rectangle]] </li> | ||
| + | </ul></div> | ||
| + | |||
| + | <!-- I created my own images (Godlike), license Public Domain --> | ||
| + | More shapes will be added in a future version. | ||
| + | |||
| + | =Sensitivity= <!--T:6--> | ||
| + | |||
| + | <!--T:7--> | ||
| + | [[File:mpanim.gif|left|frame|Visual Demonstration]]'''The sensitivity parameter is nothing more than a multiplier: input motion is multiplied so as to scale to the output motion range.''' | ||
| + | |||
| + | Increase it if the movement is too slow and decrease it if the movement is too fast. | ||
| + | |||
| + | It can be a negative value, so as to reverse the motion direction. | ||
| − | + | Remember that the output motion range is limited (the stick has a max position). | |
| − | |||
| − | |||
| − | + | <!--T:8--> | |
| − | + | To map a joystick axis to a stick axis, use a value of 128/32768 (about 0.004). | |
| − | |||
| − | |||
| − | |||
To map a joystick axis to a button axis, use a value of 256/32768 (about 0.008). | To map a joystick axis to a button axis, use a value of 256/32768 (about 0.008). | ||
| − | = | + | =X/Y ratio= <!--T:9--> |
| + | |||
| + | <!--T:10--> | ||
| + | '''The x/y ratio allows to change the vertical sensitivity independently from the horizontal sensitivity''' i.e. it determines how much faster your vertical (Y axis) aim is in relation to your horizontal (X axis) aim. | ||
| + | |||
| + | A value of 3.0 would make you aim up and down incredibly fast, whereas 0.1 would make it almost impossible to move it up or down at all. | ||
| + | |||
| + | Some games require higher or lower value. It all depends on developers implementation of controls in the game engine. | ||
| − | + | Vertical sensitivity formula is as follows: | |
| − | + | vertical_sens = sens * xy_ratio | |
| − | |||
| − | = | + | =Acceleration= <!--T:11--> |
| − | + | <!--T:12--> | |
| − | + | [[File:expanim.gif|left|frame|Visual Demonstration]] '''The acceleration parameter allows to change the in-game acceleration.''' | |
| − | |||
| − | |||
| − | + | Values higher than '''1''' increase the effective acceleration, whereas values lower that '''1''' decrease it. | |
| − | + | FPS games generally have a positive acceleration, which means there is a value in the '''0..1''' range that will cancel it (at least for games that use simple look mechanics). | |
| − | + | Acceleration value required for good aiming experience may vary from game to game as it depends on developers implementation of controls in the game engine. | |
| − | + | After having played around with these settings and you've learned what does what and how they work together, you can start fine tuning configurations to fit your personal preference or make your very own ones that we hope you'd like to share with us on the [https://forum.gimx.fr/viewforum.php?f=9 forums!]. | |
| − | |||
| − | |||
| − | |||
| − | |||
| − | + | '''''Tip''''': ''In the Call of Duty series (since Call of Duty 4) for example, a value of 0.39 will give you a 1:1-like aim (meaning there is little to no acceleration when moving the mouse) Having a higher exponent will make the aim accelerate but you won't need a high multiplier (the higher the multiplier is the bigger the gaps are between each "step" in the speed curve) | |
| − | + | '' | |
| − | + | =Buffer size and filter= <!--T:13--> | |
| − | + | <!--T:14--> | |
| + | These parameters are specific to the mouse smoothing, which is detailed on the [[Mouse_Calibration|Mouse calibration]] page. | ||
| − | + | </translate> | |
| − | |||
| − | |||
| − | |||
| − | |||
Latest revision as of 15:53, 26 January 2020
TODO: Give simple use cases such as: how to bind a joystick axis to an axis
This page explains the purpose of each axis translation parameter.
Contents
Dead zone
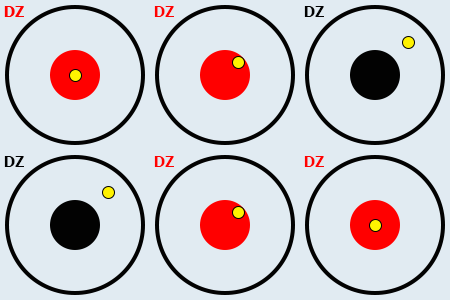
The dead zone parameter allows to shift the stick positions away from the stick center. Higher the DZ (Dead zone) is, larger mouse moves need to be done in order to aim.
This allows to skip all the stick positions around the stick center that do not generate in-game movement (these positions are called the dead zone of the stick).
If lowest input motion do not generate enough movement, increase the dead zone parameter.
When you calibrate the dead zone you want the aim to move as slowly and smoothly as possible (no jitters or random jumps) The aim should start moving by itself when you increase the dead zone using the mouse wheel, so all you need to do is fine tune it until the speed of the aim is slow and fluid.
Remember to go out of dead zone calibration to test the results of your adjustments. If the aim lags in calibration mode you'll need to save your configuration and run the emulator in normal Grab mode to test any changes you've made.
Tip: To get rid of potential jerky aim when aiming slowly you need to increase DZ slightly above the game setting. So if you find through dead zone calibration that the aim starts moving by itself at 22, increase it to 25-30 instead.
Dead zone shape
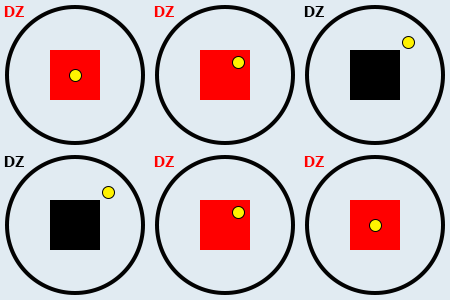
The dead zone shape can be set to:
More shapes will be added in a future version.
Sensitivity
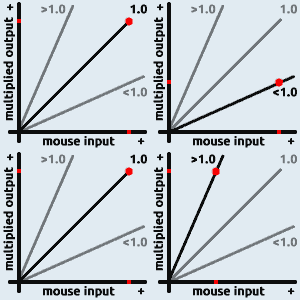
The sensitivity parameter is nothing more than a multiplier: input motion is multiplied so as to scale to the output motion range.
Increase it if the movement is too slow and decrease it if the movement is too fast.
It can be a negative value, so as to reverse the motion direction.
Remember that the output motion range is limited (the stick has a max position).
To map a joystick axis to a stick axis, use a value of 128/32768 (about 0.004).
To map a joystick axis to a button axis, use a value of 256/32768 (about 0.008).
X/Y ratio
The x/y ratio allows to change the vertical sensitivity independently from the horizontal sensitivity i.e. it determines how much faster your vertical (Y axis) aim is in relation to your horizontal (X axis) aim.
A value of 3.0 would make you aim up and down incredibly fast, whereas 0.1 would make it almost impossible to move it up or down at all.
Some games require higher or lower value. It all depends on developers implementation of controls in the game engine.
Vertical sensitivity formula is as follows:
vertical_sens = sens * xy_ratio
Acceleration
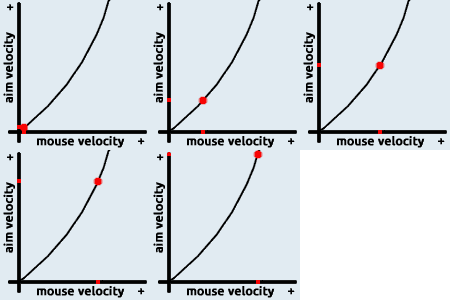
The acceleration parameter allows to change the in-game acceleration.
Values higher than 1 increase the effective acceleration, whereas values lower that 1 decrease it.
FPS games generally have a positive acceleration, which means there is a value in the 0..1 range that will cancel it (at least for games that use simple look mechanics).
Acceleration value required for good aiming experience may vary from game to game as it depends on developers implementation of controls in the game engine.
After having played around with these settings and you've learned what does what and how they work together, you can start fine tuning configurations to fit your personal preference or make your very own ones that we hope you'd like to share with us on the forums!.
Tip: In the Call of Duty series (since Call of Duty 4) for example, a value of 0.39 will give you a 1:1-like aim (meaning there is little to no acceleration when moving the mouse) Having a higher exponent will make the aim accelerate but you won't need a high multiplier (the higher the multiplier is the bigger the gaps are between each "step" in the speed curve)
Buffer size and filter
These parameters are specific to the mouse smoothing, which is detailed on the Mouse calibration page.


