Difference between revisions of "Quick Start/de"
(Created page with "Ein wird ein AVR USB development board benötigt um den Bluetooth Adapter mit der PS4 zu koppeln.<br /> Dasselbe Board kann benut...") |
|||
| Line 1: | Line 1: | ||
<languages /> | <languages /> | ||
| + | {{Deprecated}} | ||
==GIMX starten== | ==GIMX starten== | ||
===Ubuntu oder Windows=== | ===Ubuntu oder Windows=== | ||
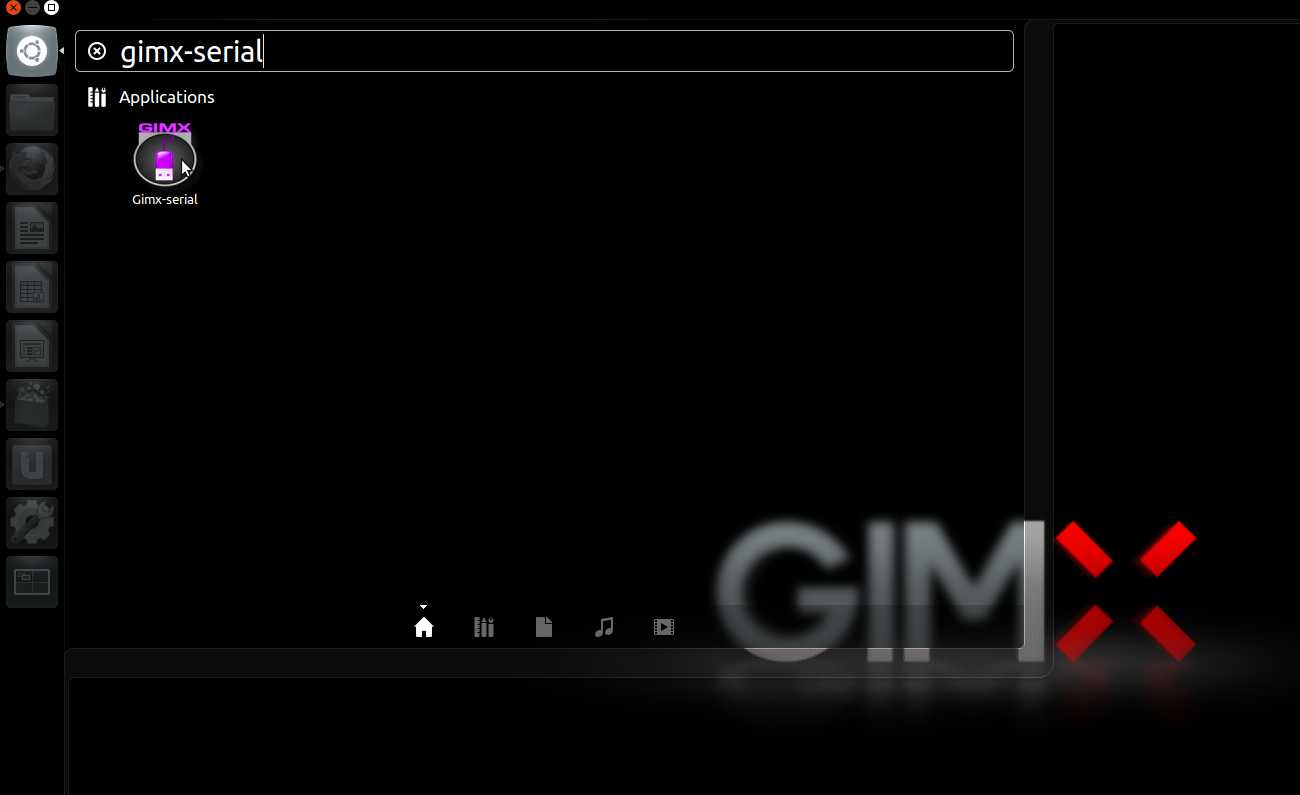
GIMX-Launcher ausführen. | GIMX-Launcher ausführen. | ||
| − | |||
| − | |||
<div class="image200px">[https://gimx.fr/img/screenshots/tuto/2.1_2_start_gimx-serial.jpg https://gimx.fr/img/screenshots/tuto/2.1_2_start_gimx-serial.jpg]</div> | <div class="image200px">[https://gimx.fr/img/screenshots/tuto/2.1_2_start_gimx-serial.jpg https://gimx.fr/img/screenshots/tuto/2.1_2_start_gimx-serial.jpg]</div> | ||
| Line 11: | Line 10: | ||
==Konfigurationsdateien herunterladen== | ==Konfigurationsdateien herunterladen== | ||
| − | + | <div class="mw-collapsible mw-collapsed"> | |
| − | + | '''This section contains information about downloading configuration from gimx-launcher.''' | |
| + | |||
| + | Most config files shared by users of the GIMX community can be downloaded directly from gimx-launcher. <!-- TODO: link page ---> | ||
| + | Please contribute by sharing your own configs in the [https://gimx.fr/forum/viewforum.php?f=9 Configuration and Requests forum section]. | ||
| + | |||
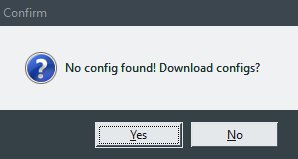
| + | * The first time '''gimx-launcher''' is started, if there is no config file present on the PC, a message box will ask you if config files should be downloaded. <div class="image200px">[https://gimx.fr/wiki/images/d/d3/Noconfigs.jpg https://gimx.fr/wiki/images/d/d3/Noconfigs.jpg]</div> | ||
| + | |||
| + | |||
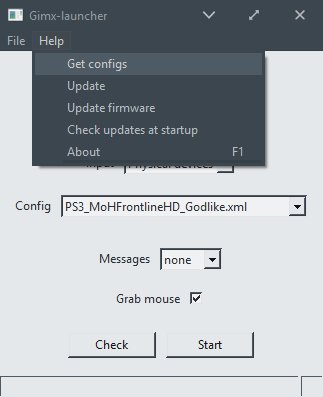
| + | * The config file downloader is also available through the "Help>Get configs" menu entry. <div class="image200px">[https://gimx.fr/wiki/images/f/f0/Getconfigs.jpg https://gimx.fr/wiki/images/f/f0/Getconfigs.jpg]</div> | ||
| + | |||
| + | |||
| + | * The config file downloader displays all config files available to download: <div class="image200px">[https://gimx.fr/wiki/images/9/96/Configdownload.jpg https://gimx.fr/wiki/images/9/96/Configdownload.jpg]</div> | ||
| + | |||
| − | + | The config name syntax is: <CONSOLE>_<GAME>_<AUTHOR>.xml or <CONSOLE>_<OS>_<DEVICE>_<AUTHOR>.xml. | |
| − | < | + | Examples: |
| + | * '''LogitechDrivingForceGT_G29.xml''': config file that emulates '''G29''' to use with '''Logitech Driving Force GT'''. | ||
| + | * '''PS3_Battlefield3_McKack.xml''': config file to use with '''mouse''' built by McKack for the PS3 version of '''Battlefield 3'''. | ||
| + | * '''PS3_LINUX_X360Pad.xml''': config file to use in Linux with a '''360''' pad and a '''PS3'''. | ||
| − | + | Just select configurations you want to download and click <u>OK</u>, program will do the rest and you can now use config you've downloaded. | |
| − | |||
| − | |||
| − | |||
| − | + | </div> | |
| − | |||
| − | |||
| − | |||
==Maus Sensitivitätsumwandlung== | ==Maus Sensitivitätsumwandlung== | ||
| + | |||
| + | <div class="mw-collapsible mw-collapsed"> | ||
Dieser Abschnitt ist für FPS-Spieler. | Dieser Abschnitt ist für FPS-Spieler. | ||
| Line 51: | Line 61: | ||
<div class="image200px">[https://gimx.fr/img/screenshots/tuto/2.3_5_multiplier_changed.png https://gimx.fr/img/screenshots/tuto/2.3_5_multiplier_changed.png]</div><br /> | <div class="image200px">[https://gimx.fr/img/screenshots/tuto/2.3_5_multiplier_changed.png https://gimx.fr/img/screenshots/tuto/2.3_5_multiplier_changed.png]</div><br /> | ||
Auf "File>Save" klicken. | Auf "File>Save" klicken. | ||
| + | |||
| + | <div class="mw-collapsible mw-collapsed"> | ||
| + | |||
| + | In gimx-launcher, select the config file, and click on the "File>Edit config" menu item.<br /> | ||
| + | <div class="image200px">[https://gimx.fr/img/screenshots/tuto/2.3_1_edit_config.png https://gimx.fr/img/screenshots/tuto/2.3_1_edit_config.png]</div><br /> | ||
| + | This opens the config file with the gimx-config editor.<br /> | ||
| + | Click on the "Edit>Convert mouse sensitivity".<br /> | ||
| + | <div class="image200px">[https://gimx.fr/img/screenshots/tuto/2.3_2_replace_mouse_dpi.png https://gimx.fr/img/screenshots/tuto/2.3_2_replace_mouse_dpi.png]</div><br /> | ||
| + | If the config contains no DPI value, a first dialog box is displayed. Enter the source DPI and validate.<br /> | ||
| + | A dialog box is displayed. Enter the destination DPI and validate.<br /> | ||
| + | <div class="image200px">[https://gimx.fr/img/screenshots/tuto/2.3_4_new_dpi.png https://gimx.fr/img/screenshots/tuto/2.3_4_new_dpi.png]</div><br /> | ||
| + | The sensitivity is converted in all profiles (hip fire = profile 1, ADS = profile 2).<br /> | ||
| + | <div class="image200px">[https://gimx.fr/img/screenshots/tuto/2.3_5_multiplier_changed.png https://gimx.fr/img/screenshots/tuto/2.3_5_multiplier_changed.png]</div><br /> | ||
| + | Click on the "File>Save". | ||
| + | |||
| + | </div> | ||
===GIMX-FPS Konfiguration=== | ===GIMX-FPS Konfiguration=== | ||
| Line 63: | Line 89: | ||
<div class="image200px">[https://gimx.fr/img/screenshots/tuto/2.3_7_sensitivity_converted.png https://gimx.fr/img/screenshots/tuto/2.3_7_sensitivity_converted.png]</div><br /> | <div class="image200px">[https://gimx.fr/img/screenshots/tuto/2.3_7_sensitivity_converted.png https://gimx.fr/img/screenshots/tuto/2.3_7_sensitivity_converted.png]</div><br /> | ||
Auf "File>Save" klicken. | Auf "File>Save" klicken. | ||
| + | |||
| + | <div class="mw-collapsible mw-collapsed"> | ||
| + | |||
| + | In gimx-launcher, select the config file, and click on the "File>Edit FPS config" menu item.<br /> | ||
| + | <div class="image200px">[https://gimx.fr/img/screenshots/tuto/2.3_6_edit_fps_config.png https://gimx.fr/img/screenshots/tuto/2.3_6_edit_fps_config.png]</div><br /> | ||
| + | This opens the config file with the gimx-fpsconfig editor.<br /> | ||
| + | If the source DPI was saved into the config file, the mouse DPI should be different from 0.<br /> | ||
| + | Click on the "Convert sensitivity" button. A dialog box is displayed. Enter the destination DPI and validate.<br /> | ||
| + | <div class="image200px">[https://gimx.fr/img/screenshots/tuto/2.3_7_convert_sensitivity.png https://gimx.fr/img/screenshots/tuto/2.3_7_convert_sensitivity.png]</div><br /> | ||
| + | <div class="image200px">[https://gimx.fr/img/screenshots/tuto/2.3_4_new_dpi.png https://gimx.fr/img/screenshots/tuto/2.3_4_new_dpi.png]</div><br /> | ||
| + | The sensitivity is converted for both hip fire and ADS.<br /> | ||
| + | <div class="image200px">[https://gimx.fr/img/screenshots/tuto/2.3_7_sensitivity_converted.png https://gimx.fr/img/screenshots/tuto/2.3_7_sensitivity_converted.png]</div><br /> | ||
| + | Click on the "File>Save". | ||
| + | |||
| + | </div> | ||
| + | </div> | ||
==Spielen== | ==Spielen== | ||
===Ubuntu oder Raspbian + Bluetooth=== | ===Ubuntu oder Raspbian + Bluetooth=== | ||
| + | |||
| + | <div class="mw-collapsible mw-collapsed"> | ||
Diese Seite ebenfalls lesen: [[Main_Page#Hardware_requirements|Hardware requirements]]. | Diese Seite ebenfalls lesen: [[Main_Page#Hardware_requirements|Hardware requirements]]. | ||
====PS3==== | ====PS3==== | ||
| + | |||
| + | <div class="mw-collapsible mw-collapsed"> | ||
# GIMX-Launcher öffnen. | # GIMX-Launcher öffnen. | ||
| Line 88: | Line 134: | ||
# Spielen | # Spielen | ||
# Linke Shift + Escape Taste zum beenden von GIMX drücken | # Linke Shift + Escape Taste zum beenden von GIMX drücken | ||
| + | |||
| + | </div> | ||
====PS4==== | ====PS4==== | ||
| + | |||
| + | <div class="mw-collapsible mw-collapsed"> | ||
Die PS4 nimmt nur eingaben von einem lizenzierten Controller an.<br /> | Die PS4 nimmt nur eingaben von einem lizenzierten Controller an.<br /> | ||
| Line 135: | Line 185: | ||
# Spielen | # Spielen | ||
# Linke Shift + Escape Taste zum beenden von GIMX drücken | # Linke Shift + Escape Taste zum beenden von GIMX drücken | ||
| + | |||
| + | </div> | ||
| + | |||
| + | </div> | ||
===Ubuntu oder Windows + DIY USB-Adapter=== | ===Ubuntu oder Windows + DIY USB-Adapter=== | ||
| + | |||
| + | <div class="mw-collapsible mw-collapsed"> | ||
====Controller Authentifizierung==== | ====Controller Authentifizierung==== | ||
| Line 142: | Line 198: | ||
* Xbox 360: it is required to have a genuine wired controller (the play and charge cable won't work) wired to the PC at startup. In Windows, the 360 controller has to be unplugged/replugged before each spoof attempt.<br /> | * Xbox 360: it is required to have a genuine wired controller (the play and charge cable won't work) wired to the PC at startup. In Windows, the 360 controller has to be unplugged/replugged before each spoof attempt.<br /> | ||
* Xbox One: it is required to have a genuine controller wired to the PC at startup. In Windows, the Xbox One controller has to be unplugged/replugged each time the AVR USB board or the console are power-cycled.<br /> | * Xbox One: it is required to have a genuine controller wired to the PC at startup. In Windows, the Xbox One controller has to be unplugged/replugged each time the AVR USB board or the console are power-cycled.<br /> | ||
| − | * PS4: it is required to have a genuine | + | * PS4: it is required to have a genuine Dualshock 4 wired to the PC all the time.<br /> |
'''Achtung: Wenn eine Konsole verwendet wird die Authentifizierung benötigt, den Controller ausschalten bevor er am Computer angeschlossen wird.''' | '''Achtung: Wenn eine Konsole verwendet wird die Authentifizierung benötigt, den Controller ausschalten bevor er am Computer angeschlossen wird.''' | ||
| Line 163: | Line 219: | ||
# Spielen | # Spielen | ||
# Linke Shift + Escape Taste zum beenden von GIMX drücken | # Linke Shift + Escape Taste zum beenden von GIMX drücken | ||
| + | |||
| + | </div> | ||
Revision as of 22:56, 31 August 2018
| This page is deprecated. It is kept for archival purposes. Please visit to the current main page to see the latest documentation. |
Contents
GIMX starten
Ubuntu oder Windows
GIMX-Launcher ausführen.
Konfigurationsdateien herunterladen
This section contains information about downloading configuration from gimx-launcher.
Most config files shared by users of the GIMX community can be downloaded directly from gimx-launcher. Please contribute by sharing your own configs in the Configuration and Requests forum section.
- The first time gimx-launcher is started, if there is no config file present on the PC, a message box will ask you if config files should be downloaded.
- The config file downloader is also available through the "Help>Get configs" menu entry.
- The config file downloader displays all config files available to download:
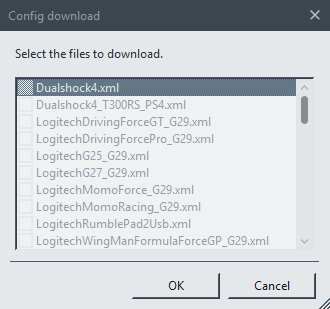
The config name syntax is: <CONSOLE>_<GAME>_<AUTHOR>.xml or <CONSOLE>_<OS>_<DEVICE>_<AUTHOR>.xml.
Examples:
- LogitechDrivingForceGT_G29.xml: config file that emulates G29 to use with Logitech Driving Force GT.
- PS3_Battlefield3_McKack.xml: config file to use with mouse built by McKack for the PS3 version of Battlefield 3.
- PS3_LINUX_X360Pad.xml: config file to use in Linux with a 360 pad and a PS3.
Just select configurations you want to download and click OK, program will do the rest and you can now use config you've downloaded.
Maus Sensitivitätsumwandlung
Dieser Abschnitt ist für FPS-Spieler.
Bevor eine vorgefertigte Konfiguration benutzt werden kann, muss man die Empfindlichkeit konvertieren damit diese der eigenen Maus-Auflösung(DPI) angepasst ist.
Im Spiel die Empfindlichkeit auf die höchste Stufe setzen und die Maus-Auflösung(DPI) auf die höchstmögliche stellen. (z.B.: Logitech G5 @2000DPI, Logitech G500 @5700DPI).
GIMX provides means to convert the sensitivity, knowing both the DPI of the source mouse (which can be embedded in the config file) and the DPI of the destination mouse.
If the source DPI and the destination DPI are the same, there is no need to convert anything.
Es ist möglich, dies mit GIMX-Confog oder GIMX-Fpsconfig durchzuführen. Diese Tools werden hier detaillierter beschrieben: this page.
GIMX-Konfiguration
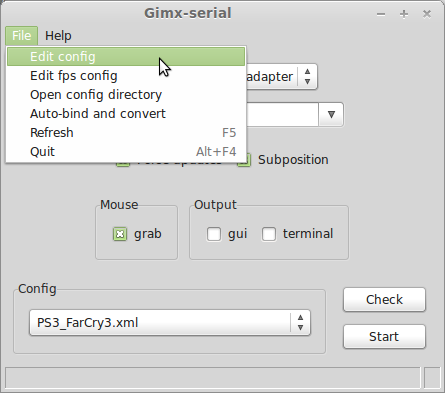
Im GIMX-Launcher die Konfigurationsdatei auswählen und im Menu den Punkt "File>Edit config" auswählen.
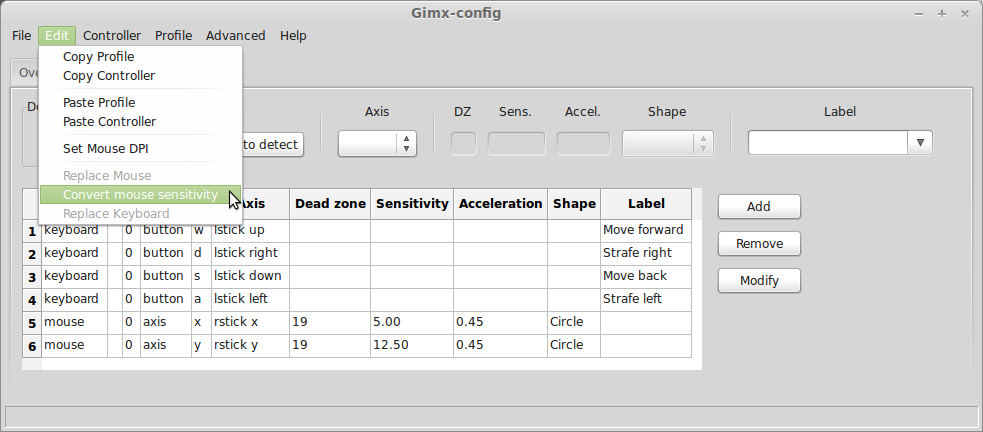
Dies öffnet die Konfiguration mit dem GIMX-Config Editor.
Auf "Edit>Convert mouse sensitivity" klicken.
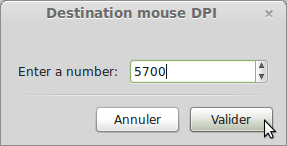
Wenn die Konfiguration keine DPI hinterlegt hat, erscheint ein Hinweis. Die Quell-DPI eingeben und bestätigen.
Ein Hinweis erscheint. Die Ziel DPI eingeben und bestätigen.
Die Empfindlichkeit wird in allen Profilen angepasst. (Hüft-Feuer = Profil 1, ADS = Profil 2) (PS: ADS = Betätigte rechte Maustaste).

Auf "File>Save" klicken.
In gimx-launcher, select the config file, and click on the "File>Edit config" menu item.
This opens the config file with the gimx-config editor.
Click on the "Edit>Convert mouse sensitivity".
If the config contains no DPI value, a first dialog box is displayed. Enter the source DPI and validate.
A dialog box is displayed. Enter the destination DPI and validate.
The sensitivity is converted in all profiles (hip fire = profile 1, ADS = profile 2).
Click on the "File>Save".
GIMX-FPS Konfiguration
Im GIMX-Launcher die Konfigurationsdatei auswählen, im Menü auf "File>Edit FPS config" klicken.

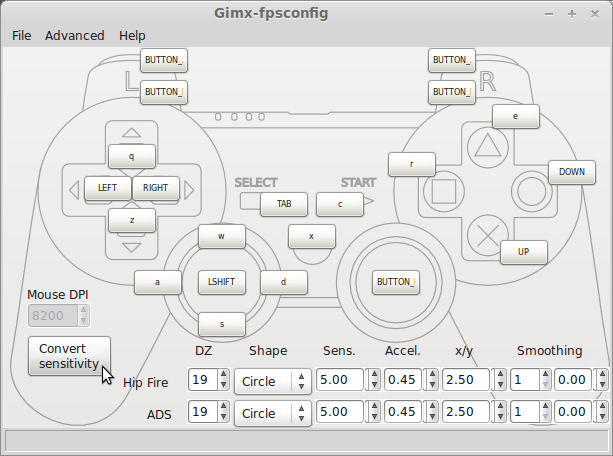
Dies öffnet die Konfigurationsdatei mit dem GIMX-Fpsconfig Editor.
Wenn die Quell-DPI in der Konfiguration gespeichert wurden, sollte sie nicht den Wert 0 haben.
Auf "Convert sensitivity" klicken. Ein Hinweis erscheint um die Ziel-DPI einzugeben, diese eingeben und auf "validate" klicken.
Die Empfindlichkeit wird für Hüftfeuer und ADS konvertiert.
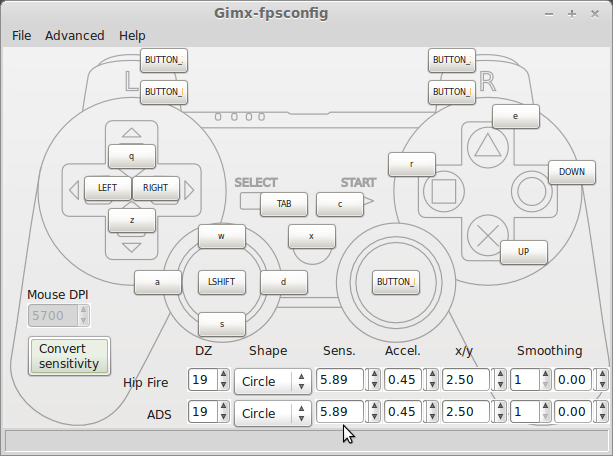
Auf "File>Save" klicken.
In gimx-launcher, select the config file, and click on the "File>Edit FPS config" menu item.
This opens the config file with the gimx-fpsconfig editor.
If the source DPI was saved into the config file, the mouse DPI should be different from 0.
Click on the "Convert sensitivity" button. A dialog box is displayed. Enter the destination DPI and validate.
The sensitivity is converted for both hip fire and ADS.
Click on the "File>Save".
Spielen
Ubuntu oder Raspbian + Bluetooth
Diese Seite ebenfalls lesen: Hardware requirements.
PS3
- GIMX-Launcher öffnen.
- Im "Output" Drop-Down Menü, "Bluetooth / PS3" auswählen".
- Wenn keine vorgängigen Verbindungen vorhanden sind, wird GIMX eine neue erstellen wollen: Auf "Yes" klicken.
- Wie gefordert, einen Sixaxis / Dualshock 3 anschliessen und auf "Yes" klicken.
- Die Verbindung auswählen und auf "Validate" klicken.
- Wie gefordert, einen Bluetooth-Adapter anschliessen und auf "Yes" klicken.
- Die Bluetooth-Adapter Adresse speichern, falls man diese später wiederherstellen möchte.
- Den Bluetooth-Adapter auswählen und auf "Validate" klicken.
- Sich versichern, dass die Bluetooth-Adapter Adresse gespeichert wurde und auf "Yes" klicken.
- Die Bluetooth-Adapter Adresse wird modifiziert, dass diese mit der Adresse des Sixaxis / Dualshock 3 Controller übereinstimmt.
- Falls eine Fehlermeldung erscheint, muss ein kompatibler Adapter gekauft werden: compatible bluetooth dongle.
- Die Verbindung zum Sixaxis / Dualshock 3 Controller trennen, den Controller mit dem PS Button ausschalten, falls dieser noch läuft.
- Die zu verwendende Konfiguration auswählen
- Start anklicken
- Spielen
- Linke Shift + Escape Taste zum beenden von GIMX drücken
PS4
Die PS4 nimmt nur eingaben von einem lizenzierten Controller an.
Damit sich GIMX als lizenzierten Controller benutzen lässt, muss es ständig via Bluetooth mit einem echten DualShock 4 Controller verbunden sein.
- Raspbian-spezifische Instruktionen
Der Bluetooth Dienst wird automatisch gestartet, wenn sich ein Gerät zu verbinden versucht.
Dies ist störend, da es die Verbindungsanfragen unterbricht.
Um den Dienst zu beenden, folgenden Befehl ausführen und neustarten:
sudo update-rc.d bluetooth disable
Alternativ kann man den Bluetooth Dienst stoppen und die bluetoothd Bibliothek umbenennen:
sudo service bluetooth stop
cd /usr/sbin
sudo mv bluetoothd bluetoothd.bk
Der Nachteil von diesem Verfahren ist, dass dieser Schritt nach jeder Aktualisierung des bluez-Pakets erneut ausgeführt werden muss.
- AVR USB Entwicklungs-Board
Ein wird ein AVR USB development board benötigt um den Bluetooth Adapter mit der PS4 zu koppeln.
Dasselbe Board kann benutzt werden um einen DIY USB-Adapter zu bauen. Aber hierfür wird kein USB zu seriell TTL-Converter benötigt.
Die benötigte Firmware "atmega32u4.hex" ist hier erhältlich: https://gimx.fr/download/EMUPS4PAIRING.7z
Die Firmware nach dieser Anleitung aufspielen: Firmware loading
- Erst-start Instruktionen
- GIMX-Launcher öffnen.
- Im "Output" Drop-Down Menü, "Bluetooth / PS4" auswählen".
- Wenn keine vorgängigen Verbindungen vorhanden sind, wird GIMX eine neue erstellen wollen: Auf "Yes" klicken.
- Wie gefordert, einen Bluetooth-Adapter anschliessen und auf "Yes" klicken (compatible bluetooth dongle).
- Wie gefordert, einen Dualshock 4 mit Micro-USB Kabel anschliessen und auf "Yes" klicken.
- Die Verbindung auswählen und auf "Validate" klicken.
- Das AVR USB-Board verbinden (z.B. Teensy 2.0) und auf "Yes" klicken.
- Wie gefordert, das AVR USB-Board mit der PS4 verbinden und einige Sekunden warten.
- Das AVR USB-Board wieder am Computer anschliessen und auf "Yes" klicken.
- Eine Neue Kopplung/Verbindung sollte nun im "Pairing" Drop-Down Menü erscheinen.
- Den Dualshock 4 Controller ausstecken.
- Im "Config" Drop-Down Menü, die zu verwendende Konfiguration auswählen.
- "Start" anklicken.
- Den "PS Button" auf dem Dualshock 4 Controller drücken
- Spielen
- Linke Shift + Escape Taste zum beenden von GIMX drücken
Ubuntu oder Windows + DIY USB-Adapter
Controller Authentifizierung
- Xbox 360: it is required to have a genuine wired controller (the play and charge cable won't work) wired to the PC at startup. In Windows, the 360 controller has to be unplugged/replugged before each spoof attempt.
- Xbox One: it is required to have a genuine controller wired to the PC at startup. In Windows, the Xbox One controller has to be unplugged/replugged each time the AVR USB board or the console are power-cycled.
- PS4: it is required to have a genuine Dualshock 4 wired to the PC all the time.
Achtung: Wenn eine Konsole verwendet wird die Authentifizierung benötigt, den Controller ausschalten bevor er am Computer angeschlossen wird.
Verbindung
Das AVR USB-Board (z.B. Teensy, Arduino Leonardo, Micro Pro, etc.) an die Konsole anschliessen.
Den USB zu UAR-Adapter (z.B. CP2102, FT232RL, etc.) an den Computer anschliessen.
Start
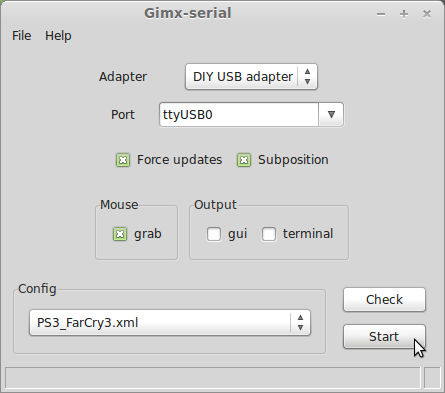
- Konsole einschalten
- Adapter auswählen
- Seriellen Port auswählen
- Die zu verwendende Konfiguration auswählen
- Start anklicken
- Den PS-Knopf auf Playstation Konsolen, oder den Home Knopf auf XBOX Konsolen drücken
- Spielen
- Linke Shift + Escape Taste zum beenden von GIMX drücken