Difference between revisions of "Mouse Calibration/ja"
Gobbledygook (talk | contribs) (Created page with "過去の動きを元に算出し、マウスの動きを滑らかにするスムージング機能があります。 低DPI(2000以下くらい)のマウスのカクツキに...") |
Gobbledygook (talk | contribs) (Created page with "==バッファサイズ==") |
||
| Line 56: | Line 56: | ||
Before adding smoothing, you should have properly set the other parameters. | Before adding smoothing, you should have properly set the other parameters. | ||
| − | == | + | ==バッファサイズ== |
The buffer size (in the 0..30 range) is the number of mouse motion reports that are used to smooth the mouse motion.<br /> | The buffer size (in the 0..30 range) is the number of mouse motion reports that are used to smooth the mouse motion.<br /> | ||
Revision as of 22:16, 25 August 2014
Contents
マウスのキャリブレーションをする前に
ゲーム内の感度を最高に設定してください。マウスのdpiも(選べるなら)一番高いものに設定してください。
キャリブレーションの開始
gimx-bluetooth (または gimx-serial) を起動し、Output の項にある GUI にチェックを入れ、エミュレーションを開始してください。
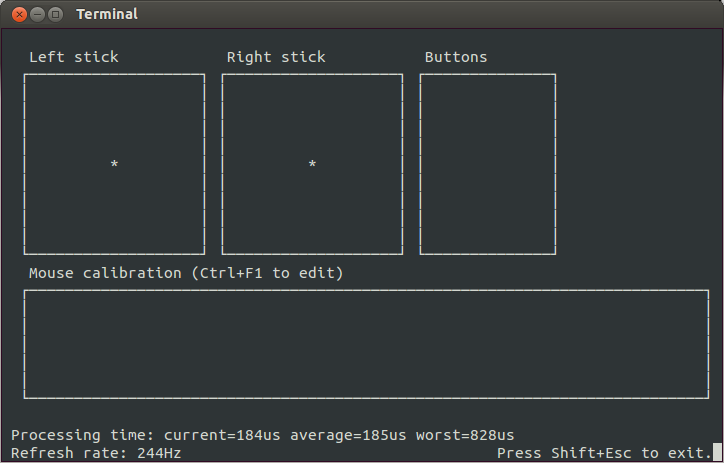
現在のマウス補正の設定が GUI 内の "Mouse calibration" に表示されています。
設定はコンフィグファイルから値が読み込まれます。
もし複数のマウスを使っている場合、必要に応じてそれぞれの設定を行うことができます。
全体的な手順
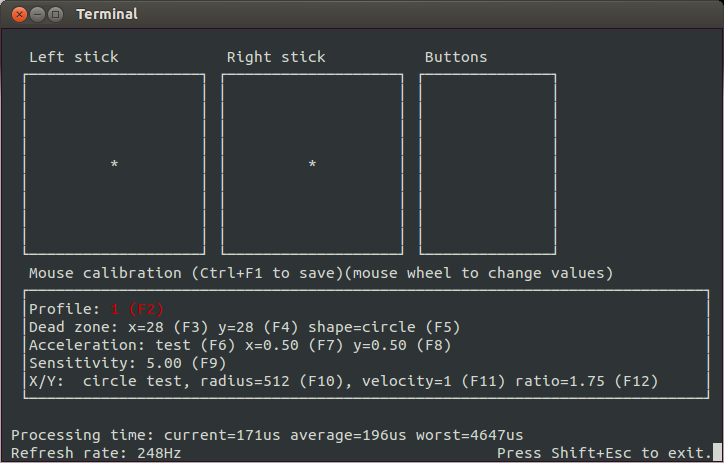
ctrl + F1 を押すと、補正の設定を開始します。
F1 ~ F12 のキーでパラメータを選び、マウスホイールで値が変更出来ます。
もう一度 ctrl + F1 を押すことで、値がセーブされ補正設定を終了します。
段階的な手順
- 全ての値はマウスホイールで上下します。
- ctrl+F1で設定を開始します。複数のマウスを使っている場合は、設定するマウスをホイールで選択することができます。
- F2 : 設定するプロファイルを選択します。(通常は、プロファイル1を腰だめに、プロファイル2を ADS に使用します)
- F3 : X 軸のデッドゾーンを設定します。照準が自動で動くので、動かなくなるまで値を下げ、次に、動くようになる最初の値まで上げてください。
- F4 : Y 軸のデッドゾーンを設定します。 X 軸と同様に設定してください。
- F5 : デッドゾーンの形状を設定します。「矩形(rectangle)」に設定して照準が動くようなら「円形(circle)」を選択してください。逆に「円形」で動くようなら「矩形」にしてください。
- F6 : マウスの変換テストを行います。左右に照準が動くので、元の位置に戻るかを確認してください。戻らないようなら F7, F8 の設定に進んでください。
- F7 : X 軸の加速を設定します。
- F8 : Y 軸の加速を設定します。
- F9 : 感度を設定します。好みの動きになるよう値を設定してください。
- F10 : 円運動テストを行います。もし必要なら、 F10, F11 で円運動の半径と速度を設定してください。照準の動きが真円を描くようなら x/y 軸の比率は適切に設定されています。もしそうでなければ、F12 で比率を変更して下さい。wheel.
- ctrl+F1 で保存して終了します。
スムージング
過去の動きを元に算出し、マウスの動きを滑らかにするスムージング機能があります。 低DPI(2000以下くらい)のマウスのカクツキに対して有効です。 バッファサイズとフィルタ、この2つのパラメータでスムージング機能を設定します。 スムージング機能の詳細はここにあります。
Note
Before adding smoothing, you should have properly set the other parameters.
バッファサイズ
The buffer size (in the 0..30 range) is the number of mouse motion reports that are used to smooth the mouse motion.
The smoothing window is the buffer size multiplied by the GIMX update period (inverse of the frequency).
Examples:
GIMX frequency = 250Hz, buffer size = 10
1000/250 * 10 = 40ms
GIMX frequency = 100Hz, buffer size = 10
1000/100 * 10 = 100ms
Keep in mind that increasing the buffer size makes motion smoother but increases the latency.
Filter
The filter (in the 0..1 range) defines how much the previous motion reports will count in the final motion.
Value 1 means that the final motion is an average of the buffered motion reports.
Value 0.5 means that the current motion report counts for 1, the previous one for 0.5, the next oldest one for 0.25 (=0.5x0.5), and so on.
Value 0 means that only the current motion report counts (resulting in an unfiltered motion).
So as to preserve a low latency, high filters (1) should only be used with low buffer sizes (2), and high buffer sizes (>10) should only be used with low filters (<0.75).
Pitfalls
This summarizes all common errors you should avoid, and what you should do instead.
- Don't change the mouse dpi to adjust your aiming speed. Always let the mouse dpi setting to the max value. Adjust the GIMX sensitivity instead.
- Don't change the in-game sensitivity to adjust your aiming speed. Always let the in-game sensitivity to the max value. Adjust the GIMX sensitivity instead.
- Don't change the mouse parameters of the OS (Linux/Windows) to adjust your aiming speed. GIMX uses raw (unmodified) events from the mouse!
- Prefer editing the sensitivity with the calibration mode. The calibration mode keeps the x/y ratio.