L'adaptateur USB à faire soi-même
Cette page explique comment fabriquer un adaptateur DIY USB.
Un tutoriel (en anglais) plus simple est aussi disponible : Adaptateur USB à faire soi même, pour les nuls.
Attention: vous êtes seul responsable du matériel que vous achetez, et de ce que vous en faites.
Contents
Matériel requis
Adaptateur USB - série TTL
Assurez-vous qu'il peut fonctionner à 500kbps et qu'il tolère 5V.
| puce | CP2102 | FT232R | PL2303 | CH340 | FT230X |
| tolère 5V | oui | (*) | (*) | (*) | oui |
| 500 kbps | oui | oui | non | non | oui |
| compatible | oui | (*) | non | non | oui |
(*) dépend de la carte
Exemples:
- MicroFTX (10$ fdpout)
- convertisseurs CP2102 sur ebay (quelques $ fdpin)
- FT232R convertisseurs FT232R sur ebay (environ 15$ fdpin)
- convertisseur CP2102 chez sparkfun (22$ fdpout)
- convertisseur FT232R chez sparkfun (15$ fdpout)
- Certains matériels comme l'arduino embarquent un convertisseur USB - série (retirer la puce AVR pour l'utiliser)
- Une deuxième carte de développement USB peut être programmée comme un convertisseur USB - série.
Carte de développement USB
Une carte de développement AVR USB fonctionnant à 5V avec une puce parmi les suivantes : at90usb82, at90usb162, at90usb646, at90usb647, at90usb1286, at90usb1287, atmega16u2, atmega32u2, atmega16u4, atmega32u4.
Exemples :
- Teensy 2.0 (atmega32u4, 16$ fdpout) (pour éviter les soudures, prendre un Teensy avec "header pins") (les cartes Teensy 3.x et LC ne sont pas compatibles car elles ont des puces différentes)
- Arduino Leonardo - distributeurs - (clones chinois à 11$ sur ebay)
- Cartes utilisées pour le psgroove (vérifier la puce).
- Cartes atmega32u4 sur ebay (environ 8$). Soudure requise. Un ISP est aussi requis.
Assemblage recommandé
- convertisseur CP2102 sur ebay (faible coût, mais délai de livraison parfois long)
- carte Teensy 2.0 (prix correct, bonne qualité, et livraison rapide).
Chargement du firmware
- EMUJOYSTICKPS3 : émulation d'un joystick HID, avec axes sur 16 bits, pour PS3
- EMUPS3 : émulation d'une Dualshock 3, pour PS3
- EMU360 : émulation d'une manette de Xbox 360, pour Xbox 360
- EMUPS4 : émulation d'une manette Hori Pad FPS Plus, pour PS4 (avec support du touchpad)
- EMUXONE : émulation d'une manette de Xbox One, pour Xbox One
- EMUG29PS4 : émulation d'un volant de jeu Logitech G29, pour PS4, avec support du retour de force
- EMUG27PS3 : émulation d'un volant de jeu Logitech G27, pour PS3, avec support du retour de force
- EMUGTFPS2: émulation d'un volant Logitech GT Force emulation, pour PS2, avec support du retour de force
- EMUDFPS2: émulation d'un volant Logitech Driving Force emulation, pour PS2, avec support du retour de force
- EMUDFPPS2: émulation d'un volant Logitech Driving Force Pro emulation, pour PS2, avec support du retour de force
- EMUG27PC : émulation d'un volant de jeu Logitech G27, pour PC, avec support du retour de force
Teensy boards
Teensy boards can be easily flashed using the Teensy Loader.
It is probably the easier to use flashing tool, but it is only compatible with genuine teensy boards.
Cheap Arduino-compatible atmega32u4-based boards
Using the Arduino Builder tool
- Download the Arduino Leonardo drivers and save them into the same folder:
- Right-click on the arduino.inf file and click on Install.
- Make sure that the USB to UART board (e.g. CP2102) is connected and powered, and that the wiring with the atmega32u4 board is correct.
- Make sure that the atmega32u4 board is connected and powered.
- Download the Arduino Builder tool and extract the archive (using 7zip).
- Run ArduinoBuilder.exe.
- Click on "Load Sketch / HEX", and select the desired atmega32u4.hex firmware.
- Click on "Board Type" and select "Arduino Leonardo".
- Click on the COM port that matches the "Silicon Labs CP210x ... (COMX)" COM port in the device manager (or whatever the name of your USB to UART board is). This is a trick to make the Arduino Builder tool look for a new COM port.
- The following message should appear: "Forcing reset using 1200bps open/close on COMX...".
- Quickly unplug/replug the atmega32u4 board, or connect RST to GND twice.
- The atmega32u4 board should run the bootloader. The Arduino builder tool should find the Arduino Leonardo COM port and flash the firmware.
Upon success a "Uploading completed!" message should be displayed.
Using Avrdude
- Download the Arduino Leonardo drivers and save them into the same folder:
- Right-click on the arduino.inf file and click on Install.
- Make sure that the USB to UART board (e.g. CP2102) is connected and powered, and that the wiring with the atmega32u4 board is correct.
- Make sure that the atmega32u4 board is connected and powered.
- Download the Arduino Builder tool and extract the archive (using 7zip).
- Press shift and right-click into the bin folder, and click on "Open command window here".
- Type the following text but don't press enter:
avrdude -p atmega32u4 -c avr109 -P COM7 -D -U flash:w:<path to atmega32u4.hex>:i
- Make sure to replace "<path to atmega32u4.hex>" in the command line with the location of the firmware to load (for example: C:\Users\YourUserName\Downloads\firmwares-5.0\EMUPS4\atmega32u4.hex).
- Move the cursor right after COM7.
- Open the device manager, and unfold the COM port item.
- Quickly unplug/replug the atmega32u4 board, or connect RST to GND twice.
- The atmega32u4 board should run the bootloader. As soon as you see it appearing in the device manager, change the COM port number in the CMD window and press enter.
- The bootloader is executed very briefly. You may have to make a few attempts before the firmware gets loaded correctly!
In GNU/Linux, the avrdude command is:
avrdude -p atmega32u4 -c avr109 -P /dev/ttyACM0 -D -U flash:w:atmega32u4.hex:i
(make sure to adjust the port and the file)
Other tools
Plusieurs outils peuvent être utilisés pour charger le fichier .hex :
- Teensy loader (seulement compatible avec les cartes Teensy officielles)
- outils Flip d'Atmel (non compatible avec les cartes Teensy officielles)
- outil en ligne de commande dfu-programmer (non compatible avec les cartes Teensy officielles)
exemple de ligne de commande pour dfu-programmer :
  sudo dfu-programmer at90usb162 erase
  sudo dfu-programmer at90usb162 flash at90usb162.hex
  sudo dfu-programmer at90usb162 reset
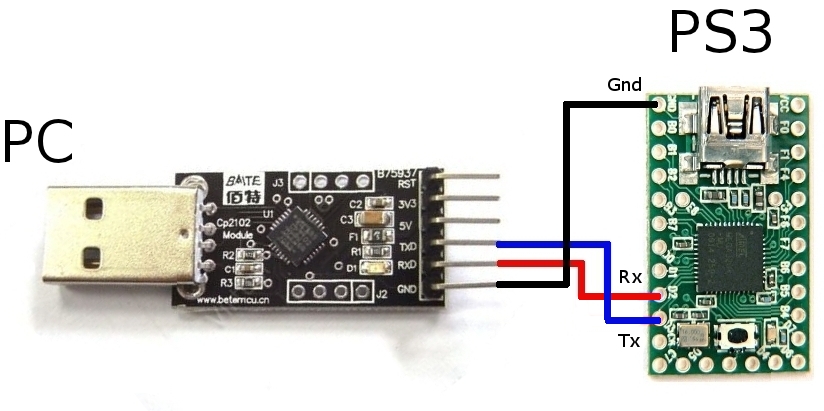
Câblage
Il faut simplement connecter les pins suivants :
| USB dev board | USB to UART board |
| GND | GND |
| RX | TX / TXO / RXD |
| TX | RX / RXI / TXD |
Avec un Teensy 2.0 :
| Teensy 2.0 | USB to UART board |
| GND | GND |
| D2 | TX / TXO / RXD |
| D3 | RX / RXI / TXD |
Si vous utilisez le convertisseur USB série d'un arduino, Rx et Tx sont inversés, cad Rx = TX▶ et Tx = RX◀
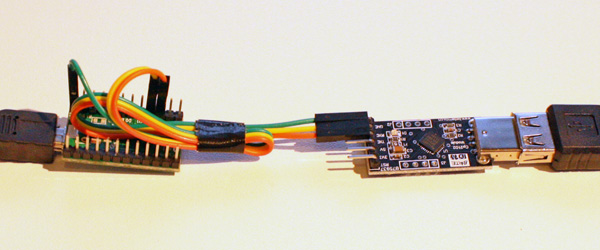
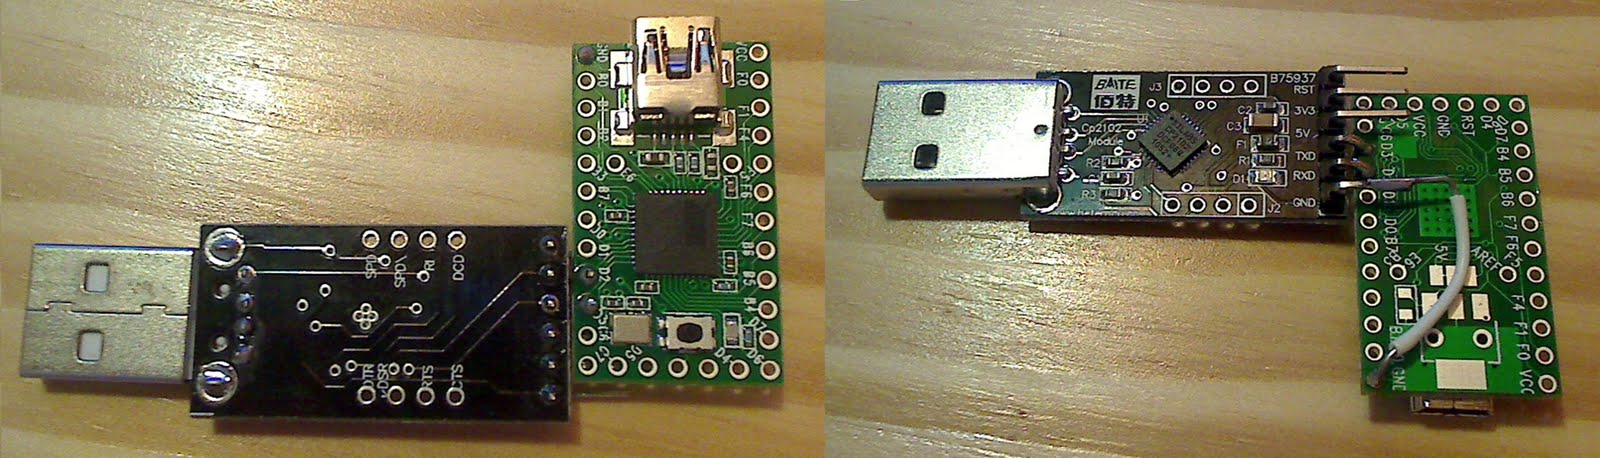
L'exemple ci-dessous montre comment connecter un convertisseur CP2102 (à gauche) à un Teensy 2.0 (à droite) :
Il est possible de souder des fils ou bien d'utiliser des "jumper wires" (fils de connexion qui sont généralement fournis avec les convertisseurs USB - série) dans le cas où la carte AVR USB a des connecteurs ("header pins").
Exemples:
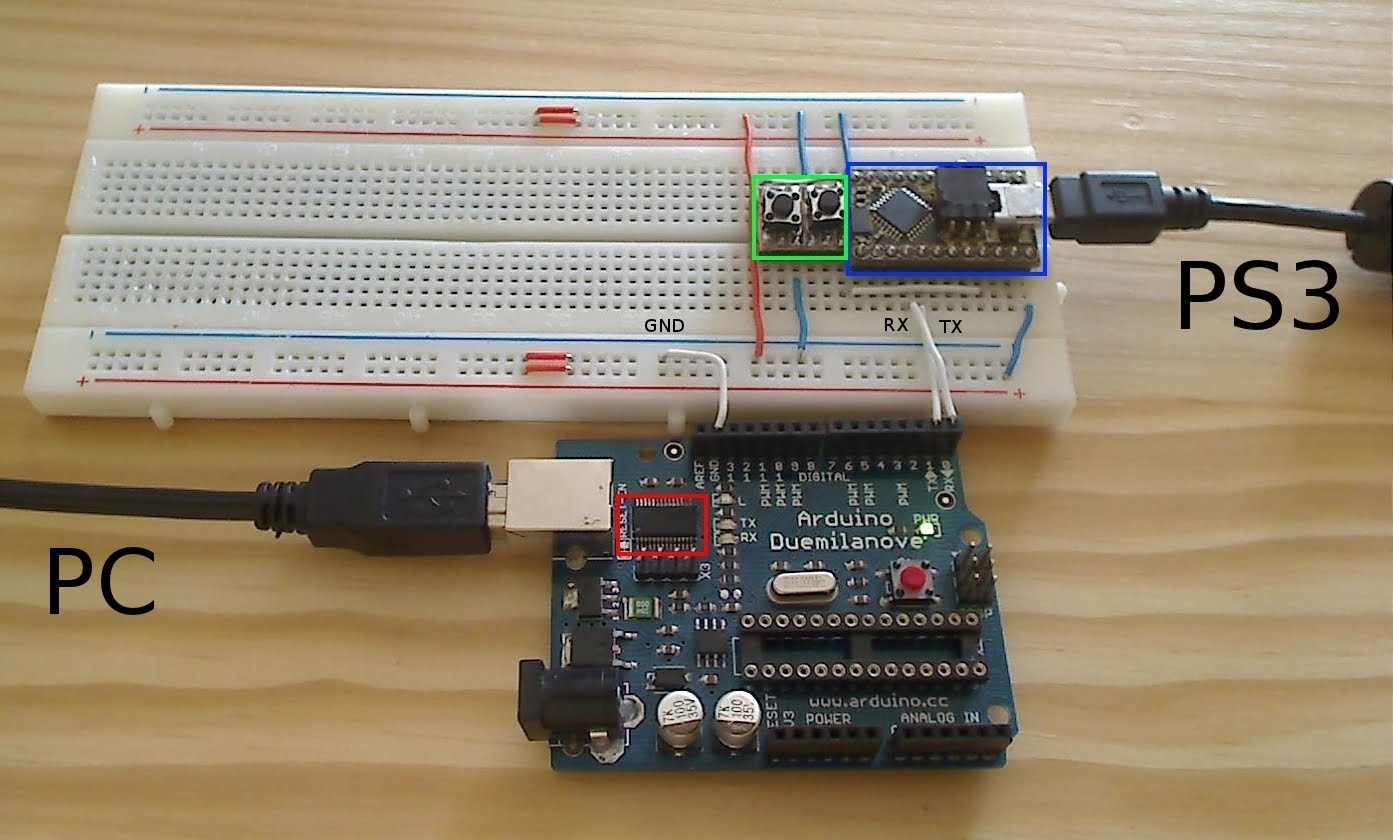
- Bumble-b et FT232RL connectés sur une breadboard :
- Teensy++ et CP2102 connectés sur une breadboard :
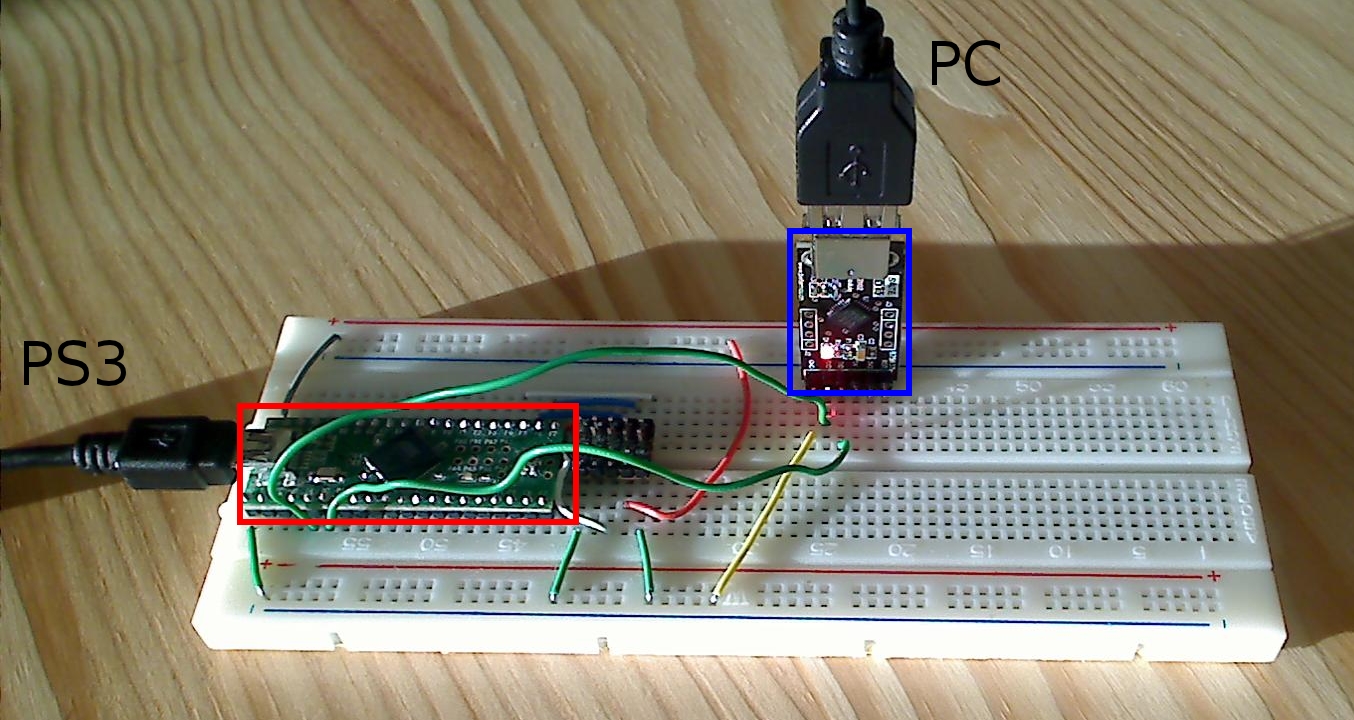
- Teensy 2.0 et CP2102 soudés :
Connexion
Si ce n'est pas déjà fait, installez GIMX.
Connectez le convertisseur USB - série au PC, et la carte de dev USB à la PS3.
Allumez la console (le bouton ps/guide ne fonctionne pas à cet instant).
La console devrait détecter une manette (si vous ajoutez une autre manette, elle devrait être détectée comme manette n°2).
Démarrez gimx-launcher:
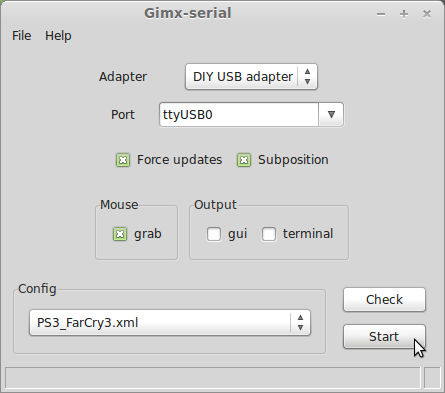
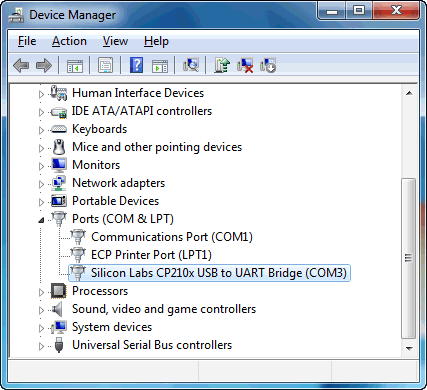
Sous Ubuntu/Linux, le convertisseur USB - série devrait être détecté comme "ttyUSBX" (avec 'X' un numéro).
Sous Windows, il devrait être détecté comme "COMX" (avec 'X' un numéro). Vérifiez le numéro dans le gestionnaire de périphériques.