Difference between revisions of "Mouse Calibration/ja"
Blackwhite (talk | contribs) (Created page with "==段階的な手順==") |
Blackwhite (talk | contribs) (Created page with "# すべての値はマウスホイールで上下します。 # F1 : 複数のマウスを使っている場合は、設定するマウスを選択することができます...") |
||
| Line 24: | Line 24: | ||
==段階的な手順== | ==段階的な手順== | ||
| − | # | + | # すべての値はマウスホイールで上下します。 |
| − | # | + | # F1 : 複数のマウスを使っている場合は、設定するマウスを選択することができます。 |
| − | # | + | # F2 : 設定するプロファイルを選択します。(通常は、プロファイル1を腰だめに、プロファイル2を ADS に使用します) |
| − | # | + | # F3 : X 軸のデッドゾーンを設定します。値を下げて照準が動かなくなるようにし、次に動くようになる最初の値まで上げてください。 |
| − | # | + | # F4 : Y 軸のデッドゾーンを設定します。 X 軸と同様にしてください。 |
| − | # | + | # F5 : デッドゾーンの形状を設定します。「矩形(rectangle)」に設定して照準が動くようなら「円形(circle)」を選択してください。逆に「円形」で動くようなら「矩形」にしてください。 |
| − | # | + | # F6 : マウスの変換テストを行います。異なる速度で左右に照準が動くので、元の位置に戻るかを確認してください。戻らないようなら F7, F8 の設定に進んでください。 |
| − | # | + | # F7 : X 軸の加速を設定します。 |
| − | # | + | # F8 : Y 軸の加速を設定します。 |
| − | # | + | # F9 : 感度を設定します。好みの動きになるよう値を設定してください。 |
| + | # F10 : 円運動テストを行います。もし必要なら、 F10, F11 で円運動の角度と速度を設定してください。照準の動きが真円を描くようなら x/y 軸の比率は適切に設定されています。もしそうでなければ、F12 で比率を変更して下さい。wheel. | ||
| + | # ctrl+F1 で保存して終了します。 | ||
Revision as of 11:06, 15 July 2012
Contents
マウスの補正をする前に
ゲーム内の感度を最高に設定してください。そして、マウスのdpiも(選べるなら)一番高いものに設定してください。
マウス補正の開始
gimx-bluetooth (か gimx-serial) を起動し、Output の項にある GUI をチェックして、エミュレーションを開始してください。
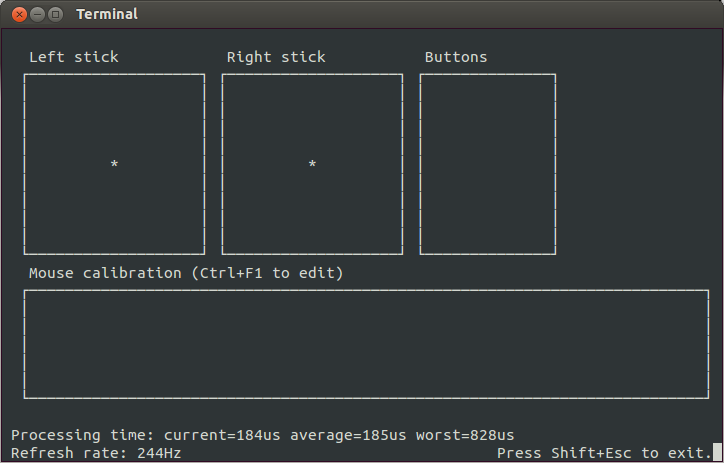
現在のマウス補正の設定が GUI 内の "Mouse calibration" に表示されています。
設定はコンフィグファイルから値が読み込まれます。
もし複数のマウスを使っている場合、必要に応じてそれぞれの設定を行うことができます。
全般的な手順
ctrl + F1 を押すと、補正の設定を開始します。
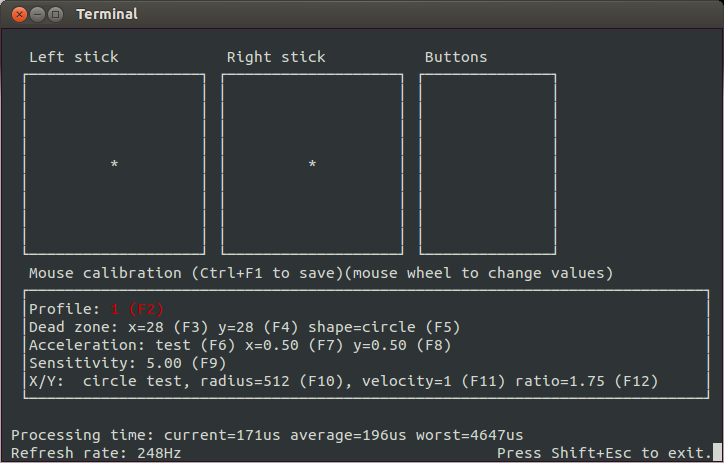
F1 ~ F12 のキーでパラメータを選び、マウスホイールで値が変更出来ます。
もう一度 ctrl + F1 を押すことで、値がセーブされ補正設定を終了します。
段階的な手順
- すべての値はマウスホイールで上下します。
- F1 : 複数のマウスを使っている場合は、設定するマウスを選択することができます。
- F2 : 設定するプロファイルを選択します。(通常は、プロファイル1を腰だめに、プロファイル2を ADS に使用します)
- F3 : X 軸のデッドゾーンを設定します。値を下げて照準が動かなくなるようにし、次に動くようになる最初の値まで上げてください。
- F4 : Y 軸のデッドゾーンを設定します。 X 軸と同様にしてください。
- F5 : デッドゾーンの形状を設定します。「矩形(rectangle)」に設定して照準が動くようなら「円形(circle)」を選択してください。逆に「円形」で動くようなら「矩形」にしてください。
- F6 : マウスの変換テストを行います。異なる速度で左右に照準が動くので、元の位置に戻るかを確認してください。戻らないようなら F7, F8 の設定に進んでください。
- F7 : X 軸の加速を設定します。
- F8 : Y 軸の加速を設定します。
- F9 : 感度を設定します。好みの動きになるよう値を設定してください。
- F10 : 円運動テストを行います。もし必要なら、 F10, F11 で円運動の角度と速度を設定してください。照準の動きが真円を描くようなら x/y 軸の比率は適切に設定されています。もしそうでなければ、F12 で比率を変更して下さい。wheel.
- ctrl+F1 で保存して終了します。