Difference between revisions of "RPi"
(→Hardware requirements) |
|||
(39 intermediate revisions by 5 users not shown) | |||
| Line 2: | Line 2: | ||
<translate> | <translate> | ||
<!--T:1--> | <!--T:1--> | ||
| − | '''Warning: RPi support should be considered as experimental. Be prepared to face issues if you try GIMX on the RPi.''' | + | '''Warning: RPi support should be considered as experimental. The USB controller has been unstable since the first version. Be prepared to face issues if you try GIMX on the RPi.''' |
GIMX can run on many Linux targets, and the [http://www.raspberrypi.org/ the Raspberry Pi] is one of them! | GIMX can run on many Linux targets, and the [http://www.raspberrypi.org/ the Raspberry Pi] is one of them! | ||
| − | |||
| − | |||
| − | |||
| − | |||
| − | |||
| − | |||
| − | |||
| − | + | == Setup using pre-made image == <!--T:23--> | |
| − | |||
| − | + | <!--T:24--> | |
| − | + | The simplest way to set up GIMX on a Raspberry Pi is by flashing a pre-made image. See forum user steel_3d's instructions on getting up and running: [http://www.steve-marton.com/gimx/?p=462 Build your own Plug n Play GIMX emulator using Raspberry Pi] | |
| − | == | + | == Hardware considerations == <!--T:23--> |
| − | |||
| − | |||
| − | |||
| − | |||
| − | |||
| − | |||
| − | |||
| − | |||
| − | |||
| − | |||
| − | |||
| − | <!--T: | + | <!--T:24--> |
| − | + | Use a USB HUB only if there are no ports available on the RPi.<br /> | |
| − | + | It is highly recommended to use a HUB with an external power supply. | |
| − | + | ||
| − | < | + | == USB adapter using the on-board UART interface == <!--T:6--> |
| − | + | ||
| − | + | === Hardware requirements === <!--T:25--> | |
| − | + | ||
| − | < | + | <!--T:26--> |
| − | + | The on-board UART runs at 0V/3.3V levels, and the AVR USB board has to run at 5V to operate at 16MHz (running at 3.3V would only allow to operate at 8MHz).<br /> | |
| − | + | Connecting the RPi and the AVR USB board directly may damage the hardware!<br /> | |
| − | + | One cheap solution is to use a voltage divider:<br /> | |
| − | + | * Connect both GNDs | |
| − | <pre>sudo | + | * It's safe to connect the TXD pin of the RPi to the Rx pin of the AVR USB board (the GIMX firmwares configure the Rx pin as an input) |
| − | + | * To connect the Tx pin of the AVR USB board to the RXD pin of the RPi, you'll need to convert the voltage level from 0..5V to 0..3.3V.<br /> | |
| − | <pre> | + | This can be done with a simple resistive divider: |
| − | + | <div class="image200px">[https://gimx.fr/img/wiki/Resistive_divider.png https://gimx.fr/img/wiki/Resistive_divider.png]</div> | |
| − | + | Vin is the Tx pin of the AVR USB board, Vout is the RXD pin of the RPi, R1=2.2kΩ , R2=3.3kΩ | |
| − | + | * Do not connect any other pin! | |
| − | + | ||
| − | + | === Sotware adjustments === <!--T:15--> | |
| − | <pre> | + | |
| − | + | <!--T:17--> | |
| − | + | By default, the RPi UART is configured as a serial console.<br /> | |
| − | + | Disable this serial console using raspi-config: | |
| − | <pre>sudo | + | <pre> |
| − | + | sudo raspi-config | |
| − | + | </pre> | |
| − | + | Then select: | |
| − | + | <pre> | |
| + | "Advanced Options", "Serial", "No", "Finish" | ||
| + | </pre> | ||
| + | The default configuration does not allow high baudrates.<br /> | ||
| + | Enable high baudrates editing /boot/config.txt: | ||
| + | <pre> | ||
| + | sudo nano /boot/config.txt | ||
| + | </pre> | ||
| + | Add the following line at the end of the file: | ||
| + | <pre> | ||
| + | init_uart_clock=8000000 | ||
| + | </pre> | ||
| + | Reboot to apply the changes: | ||
| + | <pre> | ||
| + | sudo reboot | ||
| + | </pre> | ||
== GIMX installation == <!--T:7--> | == GIMX installation == <!--T:7--> | ||
| − | <pre> | + | <pre>wget https://gimx.fr/download/gimx-raspbian -O gimx.deb |
| − | wget | + | sudo dpkg -i gimx.deb |
| − | sudo | + | sudo apt-get update && sudo apt-get -f install</pre> |
<!--T:8--> | <!--T:8--> | ||
If you get a "Dependency is not satisfiable: ..." error message, upgrade Raspbian: | If you get a "Dependency is not satisfiable: ..." error message, upgrade Raspbian: | ||
| − | <pre>sudo apt-get update && sudo apt-get upgrade</pre> | + | <pre>sudo apt-get update && sudo apt-get upgrade |
| + | sudo apt-get -f install</pre> | ||
== Stop/disable triggerhappy service == <!--T:9--> | == Stop/disable triggerhappy service == <!--T:9--> | ||
| Line 86: | Line 83: | ||
== Run GIMX == <!--T:12--> | == Run GIMX == <!--T:12--> | ||
Read the [[Quick_Start|Quick start page]] to learn how to run GIMX through the GUI.<br /> | Read the [[Quick_Start|Quick start page]] to learn how to run GIMX through the GUI.<br /> | ||
| − | A good idea is to run GIMX directly from a terminal, without starting a graphical session | + | |
| − | + | A good idea is to run GIMX directly from a terminal, without starting a graphical session, which can be done over the network, using a ssh client, or you can [[#Autostart GIMX at boot without GUI]]<br /> | |
| − | Ideally, GIMX should be launched without using the Ethernet port (because it is connected on the USB bus).<br /> | + | |
| + | Ideally, GIMX should be launched without using the Ethernet port (because it is connected on the USB bus). However, this doesn't seem to cause any issues generally.<br /> | ||
| + | |||
More details on command line options on [[Command_line|this page]].<br /> | More details on command line options on [[Command_line|this page]].<br /> | ||
| − | |||
| − | |||
| − | |||
| − | |||
| − | == | + | The GUI will help you download the config xmls. If you never run the GUI, you MUST grab the Linux config xmls from here: https://github.com/matlo/GIMX-configurations/tree/master/Linux The Windows xmls are NOT compatible!<br /> |
| − | + | ||
| − | + | == Autostart GIMX at boot without GUI == <!--T:28--> | |
| + | Simply create a file /etc/systemd/system/gimx.service (as root): | ||
| + | |||
| + | <pre> | ||
| + | sudo nano /etc/systemd/system/gimx.service | ||
| + | </pre> | ||
| + | |||
| + | With the following contents: | ||
| + | |||
| + | <!--T:29--> | ||
| + | <pre> | ||
| + | [Unit] | ||
| + | Description=GIMX | ||
| + | After=syslog.target network.target | ||
| + | |||
| + | <!--T:30--> | ||
| + | [Service] | ||
| + | User=pi | ||
| + | Type=simple | ||
| + | # Replace /dev/ttyUSB0 with /dev/ttyAMA0 when using the on-board UART interface | ||
| + | ExecStart=/usr/bin/gimx -p /dev/ttyUSB0 -c LogitechDrivingForceGT_G29.xml --nograb | ||
| + | Restart=always | ||
| + | RestartSec=5 | ||
| + | <!--T:31--> | ||
| + | [Install] | ||
| + | WantedBy=multi-user.target | ||
| + | </pre> | ||
| − | + | <!--T:32--> | |
| + | Replace ttyUSB0 with your device (/dev/ttyAMA0 when using the on-board UART interface) and LogitechDrivingForceGT_G29.xml with your mapping file (which should be available in the pi home directory as /home/pi/.gimx/config/LogitechDrivingForceGT_G29.xml) | ||
| − | + | <!--T:33--> | |
| + | Run <pre>sudo systemctl daemon-reload</pre> to notify systemd about the new file and <pre>sudo systemctl enable gimx && sudo systemctl start gimx</pre> to enable the gimx service start at boot and start it in the same line. | ||
| − | + | == Notify when GIMX is running using a led == <!--T:34--> | |
| − | + | In order to have a proper confirmation about if the gimx service is up and running, you can add a simple python script that turns a led on if the gimx service is running. | |
| − | |||
| − | |||
| − | |||
| − | |||
| − | |||
| − | |||
| − | |||
| − | |||
| − | + | <!--T:35--> | |
| + | The file will be located at /home/pi/blink.py: | ||
| − | + | <pre>sudo nano blink.py</pre> | |
| − | + | With the following contents: | |
| − | |||
| − | |||
| − | |||
| − | |||
| − | |||
| − | |||
| − | <!--T: | + | <!--T:36--> |
| − | |||
| − | |||
<pre> | <pre> | ||
| − | sudo | + | #!/usr/bin/python |
| + | import os | ||
| + | import time | ||
| + | import RPi.GPIO as GPIO | ||
| + | |||
| + | <!--T:37--> | ||
| + | led = 23 | ||
| + | button = 18 | ||
| + | GPIO.setmode(GPIO.BCM) | ||
| + | GPIO.setup(led, GPIO.OUT) | ||
| + | GPIO.setup(button, GPIO.IN, pull_up_down = GPIO.PUD_UP) | ||
| + | |||
| + | <!--T:38--> | ||
| + | def Shutdown(channel): | ||
| + | GPIO.output(led, True) | ||
| + | time.sleep(0.2) | ||
| + | GPIO.output(led, False) | ||
| + | time.sleep(0.2) | ||
| + | GPIO.output(led, True) | ||
| + | time.sleep(0.2) | ||
| + | GPIO.output(led, False) | ||
| + | os.system("sudo shutdown -h now") | ||
| + | |||
| + | <!--T:39--> | ||
| + | GPIO.add_event_detect(18, GPIO.FALLING, callback = Shutdown, bouncetime = 2000) | ||
| + | |||
| + | <!--T:40--> | ||
| + | while True: | ||
| + | found = False | ||
| + | time.sleep(5) | ||
| + | pids = [pid for pid in os.listdir('/proc') if pid.isdigit()] | ||
| + | for pid in pids: | ||
| + | try: | ||
| + | cmd = open(os.path.join('/proc', pid, 'cmdline'), 'rb').read() | ||
| + | if "gimx" in cmd: | ||
| + | found = True | ||
| + | except IOError: # proc has already terminated | ||
| + | continue | ||
| + | if found == True: | ||
| + | GPIO.output(led, True) | ||
| + | else: | ||
| + | GPIO.output(led, False) | ||
</pre> | </pre> | ||
| − | + | ||
| − | + | <!--T:41--> | |
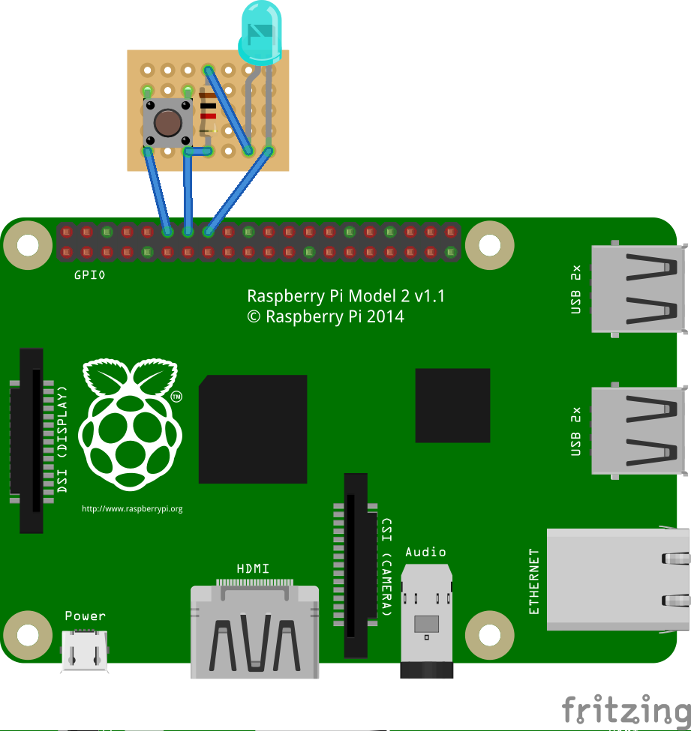
| + | As a bonus, you can add a button so when it is pressed, there is a little blink effect, and the pi is shutted down. | ||
| + | |||
| + | <!--T:42--> | ||
| + | <div class="image200px">[https://gimx.fr/img/wiki/PiButtonLed.png https://gimx.fr/img/wiki/PiButtonLed.png]</div> | ||
| + | |||
| + | <!--T:43--> | ||
| + | To start at boot, simply add it to the pi user crontab (crontab -e) as <pre>@reboot python /home/pi/blink.py &</pre> | ||
| + | |||
| + | == Powering on AVR and RPi simultaneously using the on-board UART interface == <!--T:44--> | ||
| + | In case you want to power up AVR (Tested on Pro Micro ATmega32u4) and RPi at once (i.e. using PS4 USB port and a USB Y Splitter) using the on-board UART interface, you will need the adjust shown below in order to reset the AVR board from RPi once started. | ||
| + | |||
| + | <!--T:45--> | ||
| + | It is planned to solve this issue on GIMX 8 version [https://github.com/matlo/GIMX/issues/426] | ||
| + | |||
| + | <!--T:46--> | ||
| + | More details on support forum thread [https://gimx.fr/forum/viewtopic.php?f=5&t=1672] | ||
| + | |||
| + | <!--T:47--> | ||
| + | '''Physically''' | ||
| + | * RPi's PIN40 / GPIO21 connected to ATmega32u4 RST pin directly. (Any RPi GPIO pin should works) | ||
| + | |||
| + | <!--T:48--> | ||
| + | '''Logically''' | ||
| + | * New bash script created /home/pi/resetArduino.sh with content shown below: | ||
<pre> | <pre> | ||
| − | + | #!/bin/bash | |
| + | |||
| + | echo 21 > /sys/class/gpio/export | ||
| + | sleep 1 | ||
| + | echo out > /sys/class/gpio/gpio21/direction | ||
| + | sleep 1 | ||
| + | echo 1 > /sys/class/gpio/gpio21/value | ||
| + | sleep 1 | ||
| + | echo 0 > /sys/class/gpio/gpio21/value | ||
| + | sleep 1 | ||
| + | echo 1 > /sys/class/gpio/gpio21/value | ||
| + | |||
| + | exit 0 | ||
</pre> | </pre> | ||
| − | + | * Grant execution permissions | |
| − | + | <pre>chmod +x /home/pi/resetArduino.sh</pre> | |
| + | * Add the new script to boot sequence (like we do with blink.py program) | ||
<pre> | <pre> | ||
| − | + | pi@raspberrypi:~ $ crontab -l | |
| − | + | @reboot /home/pi/resetArduino.sh && python /home/pi/blink.py & | |
| − | |||
| − | |||
| − | |||
| − | |||
| − | |||
| − | |||
| − | |||
| − | |||
| − | |||
| − | |||
| − | |||
| − | |||
| − | |||
| − | |||
| − | |||
| − | |||
| − | |||
| − | |||
| − | |||
| − | |||
</pre> | </pre> | ||
| − | + | Using this configuration, GIMX is able to start correctly on its first attempt when RPi and ATmega32u4 are powered on from PS4 simultaneously using GPIO instead of CP2102 USB UART. | |
| − | + | ||
| − | |||
| − | |||
</translate> | </translate> | ||
Revision as of 11:30, 16 March 2019
Warning: RPi support should be considered as experimental. The USB controller has been unstable since the first version. Be prepared to face issues if you try GIMX on the RPi.
GIMX can run on many Linux targets, and the the Raspberry Pi is one of them!
Contents
- 1 Setup using pre-made image
- 2 Hardware considerations
- 3 USB adapter using the on-board UART interface
- 4 GIMX installation
- 5 Stop/disable triggerhappy service
- 6 Run GIMX
- 7 Autostart GIMX at boot without GUI
- 8 Notify when GIMX is running using a led
- 9 Powering on AVR and RPi simultaneously using the on-board UART interface
Setup using pre-made image
The simplest way to set up GIMX on a Raspberry Pi is by flashing a pre-made image. See forum user steel_3d's instructions on getting up and running: Build your own Plug n Play GIMX emulator using Raspberry Pi
Hardware considerations
Use a USB HUB only if there are no ports available on the RPi.
It is highly recommended to use a HUB with an external power supply.
USB adapter using the on-board UART interface
Hardware requirements
The on-board UART runs at 0V/3.3V levels, and the AVR USB board has to run at 5V to operate at 16MHz (running at 3.3V would only allow to operate at 8MHz).
Connecting the RPi and the AVR USB board directly may damage the hardware!
One cheap solution is to use a voltage divider:
- Connect both GNDs
- It's safe to connect the TXD pin of the RPi to the Rx pin of the AVR USB board (the GIMX firmwares configure the Rx pin as an input)
- To connect the Tx pin of the AVR USB board to the RXD pin of the RPi, you'll need to convert the voltage level from 0..5V to 0..3.3V.
This can be done with a simple resistive divider:
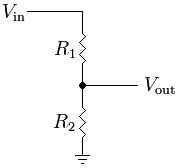
Vin is the Tx pin of the AVR USB board, Vout is the RXD pin of the RPi, R1=2.2kΩ , R2=3.3kΩ
- Do not connect any other pin!
Sotware adjustments
By default, the RPi UART is configured as a serial console.
Disable this serial console using raspi-config:
sudo raspi-config
Then select:
"Advanced Options", "Serial", "No", "Finish"
The default configuration does not allow high baudrates.
Enable high baudrates editing /boot/config.txt:
sudo nano /boot/config.txt
Add the following line at the end of the file:
init_uart_clock=8000000
Reboot to apply the changes:
sudo reboot
GIMX installation
wget https://gimx.fr/download/gimx-raspbian -O gimx.deb
sudo dpkg -i gimx.deb
sudo apt-get update && sudo apt-get -f install
If you get a "Dependency is not satisfiable: ..." error message, upgrade Raspbian:
sudo apt-get update && sudo apt-get upgrade
sudo apt-get -f install
Stop/disable triggerhappy service
Triggerhappy is a daemon that opens every input device for reading, and that consumes a few percent of the CPU time.
It seems a good idea to stop it while running GIMX.
To stop triggerhappy:
sudo service triggerhappy stop
To disable triggerhappy:
sudo update-rc.d triggerhappy disable
Run GIMX
Read the Quick start page to learn how to run GIMX through the GUI.
A good idea is to run GIMX directly from a terminal, without starting a graphical session, which can be done over the network, using a ssh client, or you can #Autostart GIMX at boot without GUI
Ideally, GIMX should be launched without using the Ethernet port (because it is connected on the USB bus). However, this doesn't seem to cause any issues generally.
More details on command line options on this page.
The GUI will help you download the config xmls. If you never run the GUI, you MUST grab the Linux config xmls from here: https://github.com/matlo/GIMX-configurations/tree/master/Linux The Windows xmls are NOT compatible!
Autostart GIMX at boot without GUI
Simply create a file /etc/systemd/system/gimx.service (as root):
sudo nano /etc/systemd/system/gimx.service
With the following contents:
[Unit]
Description=GIMX
After=syslog.target network.target

[Service]
User=pi
Type=simple
# Replace /dev/ttyUSB0 with /dev/ttyAMA0 when using the on-board UART interface
ExecStart=/usr/bin/gimx -p /dev/ttyUSB0 -c LogitechDrivingForceGT_G29.xml --nograb
Restart=always
RestartSec=5

[Install]
WantedBy=multi-user.target
Replace ttyUSB0 with your device (/dev/ttyAMA0 when using the on-board UART interface) and LogitechDrivingForceGT_G29.xml with your mapping file (which should be available in the pi home directory as /home/pi/.gimx/config/LogitechDrivingForceGT_G29.xml)
Run
sudo systemctl daemon-reload
to notify systemd about the new file and
sudo systemctl enable gimx && sudo systemctl start gimx
to enable the gimx service start at boot and start it in the same line.
Notify when GIMX is running using a led
In order to have a proper confirmation about if the gimx service is up and running, you can add a simple python script that turns a led on if the gimx service is running.
The file will be located at /home/pi/blink.py:
sudo nano blink.py
With the following contents:
#!/usr/bin/python
import os
import time
import RPi.GPIO as GPIO

led = 23
button = 18
GPIO.setmode(GPIO.BCM)
GPIO.setup(led, GPIO.OUT)
GPIO.setup(button, GPIO.IN, pull_up_down = GPIO.PUD_UP)

def Shutdown(channel):
  GPIO.output(led, True)
  time.sleep(0.2)
  GPIO.output(led, False)
  time.sleep(0.2)
  GPIO.output(led, True)
  time.sleep(0.2)
  GPIO.output(led, False)
  os.system("sudo shutdown -h now")

GPIO.add_event_detect(18, GPIO.FALLING, callback = Shutdown, bouncetime = 2000)

while True:
  found = False
  time.sleep(5)
  pids = [pid for pid in os.listdir('/proc') if pid.isdigit()]
  for pid in pids:
    try:
      cmd = open(os.path.join('/proc', pid, 'cmdline'), 'rb').read()
      if "gimx" in cmd:
        found = True
    except IOError: # proc has already terminated
      continue
  if found == True:
    GPIO.output(led, True)
  else:
    GPIO.output(led, False)
As a bonus, you can add a button so when it is pressed, there is a little blink effect, and the pi is shutted down.
To start at boot, simply add it to the pi user crontab (crontab -e) as
@reboot python /home/pi/blink.py &
Powering on AVR and RPi simultaneously using the on-board UART interface
In case you want to power up AVR (Tested on Pro Micro ATmega32u4) and RPi at once (i.e. using PS4 USB port and a USB Y Splitter) using the on-board UART interface, you will need the adjust shown below in order to reset the AVR board from RPi once started.
It is planned to solve this issue on GIMX 8 version [1]
More details on support forum thread [2]
Physically
- RPi's PIN40 / GPIO21 connected to ATmega32u4 RST pin directly. (Any RPi GPIO pin should works)
Logically
- New bash script created /home/pi/resetArduino.sh with content shown below:
#!/bin/bash

echo 21 > /sys/class/gpio/export
sleep 1
echo out > /sys/class/gpio/gpio21/direction
sleep 1
echo 1 > /sys/class/gpio/gpio21/value
sleep 1
echo 0 > /sys/class/gpio/gpio21/value
sleep 1
echo 1 > /sys/class/gpio/gpio21/value

exit 0
- Grant execution permissions
chmod +x /home/pi/resetArduino.sh
- Add the new script to boot sequence (like we do with blink.py program)
pi@raspberrypi:~ $ crontab -l
@reboot /home/pi/resetArduino.sh && python /home/pi/blink.py &
Using this configuration, GIMX is able to start correctly on its first attempt when RPi and ATmega32u4 are powered on from PS4 simultaneously using GPIO instead of CP2102 USB UART.