DIY USB adapter for dummies
http://gimx.fr/img/screenshots/tuto/gfd/gfd-header.png
This tutorial focuses on simplicity and easiness. If you want more details, please read the DIY_USB_adapter page.
Welcome to the straight-to-the-point tutorial on how to build the GIMX PC to PS3/360 USB adapter, solderless!
Everything you need to know to build and get started with the adapter is covered here if you read it carefully!
I suggest you read it through at least once, just to have a heads up on what you're going to do.
Contents
Get the required parts
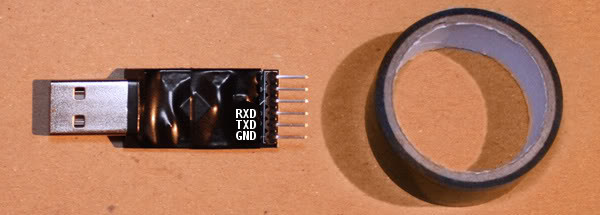
- It should come with a set of cables and look like this:
http://gimx.fr/img/screenshots/tuto/gfd/gfd-cp2102.jpg
- You need the one with pins to be able to connect everything without soldering.
And if you don't already have it, you need to get some USB cables, like these:
- Mini USB A Male to USB B 5 Pin Male Retractable Cable
- USB Male to Female Extension Retractable Cable
Optional:
- A project box to contain all the parts.
- I'll be using a match box for this tutorial. Another popular DIY project box is an empty Altoids tin for example.
- Electrical tape
- For insulating or securing parts and cables in place. Regular adhesive tape should work as well.
- Rubber band
- For bundling everything up - easy to undo and redo if you don't get it right the first time.
And hopefully you have some basic tools like a hobby/utility knife or scissors laying around.
http://gimx.fr/img/screenshots/tuto/gfd/gfd-parts.jpg
Download the required software, firmware and drivers
Windows
- Joystick: 16bit stick axes, for PS3
- EMUPS3: Sixaxis emulation, for PS3
- EMU360: 360 pad emulation, for Xbox 360
For easy access later on, just save/extract all the files to your desktop.
http://gimx.fr/img/screenshots/tuto/gfd/gfd-files.png
Ubuntu
- GIMX software, 32bit / GIMX software, 64bit
- See this video for some important installation instructions!
- Firmwares
- Joystick: 16bit stick axes, for PS3
- EMUPS3: Sixaxis emulation, for PS3
- EMU360: 360 pad emulation, for Xbox 360
- (You will have to follow the instructions on that page if you want to use the Teensy Loader with Ubuntu)
Assemble the adapter
To begin with, carefully check that your serial converter is exactly the same as in this tutorial.
If it is not exactly the same as in the above picture, you may have to connect different pins:
| Teensy | USB to UART board |
| GND | GND |
| D2 | TX / TXO / RXD |
| D3 | RX / RXI / TXD |
Next, I recommend you insulate the serial converter using the electrical tape if it's going to be in a tight enclosure, to avoid any shorts between it and the Teensy.
http://gimx.fr/img/screenshots/tuto/gfd/gfd-insulate.jpg
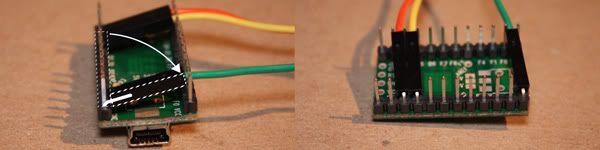
Now connect the cables as shown in the picture below. (Notice how the Teensy is placed! Pins should point left with the USB connector pointing away from you.)
http://gimx.fr/img/screenshots/tuto/gfd/gfd-cablesgohere.jpg
The next two steps are only required if you're putting the parts in a very tight enclosure and need the parts to take up as little space as possible.
1. Bend the pins with the jumper cables attached to them inwards, slowly to prevent them from snapping, and tuck the cables between the pins on the opposite side.
http://gimx.fr/img/screenshots/tuto/gfd/gfd-bend-1.jpg
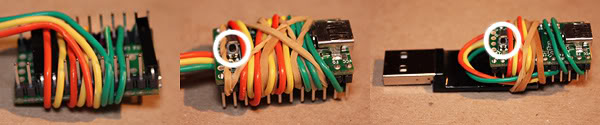
2. To save some extra space, I usually wrap the cables around the Teensy. There's no special way of doing this, so you just need to figure out what works best for your build.
Remember not to cover up the button on the Teensy as we need to press it later on. (Also, this is where the rubber band will come in handy!)
http://gimx.fr/img/screenshots/tuto/gfd/gfd-bundle.jpg
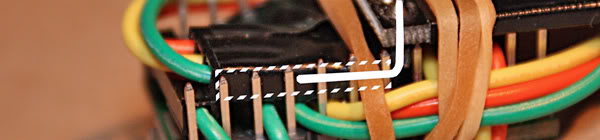
If you want, you can also place the serial converter so that the pins and jumper cables go in between the rows of pins on the Teensy. It's a very snug fit though so you should use some electrical tape to insulate the pins on the serial converter because they will touch the Teensy ones if you don't.
http://gimx.fr/img/screenshots/tuto/gfd/gfd-insulate2.jpg
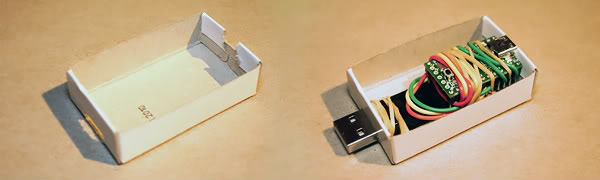
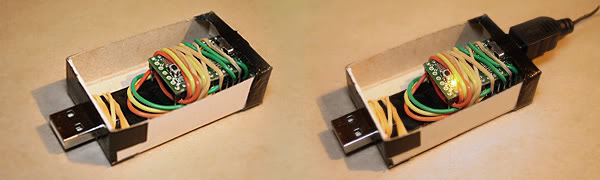
Cut some holes in your project box of choice to match the Mini USB plug on one side and regular USB plug on the other side. Do some tests and make sure everything aligns up before securing everything in place. In the picture below I've bundled everything up using the rubber band and secured it to the box with some electrical tape (double sided tape or hot glue works wonders too if you have it)
http://gimx.fr/img/screenshots/tuto/gfd/gfd-matchdapter.jpg
Voilà! You're done building the adapter.
Load the firmware onto the adapter
Connect the adapter to your computer using the USB Mini-B cable and a LED on the Teensy should turn on or start blinking.
http://gimx.fr/img/screenshots/tuto/gfd/gfd-loadfirmware.png
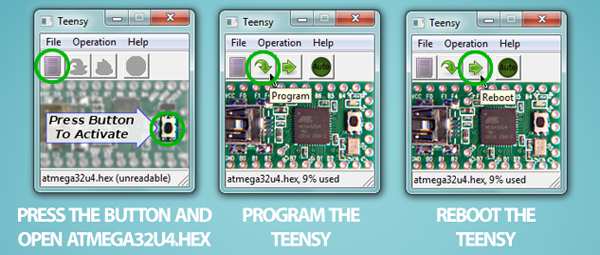
Now start up Teensy Loader (teensy.exe on your desktop) and follow these steps:
Press the button on the Teensy and the LED should turn off. In Teensy Loader, open atmega32u4.hex from the firmwares folder on your desktop. Click the Program button and you should get the message "Download Complete" Now click the Reboot button and your GIMX USB adapter is ready for use!
If the Teensy loader does not detect the device, try with another USB cable, and another USB port.
http://gimx.fr/img/screenshots/tuto/gfd/gfd-connect.jpg
NOTE! You can now unplug the USB Mini-B cable from your computer. The USB Mini-B cable will only be connected to your computer when upgrading the firmware from now on. When in use, the USB Mini-B cable is connected to your console.
Install the GIMX software
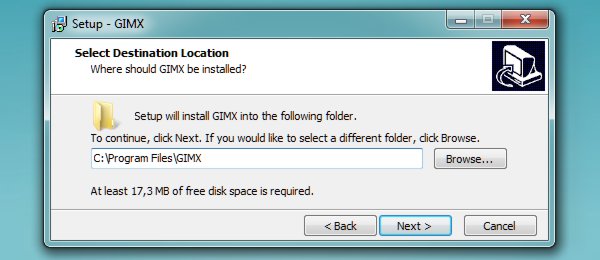
This step is pretty straight forward. Simply run setup-X.YZ.exe from your desktop and follow the installation steps, preferably with the default installation location.
http://gimx.fr/img/screenshots/tuto/gfd/gfd-setupgimx2.jpg
When the installation is done you should have three GIMX icons on your desktop.
http://gimx.fr/img/screenshots/tuto/gfd/gfd-icons.png
Configuration basics
GIMX comes pre-loaded with a few configurations, but let's take a quick look on how you can make your own configurations using the GIMX FPS Config Tool (As you can tell by the name, this is mainly meant for setting up a basic FPS configuration.)
You can also check out the Configuration Requests and Index thread for other configurations available for download, or post requests that we or the community might be able to fulfill.
NOTE!
- For Windows 32bit, downloaded configurations go in the C:\Program Files\GIMX\config folder.
- For Windows 64bit, downloaded configurations go in the C:\Program Files (x86)\GIMX\config folder.
Good to go!
That's it. You're ready to start using the GIMX USB adapter!
- Connect the regular USB side to your PC and install the serial converter drivers (CP210x_VCP_Win_XP_S2K3_Vista_7.exe on your desktop)
- This is of course only required the very first time you use the adapter!
http://gimx.fr/img/screenshots/tuto/gfd/gfd-contopc.jpg
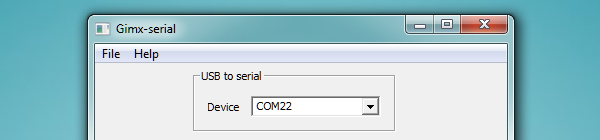
- Connect the USB Mini-B side to your console, run gimx-serial and make sure the adapter is recognized on a COM port.
- (If the Device box is blank, refer to the Support section and report the problem if a solution isn't found)
http://gimx.fr/img/screenshots/tuto/gfd/gfd-comport.jpg
- Select the config you made/downloaded from the drop down menu, click the Start button and a couple of windows should pop up to start capturing your mouse and keyboard input!
If there is a "No controller detected." error message when you start GIMX, double check you wiring, and try to invert TX and RX in case it's still not working.
http://gimx.fr/img/screenshots/tuto/gfd/gfd-selconfig.png
Now if you're in the menus of your console and press the WASD or arrow keys on your keyboard, you should be able to navigate through the menus, meaning you've succeeded! If not, or if something went wrong elsewhere, go back and make sure you followed every step to the letter and try again, then let us know if nothing you try works.
Enjoy!