Difference between revisions of "Config Editors"
| Line 17: | Line 17: | ||
==gimx-fpsconfig== <!--T:21--> | ==gimx-fpsconfig== <!--T:21--> | ||
| − | --todo: | + | |
| + | gimx-fpsconfig is a config editor that helps to use a keyboard and a mouse in FPS games.<br /> | ||
| + | This means it only allows to: | ||
| + | * bind mouse and keyboard buttons to buttons | ||
| + | * bind mouse and keyboard buttons to the left stick | ||
| + | * bind the mouse axes to the right stick and edit the translation parameters | ||
| + | * use 2 profiles (first = hip fire, second = aiming down the sights, second profile trigger is the mouse right button, with switch back enabled) | ||
| + | |||
| + | To bind a button to a button or a direction of the left stick, click on the GUI button (cross, l1, select, left stick up, etc), and click on the button (w, space, left button, etc).<br > | ||
| + | --todo: add screenshot <br /> | ||
| + | The mouse translation parameters can be edited in the bottom part of the GUI. It is advised to calibrate these parameters through the [http://gimx.fr/wiki/index.php?title=Mouse_Calibration Mouse Calibration] tool.<br /> | ||
| + | --todo: add screenshot <br /> | ||
| + | To set a label, click on menu 'Advanced>Edit Label', click on the GUI button, and set the label.<br /> | ||
| + | --todo: add screenshot <br /> | ||
| + | The label will appear in the GUI button tooltip.<br /> | ||
| + | --todo: add screenshot<br /> | ||
| + | In case the config is built from scratch (menu 'File>New'), the mouse DPI has to be set.<br /> | ||
| + | The value is used by the calibration tests that are run by the [http://gimx.fr/wiki/index.php?title=Mouse_Calibration Mouse Calibration] tool.<br /> | ||
| + | --todo: add screenshot<br /> | ||
| + | The "Convert sensitivity" GUI button allows to adjust the mouse sensitivity according to source/destination DPI values.<br /> | ||
| + | It is useful to convert a config that was built for a mouse that runs at a different DPI setting.<br /> | ||
| + | --todo: add screenshot<br /> | ||
| + | To auto bind controls according to the labels defined in a reference configuration, click on menu 'Advanced>Auto-bind controls'. The configuration to modify and the reference configuration should have labels configured.<br /> | ||
| + | --todo: add screenshot<br /> | ||
==gimx-config== <!--T:5--> | ==gimx-config== <!--T:5--> | ||
Revision as of 12:28, 16 July 2012
- gimx-config is the general purpose config editor, and the most complete of the 2 editors.
- gimx-fpsconfig is the config editor for FPS games, easier to use, but far less complete.
Contents
Notes
- gimx-config can edit configs produced by gimx-fpsconfig, and vice-versa.
- Configuration files have to be saved into:
- Ubuntu: the ~/.emuclient/config directory. ~ is the home directory. .emuclient folder is hidden (in the file manager, press ctrl+h to display hidden folders).
- Windows 32bits: the C:\Program Files\GIMX\config directory.
- Windows 64bits: the C:\Program Files (x86)\GIMX\config directory.
gimx-fpsconfig
gimx-fpsconfig is a config editor that helps to use a keyboard and a mouse in FPS games.
This means it only allows to:
- bind mouse and keyboard buttons to buttons
- bind mouse and keyboard buttons to the left stick
- bind the mouse axes to the right stick and edit the translation parameters
- use 2 profiles (first = hip fire, second = aiming down the sights, second profile trigger is the mouse right button, with switch back enabled)
To bind a button to a button or a direction of the left stick, click on the GUI button (cross, l1, select, left stick up, etc), and click on the button (w, space, left button, etc).
--todo: add screenshot
The mouse translation parameters can be edited in the bottom part of the GUI. It is advised to calibrate these parameters through the Mouse Calibration tool.
--todo: add screenshot
To set a label, click on menu 'Advanced>Edit Label', click on the GUI button, and set the label.
--todo: add screenshot
The label will appear in the GUI button tooltip.
--todo: add screenshot
In case the config is built from scratch (menu 'File>New'), the mouse DPI has to be set.
The value is used by the calibration tests that are run by the Mouse Calibration tool.
--todo: add screenshot
The "Convert sensitivity" GUI button allows to adjust the mouse sensitivity according to source/destination DPI values.
It is useful to convert a config that was built for a mouse that runs at a different DPI setting.
--todo: add screenshot
To auto bind controls according to the labels defined in a reference configuration, click on menu 'Advanced>Auto-bind controls'. The configuration to modify and the reference configuration should have labels configured.
--todo: add screenshot
gimx-config
Start
--todo: add screenshot
Button tab
Bind controls (button or axis, from any device) to controller buttons (cross, select, etc.). --todo: add screenshot
Axis tab
Bind controls (button or axis, from any device) to controller axes (left stick x, left stick y, pressure sensitive buttons, etc.). --todo: add screenshot
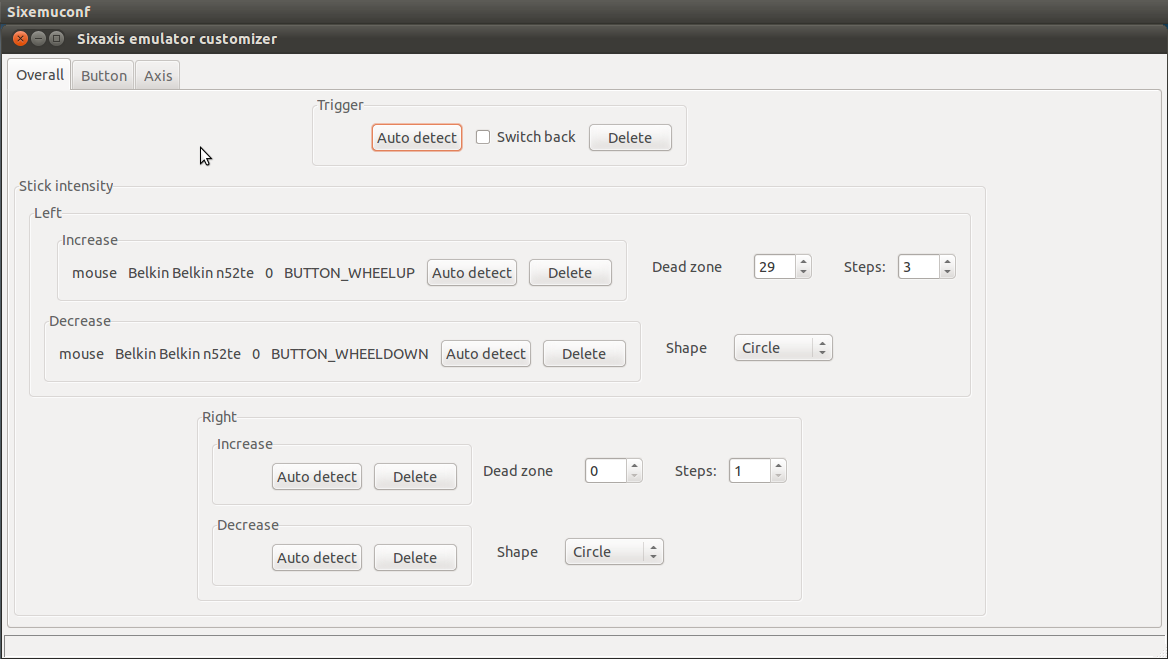
Overall tab
This is the place to configure:
- the profile trigger, which is the button that activate the profile
- The profile activation can be delayed (for ex. 100ms).
- If the switch back checkbox is enabled, GIMX will switch back to the previous profile when the button is released.
- Typical use cases that allow to tweak the ADS mouse parameters in FPS games:
- second profile with right mouse button as trigger, and switch back enabled; right mouse button is bind to the ADS button (for ex. l1) in both profiles
- first and second profiles with right mouse button as trigger, and switch back disabled; right mouse button is bind to the ADS button (for ex. l1) in the first profile only ("toggle mode")
- second profile with right mouse button as trigger, and switch back enabled; right mouse button is bind to the ADS button (for ex. l1) in both profiles
- left or right stick intensities
- This can be used to have a precise control over a stick with buttons.
- Typical use case for FPS games:
- WASD is bind to the left stick
- mouse wheel down and up resp. decrease and increase the left stick intensity
- dead zone = 20 (lowest stick position along each axis)
- steps = 3 (number of stick positions along each axis)
- WASD is bind to the left stick
--todo: update screenshot
Controllers
This part is only applicable for bluetooth.
Up to 7 sixaxis controllers, each using a different bluetooth dongle, can be emulated by GIMX.
Each controller can be configured independently.
--todo: add screenshot
Profiles
There are up to 8 profiles per controller.
For example, it's possible to define a profile for aiming: copy-paste the profile #1 to profile #2, define the right mouse click as profile #2 trigger with switch back (Overall tab), and adjust the mouse sensitivity & acceleration (Axis tab).
--todo: update screenshot
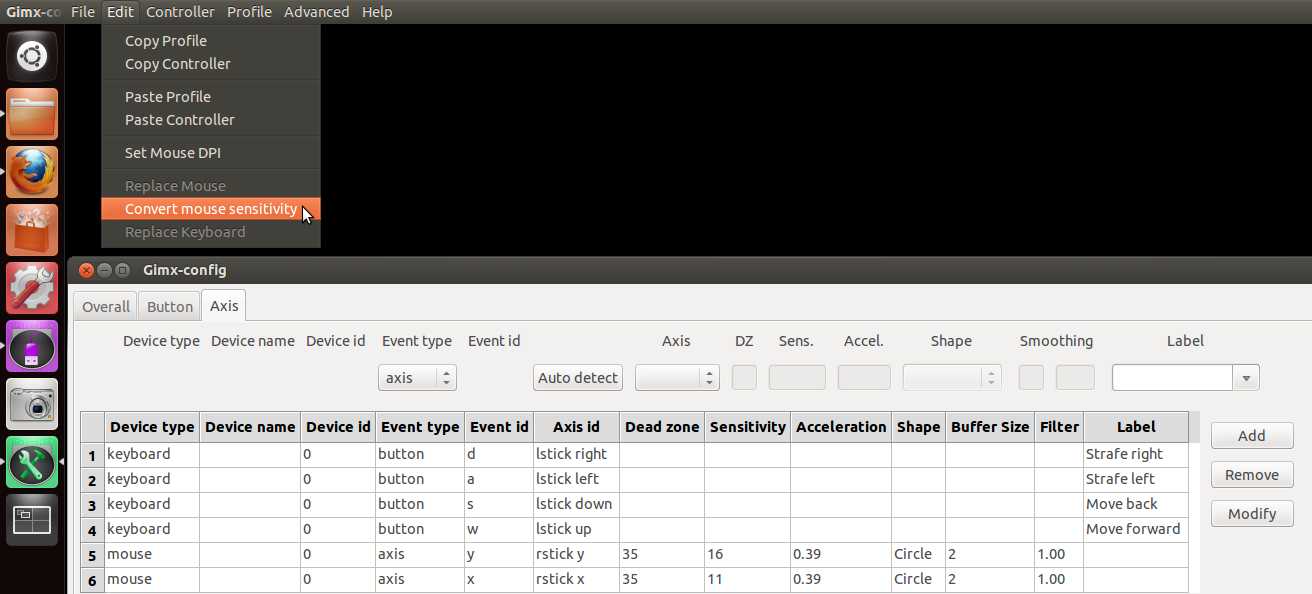
Config conversion
Items of the "Edit" menu that allow to convert a configuration:
The "Replace Mouse" item allows to change the mouse name and id.
The "Convert mouse sensitivity" item allows to adjust the mouse sensitivity according to source/destination DPI values.
The "Replace Keyboard" item allows to change the keyboard name and id.
Advanced
- Multiple mice and keyboards: check this box if you want two mice or two keyboards to be independent.
- Use case: use the mouse wheel of a keypad (such as the n52te) independently from the mouse wheel.
- Link controls: updates bindings in all controller profiles.
- Use case: a same binding is defined in profiles 1 & 2; modify the binding in profile 1: the binding in profile 2 is updated.
- Auto-bind controls: remap bindings according to the labels; the configuration to modify and the reference configuration should have labels configured (column 'Label' in Button and Axis tabs).