Difference between revisions of "Mouse tweaks"
(Marked this version for translation) |
|||
| Line 1: | Line 1: | ||
<translate> | <translate> | ||
| − | =About= | + | =About= <!--T:1--> |
| + | <!--T:2--> | ||
If you're experiencing a laggy aim/mouse translation after having increased the DPI to it's max as well as calibrated your configuration following the [[Mouse_Calibration|Mouse Calibration]] guide - the problem might be the default (USB) mouse polling rate of the operating system, or in a worst case scenario, a crappy Bluetooth dongle. So let's give the mouse polling rate a shot before we dump the Bluetooth dongle. | If you're experiencing a laggy aim/mouse translation after having increased the DPI to it's max as well as calibrated your configuration following the [[Mouse_Calibration|Mouse Calibration]] guide - the problem might be the default (USB) mouse polling rate of the operating system, or in a worst case scenario, a crappy Bluetooth dongle. So let's give the mouse polling rate a shot before we dump the Bluetooth dongle. | ||
| + | <!--T:3--> | ||
'''You're doing this at your own risk! We're not responsible for any damage you may cause to your console, computer or peripherals.''' | '''You're doing this at your own risk! We're not responsible for any damage you may cause to your console, computer or peripherals.''' | ||
| − | =For Ubuntu 10 or later= | + | =For Ubuntu 10 or later= <!--T:4--> |
| + | <!--T:5--> | ||
This method has only been tested with Ubuntu 10 and 11, but may work with older versions. | This method has only been tested with Ubuntu 10 and 11, but may work with older versions. | ||
| − | ==Edit the modules file== | + | ==Edit the modules file== <!--T:6--> |
| + | <!--T:7--> | ||
In a Terminal: | In a Terminal: | ||
gksudo gedit /etc/modules | gksudo gedit /etc/modules | ||
After entering the password (if prompted) the modules file will be opened in a text editor with the proper permissions, allowing you to edit it. | After entering the password (if prompted) the modules file will be opened in a text editor with the proper permissions, allowing you to edit it. | ||
| + | <!--T:8--> | ||
Then, at the bottom add these two lines and save the file: | Then, at the bottom add these two lines and save the file: | ||
-r usbhid | -r usbhid | ||
usbhid mousepoll=NUMBER | usbhid mousepoll=NUMBER | ||
| + | <!--T:9--> | ||
http://gimx.fr/img/screenshots/tuto/mt/modules.jpg | http://gimx.fr/img/screenshots/tuto/mt/modules.jpg | ||
| + | <!--T:10--> | ||
Where '''NUMBER''' is: | Where '''NUMBER''' is: | ||
1 = 1000Hz | 1 = 1000Hz | ||
| Line 29: | Line 36: | ||
10 = 100Hz (Default) | 10 = 100Hz (Default) | ||
| + | <!--T:11--> | ||
'''Example for 250Hz:''' | '''Example for 250Hz:''' | ||
-r usbhid | -r usbhid | ||
usbhid mousepoll=4 | usbhid mousepoll=4 | ||
| + | <!--T:12--> | ||
'''P.S.''' | '''P.S.''' | ||
Normally a polling rate of either 250Hz or 500Hz is enough. Newer mice may or may not benefit from 1000Hz. Just remember that a high polling rate is a strain on both your computer and mouse which may create more lag than mend it. | Normally a polling rate of either 250Hz or 500Hz is enough. Newer mice may or may not benefit from 1000Hz. Just remember that a high polling rate is a strain on both your computer and mouse which may create more lag than mend it. | ||
| − | ==Restart and verify== | + | ==Restart and verify== <!--T:13--> |
| + | <!--T:14--> | ||
That's it! Just restart Ubuntu, verify that the change has taken effect, and you're good to go | That's it! Just restart Ubuntu, verify that the change has taken effect, and you're good to go | ||
| + | <!--T:15--> | ||
'''Run this command in terminal to verify the value you set:''' | '''Run this command in terminal to verify the value you set:''' | ||
cat /sys/module/usbhid/parameters/mousepoll | cat /sys/module/usbhid/parameters/mousepoll | ||
| + | <!--T:16--> | ||
http://gimx.fr/img/screenshots/tuto/mt/ubmp4.jpg | http://gimx.fr/img/screenshots/tuto/mt/ubmp4.jpg | ||
| − | =For Windows Vista/7= | + | =For Windows Vista/7= <!--T:17--> |
| + | <!--T:18--> | ||
In Windows, if you have a mouse like the Logitech MX518, you're stuck with a polling rate of 125Hz by default, unlike the Logitech G5, G500 and new G400 that change it to 500Hz, 1000Hz and 1000Hz respectively. | In Windows, if you have a mouse like the Logitech MX518, you're stuck with a polling rate of 125Hz by default, unlike the Logitech G5, G500 and new G400 that change it to 500Hz, 1000Hz and 1000Hz respectively. | ||
There's ''is'' a way to change the default rate of 125Hz to 250Hz though for your mouse, so you can have the benefit of both smoother aim and a faster response time from running the emulator in it's 250Hz mode. | There's ''is'' a way to change the default rate of 125Hz to 250Hz though for your mouse, so you can have the benefit of both smoother aim and a faster response time from running the emulator in it's 250Hz mode. | ||
| + | <!--T:19--> | ||
http://gimx.fr/img/screenshots/tuto/mt/250hzemu.jpg | http://gimx.fr/img/screenshots/tuto/mt/250hzemu.jpg | ||
| + | <!--T:20--> | ||
Changing the mouse polling rate in Windows Vista/7 isn't as easy as in Ubuntu, unfortunately, since you simply can't change a value in some file or the registry, but are required to use a modified USB HID driver while running Windows in '''Test Mode''' to allow the driver to work, instead. | Changing the mouse polling rate in Windows Vista/7 isn't as easy as in Ubuntu, unfortunately, since you simply can't change a value in some file or the registry, but are required to use a modified USB HID driver while running Windows in '''Test Mode''' to allow the driver to work, instead. | ||
| − | ==Requirements== | + | ==Requirements== <!--T:21--> |
First of all you'll need to download the NGOHQ's '''Driver Signer Enforcement Overrider''': | First of all you'll need to download the NGOHQ's '''Driver Signer Enforcement Overrider''': | ||
[http://www.ngohq.com/home.php?page=dseo link] | [http://www.ngohq.com/home.php?page=dseo link] | ||
| + | <!--T:22--> | ||
Then grab this archive I've compiled containing both the USB HID driver and DIMR (handy tool to check the current rate of your mouse, author unknown) and extract the '''HIDUSBF''' folder anywhere you'd like on your computer: | Then grab this archive I've compiled containing both the USB HID driver and DIMR (handy tool to check the current rate of your mouse, author unknown) and extract the '''HIDUSBF''' folder anywhere you'd like on your computer: | ||
[http://solidfiles.com/d/ff84/ link] | [http://solidfiles.com/d/ff84/ link] | ||
| + | <!--T:23--> | ||
(Credits go out to SweetLow for the drivers - '''We don't offer support for these drivers''' so check the readme file for further instructions, troubleshooting and links) | (Credits go out to SweetLow for the drivers - '''We don't offer support for these drivers''' so check the readme file for further instructions, troubleshooting and links) | ||
| + | <!--T:24--> | ||
It is also recommended to turn off UAC but may not be required (everything must be run as administrator): | It is also recommended to turn off UAC but may not be required (everything must be run as administrator): | ||
[http://windows.microsoft.com/en-US/windows-vista/Turn-User-Account-Control-on-or-off link] | [http://windows.microsoft.com/en-US/windows-vista/Turn-User-Account-Control-on-or-off link] | ||
| − | ==Install the driver and enable Test Mode== | + | ==Install the driver and enable Test Mode== <!--T:25--> |
To install the driver simply right click the '''HIDUSBF.INF''' file in the '''HIDUSBF''' folder and select '''Install''' | To install the driver simply right click the '''HIDUSBF.INF''' file in the '''HIDUSBF''' folder and select '''Install''' | ||
| + | <!--T:26--> | ||
To enable '''Test Mode''', run the Driver Signer Enforcement Overrider ('''dseo13b.exe''') and click the '''Next''' button after having selected the '''Enable Test Mode''' option. | To enable '''Test Mode''', run the Driver Signer Enforcement Overrider ('''dseo13b.exe''') and click the '''Next''' button after having selected the '''Enable Test Mode''' option. | ||
| + | <!--T:27--> | ||
http://gimx.fr/img/screenshots/tuto/mt/tmenabled.jpg | http://gimx.fr/img/screenshots/tuto/mt/tmenabled.jpg | ||
| + | <!--T:28--> | ||
Restart Windows to complete the process. | Restart Windows to complete the process. | ||
| − | ==Sign the driver== | + | ==Sign the driver== <!--T:29--> |
| + | <!--T:30--> | ||
After restarting Windows you'll be in '''Test Mode''', verified by a watermark in the lower right hand corner of your desktop. You'll now be able to sign the driver you installed. | After restarting Windows you'll be in '''Test Mode''', verified by a watermark in the lower right hand corner of your desktop. You'll now be able to sign the driver you installed. | ||
| + | <!--T:31--> | ||
http://gimx.fr/img/screenshots/tuto/mt/tmwm.jpg | http://gimx.fr/img/screenshots/tuto/mt/tmwm.jpg | ||
| + | <!--T:32--> | ||
To sign the driver, run the Driver Signer Enforcement Overrider again and click the '''Next''' button after having selected the '''Sign a System File''' option. | To sign the driver, run the Driver Signer Enforcement Overrider again and click the '''Next''' button after having selected the '''Sign a System File''' option. | ||
| + | <!--T:33--> | ||
'''In the next window enter the following text into the text field and click OK:''' | '''In the next window enter the following text into the text field and click OK:''' | ||
C:\Windows\System32\Drivers\HIDUSBF.SYS | C:\Windows\System32\Drivers\HIDUSBF.SYS | ||
Restart Windows to take the newly signed driver into use. | Restart Windows to take the newly signed driver into use. | ||
| − | ==Adjust your mouse polling rate and verify== | + | ==Adjust your mouse polling rate and verify== <!--T:34--> |
After having restarted Windows, open up the '''HIDUSBF''' folder you extracted in the beginning and run '''Setup.exe''' | After having restarted Windows, open up the '''HIDUSBF''' folder you extracted in the beginning and run '''Setup.exe''' | ||
| + | <!--T:35--> | ||
http://gimx.fr/img/screenshots/tuto/mt/rateadjust.jpg | http://gimx.fr/img/screenshots/tuto/mt/rateadjust.jpg | ||
| + | <!--T:36--> | ||
Now, make sure the '''Mouses Only''' checkbox is ticked and that you have the right mouse selected if there are several devices listed. Then simply tick the '''Filter On Device''' checkbox, select '''250''' from the '''Selected Rate''' dropdown box and click the '''Restart''' button. | Now, make sure the '''Mouses Only''' checkbox is ticked and that you have the right mouse selected if there are several devices listed. Then simply tick the '''Filter On Device''' checkbox, select '''250''' from the '''Selected Rate''' dropdown box and click the '''Restart''' button. | ||
| + | <!--T:37--> | ||
Your mouse should now be running with a polling rate of 250Hz! | Your mouse should now be running with a polling rate of 250Hz! | ||
You can verify this by running the '''dimr.exe''' file in the '''HIDUSBF''' folder and moving the mouse around. | You can verify this by running the '''dimr.exe''' file in the '''HIDUSBF''' folder and moving the mouse around. | ||
| + | <!--T:38--> | ||
http://gimx.fr/img/screenshots/tuto/mt/125vs250.jpg | http://gimx.fr/img/screenshots/tuto/mt/125vs250.jpg | ||
Before and after. | Before and after. | ||
| + | <!--T:39--> | ||
'''P.S.''' | '''P.S.''' | ||
If the polling rate didn't change you might have to restart Windows for it to take effect. | If the polling rate didn't change you might have to restart Windows for it to take effect. | ||
| − | =For Windows XP= | + | =For Windows XP= <!--T:40--> |
| + | <!--T:41--> | ||
Changing the mouse polling rate in Windows XP is a piece of cake compared to Windows Vista/7 since you don't need to sign any drivers and all that jazz. | Changing the mouse polling rate in Windows XP is a piece of cake compared to Windows Vista/7 since you don't need to sign any drivers and all that jazz. | ||
| − | ==Download== | + | ==Download== <!--T:42--> |
| + | <!--T:43--> | ||
Download the following archive and extract the '''HIDUSBF''' folder anywhere you'd like on your computer: | Download the following archive and extract the '''HIDUSBF''' folder anywhere you'd like on your computer: | ||
[http://solidfiles.com/d/ff84/ link] | [http://solidfiles.com/d/ff84/ link] | ||
| + | <!--T:44--> | ||
(Credits go out to SweetLow for the drivers - '''We don't offer support for these drivers''' so check the readme file for further instructions, troubleshooting and links) | (Credits go out to SweetLow for the drivers - '''We don't offer support for these drivers''' so check the readme file for further instructions, troubleshooting and links) | ||
| − | ==Adjust your mouse polling rate and verify== | + | ==Adjust your mouse polling rate and verify== <!--T:45--> |
| + | <!--T:46--> | ||
Open up the '''HIDUSBF''' folder you extracted in the previous step and run '''Setup.exe''' | Open up the '''HIDUSBF''' folder you extracted in the previous step and run '''Setup.exe''' | ||
| + | <!--T:47--> | ||
http://gimx.fr/img/screenshots/tuto/mt/adjustratexp.jpg | http://gimx.fr/img/screenshots/tuto/mt/adjustratexp.jpg | ||
| + | <!--T:48--> | ||
Now, make sure the '''Mouses Only''' checkbox is ticked and that you have the right mouse selected if there are several devices listed. Then simply tick the '''Filter On Device''' checkbox, select '''250''' from the '''Selected Rate''' dropdown box and click the '''Restart''' button. | Now, make sure the '''Mouses Only''' checkbox is ticked and that you have the right mouse selected if there are several devices listed. Then simply tick the '''Filter On Device''' checkbox, select '''250''' from the '''Selected Rate''' dropdown box and click the '''Restart''' button. | ||
| + | <!--T:49--> | ||
Your mouse should now be running with a polling rate of 250Hz! | Your mouse should now be running with a polling rate of 250Hz! | ||
You can verify this by running the '''dimr.exe''' file in the '''HIDUSBF''' folder and moving the mouse around. | You can verify this by running the '''dimr.exe''' file in the '''HIDUSBF''' folder and moving the mouse around. | ||
| + | <!--T:50--> | ||
http://gimx.fr/img/screenshots/tuto/mt/dimrxp.jpg | http://gimx.fr/img/screenshots/tuto/mt/dimrxp.jpg | ||
| + | <!--T:51--> | ||
'''P.S.''' | '''P.S.''' | ||
If the polling rate didn't change you might have to restart Windows for it to take effect. | If the polling rate didn't change you might have to restart Windows for it to take effect. | ||
</translate> | </translate> | ||
Revision as of 22:01, 9 September 2012
About
If you're experiencing a laggy aim/mouse translation after having increased the DPI to it's max as well as calibrated your configuration following the Mouse Calibration guide - the problem might be the default (USB) mouse polling rate of the operating system, or in a worst case scenario, a crappy Bluetooth dongle. So let's give the mouse polling rate a shot before we dump the Bluetooth dongle.
You're doing this at your own risk! We're not responsible for any damage you may cause to your console, computer or peripherals.
For Ubuntu 10 or later
This method has only been tested with Ubuntu 10 and 11, but may work with older versions.
Edit the modules file
In a Terminal:
gksudo gedit /etc/modules
After entering the password (if prompted) the modules file will be opened in a text editor with the proper permissions, allowing you to edit it.
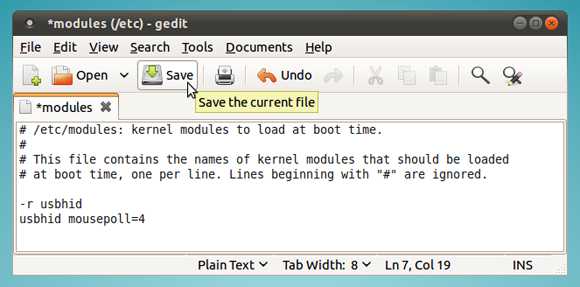
Then, at the bottom add these two lines and save the file:
-r usbhid
usbhid mousepoll=NUMBER
http://gimx.fr/img/screenshots/tuto/mt/modules.jpg
Where NUMBER is:
1 = 1000Hz
2 = 500Hz
4 = 250Hz
8 = 125Hz
10 = 100Hz (Default)
Example for 250Hz:
-r usbhid
usbhid mousepoll=4
P.S. Normally a polling rate of either 250Hz or 500Hz is enough. Newer mice may or may not benefit from 1000Hz. Just remember that a high polling rate is a strain on both your computer and mouse which may create more lag than mend it.
Restart and verify
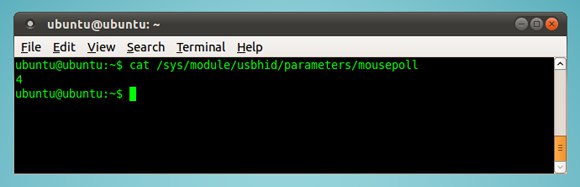
That's it! Just restart Ubuntu, verify that the change has taken effect, and you're good to go
Run this command in terminal to verify the value you set:
cat /sys/module/usbhid/parameters/mousepoll
http://gimx.fr/img/screenshots/tuto/mt/ubmp4.jpg
For Windows Vista/7
In Windows, if you have a mouse like the Logitech MX518, you're stuck with a polling rate of 125Hz by default, unlike the Logitech G5, G500 and new G400 that change it to 500Hz, 1000Hz and 1000Hz respectively. There's is a way to change the default rate of 125Hz to 250Hz though for your mouse, so you can have the benefit of both smoother aim and a faster response time from running the emulator in it's 250Hz mode.
http://gimx.fr/img/screenshots/tuto/mt/250hzemu.jpg
Changing the mouse polling rate in Windows Vista/7 isn't as easy as in Ubuntu, unfortunately, since you simply can't change a value in some file or the registry, but are required to use a modified USB HID driver while running Windows in Test Mode to allow the driver to work, instead.
Requirements
First of all you'll need to download the NGOHQ's Driver Signer Enforcement Overrider: link
Then grab this archive I've compiled containing both the USB HID driver and DIMR (handy tool to check the current rate of your mouse, author unknown) and extract the HIDUSBF folder anywhere you'd like on your computer: link
(Credits go out to SweetLow for the drivers - We don't offer support for these drivers so check the readme file for further instructions, troubleshooting and links)
It is also recommended to turn off UAC but may not be required (everything must be run as administrator): link
Install the driver and enable Test Mode
To install the driver simply right click the HIDUSBF.INF file in the HIDUSBF folder and select Install
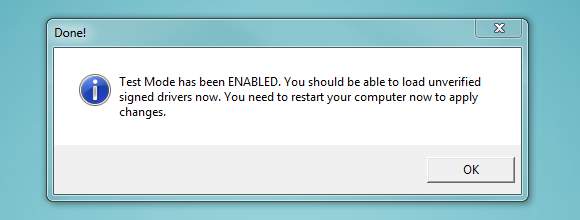
To enable Test Mode, run the Driver Signer Enforcement Overrider (dseo13b.exe) and click the Next button after having selected the Enable Test Mode option.
http://gimx.fr/img/screenshots/tuto/mt/tmenabled.jpg
Restart Windows to complete the process.
Sign the driver
After restarting Windows you'll be in Test Mode, verified by a watermark in the lower right hand corner of your desktop. You'll now be able to sign the driver you installed.
http://gimx.fr/img/screenshots/tuto/mt/tmwm.jpg
To sign the driver, run the Driver Signer Enforcement Overrider again and click the Next button after having selected the Sign a System File option.
In the next window enter the following text into the text field and click OK:
C:\Windows\System32\Drivers\HIDUSBF.SYS
Restart Windows to take the newly signed driver into use.
Adjust your mouse polling rate and verify
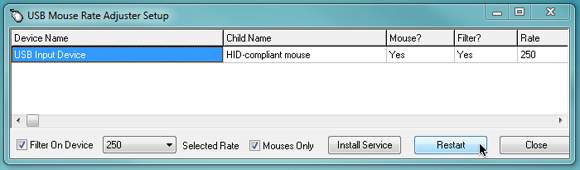
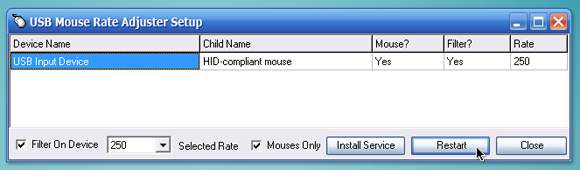
After having restarted Windows, open up the HIDUSBF folder you extracted in the beginning and run Setup.exe
http://gimx.fr/img/screenshots/tuto/mt/rateadjust.jpg
Now, make sure the Mouses Only checkbox is ticked and that you have the right mouse selected if there are several devices listed. Then simply tick the Filter On Device checkbox, select 250 from the Selected Rate dropdown box and click the Restart button.
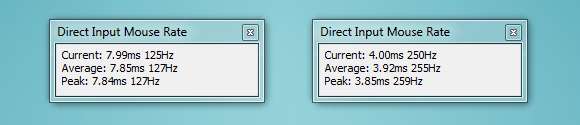
Your mouse should now be running with a polling rate of 250Hz! You can verify this by running the dimr.exe file in the HIDUSBF folder and moving the mouse around.
http://gimx.fr/img/screenshots/tuto/mt/125vs250.jpg Before and after.
P.S. If the polling rate didn't change you might have to restart Windows for it to take effect.
For Windows XP
Changing the mouse polling rate in Windows XP is a piece of cake compared to Windows Vista/7 since you don't need to sign any drivers and all that jazz.
Download
Download the following archive and extract the HIDUSBF folder anywhere you'd like on your computer: link
(Credits go out to SweetLow for the drivers - We don't offer support for these drivers so check the readme file for further instructions, troubleshooting and links)
Adjust your mouse polling rate and verify
Open up the HIDUSBF folder you extracted in the previous step and run Setup.exe
http://gimx.fr/img/screenshots/tuto/mt/adjustratexp.jpg
Now, make sure the Mouses Only checkbox is ticked and that you have the right mouse selected if there are several devices listed. Then simply tick the Filter On Device checkbox, select 250 from the Selected Rate dropdown box and click the Restart button.
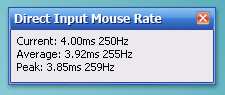
Your mouse should now be running with a polling rate of 250Hz! You can verify this by running the dimr.exe file in the HIDUSBF folder and moving the mouse around.
http://gimx.fr/img/screenshots/tuto/mt/dimrxp.jpg
P.S. If the polling rate didn't change you might have to restart Windows for it to take effect.