|
|
(11 intermediate revisions by 2 users not shown)
|
| Line 8: |
Line 8: |
| | Il est fortement recommandé d'utiliser un HUB avec alimentation externe. | | Il est fortement recommandé d'utiliser un HUB avec alimentation externe. |
| | | | |
| | + | <span class="mw-translate-fuzzy"> |
| | == Mise à jour du firmware == | | == Mise à jour du firmware == |
| | Comme les premiers firmware avaient de gros soucis de gestion de l'USB, il est recommandé de mettre à jour le firmware avant d'utiliser GIMX.<br /> | | Comme les premiers firmware avaient de gros soucis de gestion de l'USB, il est recommandé de mettre à jour le firmware avant d'utiliser GIMX.<br /> |
| Line 17: |
Line 18: |
| | Linux raspberrypi 4.1.9+ #819 PREEMPT Thu Oct 1 20:31:26 BST 2015 armv6l | | Linux raspberrypi 4.1.9+ #819 PREEMPT Thu Oct 1 20:31:26 BST 2015 armv6l |
| | GNU/Linux</pre> | | GNU/Linux</pre> |
| | + | </span> |
| | | | |
| | + | If you plan to use a Logitech force feedback wheel, you will have to build the uhid.ko module for your kernel.<br /> |
| | + | Install the right version of gcc, as explained here: [https://github.com/notro/rpi-source/wiki link].<br /> |
| | + | Update your kernel: |
| | + | <pre>sudo rpi-update</pre> |
| | + | In case the kernel was updated, reboot: |
| | + | <pre>sudo reboot</pre> |
| | + | Install the rpi-source tool: |
| | + | <pre>sudo wget https://raw.githubusercontent.com/notro/rpi-source/master/rpi-source -O /usr/bin/rpi-source && sudo chmod +x /usr/bin/rpi-source && /usr/bin/rpi-source -q --tag-update</pre> |
| | + | Run rpi-source: |
| | + | <pre>rpi-source</pre> |
| | + | This step may take a while to complete.<br /> |
| | + | Install ncurses: |
| | + | <pre>sudo apt-get install libncurses5-dev</pre> |
| | + | Enable the UHID module compilation: |
| | + | <pre>cd linux |
| | + | make menuconfig</pre> |
| | + | Select Device Drivers>HID support>User-space I/O driver support for HID subsystem. The line should start with '<M>'.<br /> |
| | + | To speed up the compilation, you can disable all other modules in the HID support section and subsections.<br /> |
| | + | Save the config to the default location and exit.<br /> |
| | + | Build the module: |
| | + | <pre>make prepare |
| | + | make scripts |
| | + | make M=drivers/hid</pre> |
| | + | Install it: |
| | + | <pre>sudo cp drivers/hid/uhid.ko /lib/modules/`uname -r`/kernel/drivers/hid/ |
| | + | sudo depmod -a</pre>--> |
| | + | <!--mkdir dest |
| | + | make INSTALL_HDR_PATH=dest headers_install |
| | + | sudo cp dest/include/linux/uhid.h /usr/include/linux/--> |
| | + | |
| | + | <span class="mw-translate-fuzzy"> |
| | == Utiliser l'interface UART avec l'adaptateur USB == | | == Utiliser l'interface UART avec l'adaptateur USB == |
| | + | </span> |
| | | | |
| | === Matériel requis === | | === Matériel requis === |
| | | | |
| − | The on-board UART runs at 0V/3.3V levels, and the AVR USB board has to run at 5V to operate at 16MHz (running at 3.3V would only allow to operate at 8MHz).<br />
| + | <span class="mw-translate-fuzzy"> |
| − | Connecting the RPi and the AVR USB board directly may damage the hardware!<br />
| + | L'interface série fonctionne aux niveaux 0V/3.3V, alors que la carte AVR USB doit être alimentée à 5V pour fonctionner à 16MHz (à 3.3V elle ne peut fonctionner qu'à 8MHz).<br /> |
| − | One cheap solution is to use a voltage divider:<br />
| + | Connecter directement la RPi et la carte AVR USB peut endommager le matériel !<br /> |
| − | * Connect both GNDs | + | Une solution peu couteuse est d'utiliser un diviseur de tension :<br /> |
| − | * It's safe to connect the TXD pin of the RPi to the Rx pin of the AVR USB board (the GIMX firmwares configure the Rx pin as an input) | + | * Connecter les broches GND. |
| − | * To connect the Tx pin of the AVR USB board to the RXD pin of the RPi, you'll need to convert the voltage level from 0..5V to 0..3.3V.<br /> | + | * Il est sans danger de connecter la broche TXD du RPi à la broche RX de la carte AVR USB (le firmware GIMX configure la broche RX comme une entrée). |
| − | This can be done with a simple resistive divider:
| + | * Pour connecter la broche TX de la carte AVR USB à la broche RXD du RPi, il faut convertir les niveaux de tension de 0..5V à 0..3.3V.<br /> |
| | + | Ceci peut se faire simplement à l'aide d'un diviseur de tension : |
| | <div class="image200px">[http://gimx.fr/img/wiki/Resistive_divider.png http://gimx.fr/img/wiki/Resistive_divider.png]</div> | | <div class="image200px">[http://gimx.fr/img/wiki/Resistive_divider.png http://gimx.fr/img/wiki/Resistive_divider.png]</div> |
| − | Vin is the Tx pin of the AVR USB board, Vout is the RXD pin of the RPi, R1=2.2kΩ , R2=3.3kΩ | + | Vin est la broche TX de la carte AVR USB, Vout est la broche RXD du RPi, R1=2.2kΩ , R2=3.3kΩ |
| − | * Do not connect any other pin! | + | * Ne connecter aucune autre broche ! |
| | + | </span> |
| | | | |
| − | === Sotware adjustments === | + | === Ajustements logiciels === |
| | | | |
| − | By default, the RPi sends debug messages on the UART port. To use it for GIMX, we should execute:
| + | <span class="mw-translate-fuzzy"> |
| | + | Par défaut, le RPi utilise le port série pour un terminal. Pour l'utiliser avec GIMX, exécuter : |
| | <pre> | | <pre> |
| | sudo raspi-config | | sudo raspi-config |
| | </pre> | | </pre> |
| − | Then select:
| + | Puis sélectionner : |
| | <pre> | | <pre> |
| | "Advanced Options", "Serial", "No", "Finish" | | "Advanced Options", "Serial", "No", "Finish" |
| | </pre> | | </pre> |
| − | Open the /boot/config.txt with the nano editor:
| + | Ouvrir le fichier /boot/config.txt avec l'éditeur nano : |
| | <pre> | | <pre> |
| | sudo nano /boot/config.txt | | sudo nano /boot/config.txt |
| | </pre> | | </pre> |
| − | Add the following line at the end of the file:
| + | Et ajouter la ligne suivante en fin de fichier : |
| | <pre> | | <pre> |
| | init_uart_clock=8000000 | | init_uart_clock=8000000 |
| | </pre> | | </pre> |
| − | Create a symbolic link to make gimx-launcher find the port:
| + | Créer un lien symbolique pour que gimx-launcher trouve le port série : |
| | <pre> | | <pre> |
| | sudo ln -s /dev/ttyAMA0 /dev/ttyUSB0 | | sudo ln -s /dev/ttyAMA0 /dev/ttyUSB0 |
| | </pre> | | </pre> |
| | + | </span> |
| | | | |
| − | == GIMX installation == | + | <span class="mw-translate-fuzzy"> |
| | + | == Installation de GIMX == |
| | <pre>sudo apt-get install gdebi | | <pre>sudo apt-get install gdebi |
| | wget http://gimx.fr/download/gimx-raspbian -O gimx.deb | | wget http://gimx.fr/download/gimx-raspbian -O gimx.deb |
| | sudo gdebi gimx.deb</pre> | | sudo gdebi gimx.deb</pre> |
| | + | </span> |
| | | | |
| − | If you get a "Dependency is not satisfiable: ..." error message, upgrade Raspbian:
| + | En cas de dépendance insatisfaite, mettre à jour Raspbian : |
| | <pre>sudo apt-get update && sudo apt-get upgrade</pre> | | <pre>sudo apt-get update && sudo apt-get upgrade</pre> |
| | | | |
| − | == Stop/disable triggerhappy service == | + | == Arrêt/désactivation du service triggerhappy == |
| − | [https://github.com/wertarbyte/triggerhappy/blob/master/README Triggerhappy] is a daemon that opens every input device for reading, and that consumes a few percent of the CPU time. | + | [https://github.com/wertarbyte/triggerhappy/blob/master/README Triggerhappy] est un service qui ouvre tous les périphériques en lecture et qui consomme quelques pourcent du temps CPU. |
| | | | |
| − | It seems a good idea to stop it while running GIMX.
| + | Il est conseillé de l'arrêter lorsqu'on exécute GIMX. |
| | | | |
| − | To stop triggerhappy:
| + | Pour l'arrêter : |
| | sudo service triggerhappy stop | | sudo service triggerhappy stop |
| − | To disable triggerhappy:
| + | Pour le désactiver : |
| | sudo update-rc.d triggerhappy disable | | sudo update-rc.d triggerhappy disable |
| | | | |
| − | == Run GIMX == | + | <span class="mw-translate-fuzzy"> |
| − | Read the [[Quick_Start|Quick start page]] to learn how to run GIMX through the GUI.<br />
| + | == Démarrage de GIMX == |
| − | A good idea is to run GIMX directly from a terminal, without starting a graphical session.<br />
| + | Lire la page [[Quick_Start/fr|démarrage rapide]] pour apprendre comment démarrer GIMX via une interface graphique.<br /> |
| − | This can be done over the network, using a ssh client.<br />
| + | C'est une bonne idée d'exécuter GIMX directement depuis un terminal, sans démarrer une session graphique.<br /> |
| − | Ideally, GIMX should be launched without using the Ethernet port (because it is connected on the USB bus).<br />
| + | Ceci peut se faire via le réseau, en utilisant un client ssh.<br /> |
| − | More details on command line options on [[Command_line|this page]].<br />
| + | Idéalement, GIMX devrait être démarré dans utiliser le port Ethernet (car il est connecté sur le bus USB).<br /> |
| − | === Bluetooth === | + | Plus de détails sur la page [[Command_line/fr|ligne de commande]].<br /> |
| − | In a terminal:
| + | </span> |
| − | gimx -t Sixaxis -c <config file> -b <PS3 bdaddr> | + | |
| − | The dongle address has to be changed before running the above commands. | + | == Autostart GIMX at boot without GUI == |
| | + | Simply create a file /etc/systemd/system/gimx.service (as root) with the following content: |
| | + | |
| | + | <pre> |
| | + | [Unit] |
| | + | Description=GIMX |
| | + | After=syslog.target network.target |
| | + | |
| | + | [Service] |
| | + | User=pi |
| | + | Type=simple |
| | + | ExecStart=/usr/bin/gimx -p /dev/ttyUSB0 -c LogitechDrivingForceGT_G29.xml --nograb |
| | + | Restart=always |
| | + | RestartSec=5 |
| | + | |
| | + | [Install] |
| | + | WantedBy=multi-user.target |
| | + | </pre> |
| | + | |
| | + | Replace ttyUSB0 with your device and LogitechDrivingForceGT_G29.xml with your mapping file (which should be available in the pi home directory as /home/pi/.gimx/config/LogitechDrivingForceGT_G29.xml) |
| | + | |
| | + | Run <pre>sudo systemctl daemon-reload</pre> to notify systemd about the new file and <pre>sudo systemctl enable gimx && sudo systemctl start gimx</pre> to enable the gimx service start at boot and start it in the same line. |
| | + | |
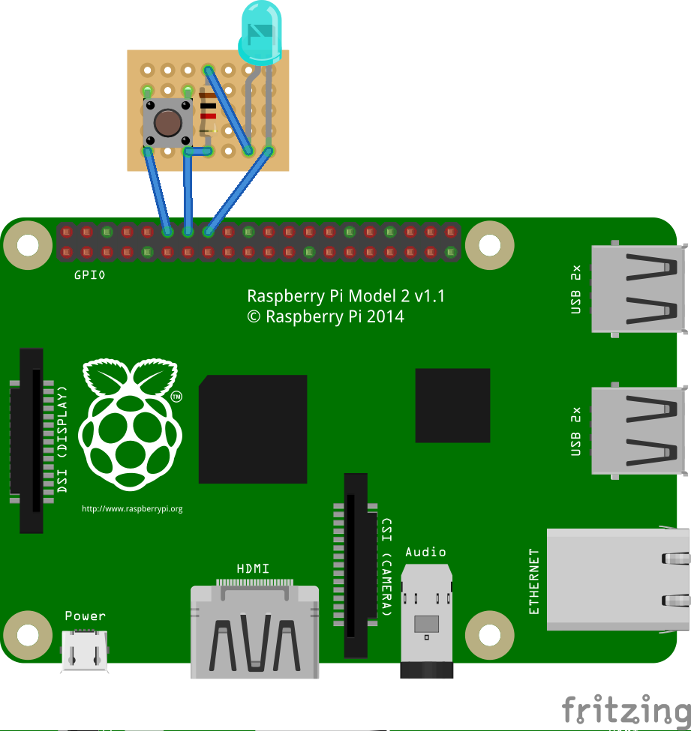
| | + | == Notify when GIMX is running using a led == |
| | + | In order to have a proper confirmation about if the gimx service is up and running, you can add a simple python script that turns a led on if the gimx service is running. |
| | + | |
| | + | The file will be located at /home/pi/blink.py: |
| | + | |
| | + | <pre> |
| | + | #!/usr/bin/python |
| | + | import os |
| | + | import time |
| | + | import RPi.GPIO as GPIO |
| | + | |
| | + | led = 23 |
| | + | button = 18 |
| | + | GPIO.setmode(GPIO.BCM) |
| | + | GPIO.setup(led, GPIO.OUT) |
| | + | GPIO.setup(button, GPIO.IN, pull_up_down = GPIO.PUD_UP) |
| | + | |
| | + | def Shutdown(channel): |
| | + | GPIO.output(led, True) |
| | + | time.sleep(0.2) |
| | + | GPIO.output(led, False) |
| | + | time.sleep(0.2) |
| | + | GPIO.output(led, True) |
| | + | time.sleep(0.2) |
| | + | GPIO.output(led, False) |
| | + | os.system("sudo shutdown -h now") |
| | + | |
| | + | GPIO.add_event_detect(18, GPIO.FALLING, callback = Shutdown, bouncetime = 2000) |
| | + | |
| | + | while True: |
| | + | found = False |
| | + | time.sleep(5) |
| | + | pids = [pid for pid in os.listdir('/proc') if pid.isdigit()] |
| | + | for pid in pids: |
| | + | try: |
| | + | cmd = open(os.path.join('/proc', pid, 'cmdline'), 'rb').read() |
| | + | if "gimx" in cmd: |
| | + | found = True |
| | + | except IOError: # proc has already terminated |
| | + | continue |
| | + | if found == True: |
| | + | GPIO.output(led, True) |
| | + | else: |
| | + | GPIO.output(led, False) |
| | + | </pre> |
| | + | |
| | + | As a bonus, you can add a button so when it is pressed, there is a little blink effect, and the pi is shutted down. |
| | + | |
| | + | <div class="image200px">[https://gimx.fr/img/wiki/PiButtonLed.png https://gimx.fr/img/wiki/PiButtonLed.png]</div> |
| | | | |
| − | === DIY USB adapter ===
| + | To start at boot, simply add it to the pi user crontab (crontab -e) as <pre>@reboot python /home/pi/blink.py &</pre> |
| − | In a terminal:
| |
| − | gimx -c <config file> -p /dev/<ttyUSB port>
| |
Attention : le support de la RPi doit être considéré comme expérimental. Soyez prêt à affronter des problèmes si vous exécutez GIMX sur la RPi.
GIMX peut s'exécuter sur beaucoup de cibles GNU/Linux, et le Raspberry Pi est l'une d'entre elles !
Considérations matérielles
Utiliser un HUB USB seulement si tous les ports USB sont occupés sur la RPi.
Il est fortement recommandé d'utiliser un HUB avec alimentation externe.
Mise à jour du firmware
Comme les premiers firmware avaient de gros soucis de gestion de l'USB, il est recommandé de mettre à jour le firmware avant d'utiliser GIMX.
Ceci est aussi utile pour utiliser un volant Logitech avec retour de force (le module uhid était absent dans les firmwares plus anciens).
Taper la commande suivante :
sudo rpi-update && sudo reboot
Firmware testé :
pi@raspberrypi ~ $ uname -a
Linux raspberrypi 4.1.9+ #819 PREEMPT Thu Oct 1 20:31:26 BST 2015 armv6l
GNU/Linux
If you plan to use a Logitech force feedback wheel, you will have to build the uhid.ko module for your kernel.
Install the right version of gcc, as explained here: link.
Update your kernel:
sudo rpi-update
In case the kernel was updated, reboot:
sudo reboot
Install the rpi-source tool:
sudo wget https://raw.githubusercontent.com/notro/rpi-source/master/rpi-source -O /usr/bin/rpi-source && sudo chmod +x /usr/bin/rpi-source && /usr/bin/rpi-source -q --tag-update
Run rpi-source:
rpi-source
This step may take a while to complete.
Install ncurses:
sudo apt-get install libncurses5-dev
Enable the UHID module compilation:
cd linux
make menuconfig
Select Device Drivers>HID support>User-space I/O driver support for HID subsystem. The line should start with '<M>'.
To speed up the compilation, you can disable all other modules in the HID support section and subsections.
Save the config to the default location and exit.
Build the module:
make prepare
make scripts
make M=drivers/hid
Install it:
sudo cp drivers/hid/uhid.ko /lib/modules/`uname -r`/kernel/drivers/hid/
sudo depmod -a
-->
Utiliser l'interface UART avec l'adaptateur USB
Matériel requis
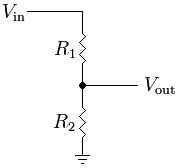
L'interface série fonctionne aux niveaux 0V/3.3V, alors que la carte AVR USB doit être alimentée à 5V pour fonctionner à 16MHz (à 3.3V elle ne peut fonctionner qu'à 8MHz).
Connecter directement la RPi et la carte AVR USB peut endommager le matériel !
Une solution peu couteuse est d'utiliser un diviseur de tension :
- Connecter les broches GND.
- Il est sans danger de connecter la broche TXD du RPi à la broche RX de la carte AVR USB (le firmware GIMX configure la broche RX comme une entrée).
- Pour connecter la broche TX de la carte AVR USB à la broche RXD du RPi, il faut convertir les niveaux de tension de 0..5V à 0..3.3V.
Ceci peut se faire simplement à l'aide d'un diviseur de tension :
Vin est la broche TX de la carte AVR USB, Vout est la broche RXD du RPi, R1=2.2kΩ , R2=3.3kΩ
- Ne connecter aucune autre broche !
Ajustements logiciels
Par défaut, le RPi utilise le port série pour un terminal. Pour l'utiliser avec GIMX, exécuter :
sudo raspi-config
Puis sélectionner :
"Advanced Options", "Serial", "No", "Finish"
Ouvrir le fichier /boot/config.txt avec l'éditeur nano :
sudo nano /boot/config.txt
Et ajouter la ligne suivante en fin de fichier :
init_uart_clock=8000000
Créer un lien symbolique pour que gimx-launcher trouve le port série :
sudo ln -s /dev/ttyAMA0 /dev/ttyUSB0
Installation de GIMX
sudo apt-get install gdebi
wget http://gimx.fr/download/gimx-raspbian -O gimx.deb
sudo gdebi gimx.deb
En cas de dépendance insatisfaite, mettre à jour Raspbian :
sudo apt-get update && sudo apt-get upgrade
Arrêt/désactivation du service triggerhappy
Triggerhappy est un service qui ouvre tous les périphériques en lecture et qui consomme quelques pourcent du temps CPU.
Il est conseillé de l'arrêter lorsqu'on exécute GIMX.
Pour l'arrêter :
sudo service triggerhappy stop
Pour le désactiver :
sudo update-rc.d triggerhappy disable
Démarrage de GIMX
Lire la page démarrage rapide pour apprendre comment démarrer GIMX via une interface graphique.
C'est une bonne idée d'exécuter GIMX directement depuis un terminal, sans démarrer une session graphique.
Ceci peut se faire via le réseau, en utilisant un client ssh.
Idéalement, GIMX devrait être démarré dans utiliser le port Ethernet (car il est connecté sur le bus USB).
Plus de détails sur la page ligne de commande.
Autostart GIMX at boot without GUI
Simply create a file /etc/systemd/system/gimx.service (as root) with the following content:
[Unit]
Description=GIMX
After=syslog.target network.target

[Service]
User=pi
Type=simple
ExecStart=/usr/bin/gimx -p /dev/ttyUSB0 -c LogitechDrivingForceGT_G29.xml --nograb
Restart=always
RestartSec=5

[Install]
WantedBy=multi-user.target
Replace ttyUSB0 with your device and LogitechDrivingForceGT_G29.xml with your mapping file (which should be available in the pi home directory as /home/pi/.gimx/config/LogitechDrivingForceGT_G29.xml)
Run
sudo systemctl daemon-reload
to notify systemd about the new file and
sudo systemctl enable gimx && sudo systemctl start gimx
to enable the gimx service start at boot and start it in the same line.
Notify when GIMX is running using a led
In order to have a proper confirmation about if the gimx service is up and running, you can add a simple python script that turns a led on if the gimx service is running.
The file will be located at /home/pi/blink.py:
#!/usr/bin/python
import os
import time
import RPi.GPIO as GPIO

led = 23
button = 18
GPIO.setmode(GPIO.BCM)
GPIO.setup(led, GPIO.OUT)
GPIO.setup(button, GPIO.IN, pull_up_down = GPIO.PUD_UP)

def Shutdown(channel):
  GPIO.output(led, True)
  time.sleep(0.2)
  GPIO.output(led, False)
  time.sleep(0.2)
  GPIO.output(led, True)
  time.sleep(0.2)
  GPIO.output(led, False)
  os.system("sudo shutdown -h now")

GPIO.add_event_detect(18, GPIO.FALLING, callback = Shutdown, bouncetime = 2000)

while True:
  found = False
  time.sleep(5)
  pids = [pid for pid in os.listdir('/proc') if pid.isdigit()]
  for pid in pids:
    try:
      cmd = open(os.path.join('/proc', pid, 'cmdline'), 'rb').read()
      if "gimx" in cmd:
        found = True
    except IOError: # proc has already terminated
      continue
  if found == True:
    GPIO.output(led, True)
  else:
    GPIO.output(led, False)
As a bonus, you can add a button so when it is pressed, there is a little blink effect, and the pi is shutted down.
To start at boot, simply add it to the pi user crontab (crontab -e) as
@reboot python /home/pi/blink.py &