|
|
(2 intermediate revisions by the same user not shown)
|
| Line 1: |
Line 1: |
| | + | <languages /> |
| | '''Warning: RPi support should be considered as experimental. Be prepared to face issues if you try GIMX on the RPi.''' | | '''Warning: RPi support should be considered as experimental. Be prepared to face issues if you try GIMX on the RPi.''' |
| | | | |
| | GIMX can run on many Linux targets, and the [http://www.raspberrypi.org/ the Raspberry Pi] is one of them! | | GIMX can run on many Linux targets, and the [http://www.raspberrypi.org/ the Raspberry Pi] is one of them! |
| − | == Tested setup == | + | == Hardware considerations == |
| − | * Raspberry Pi: model B, 256MB
| |
| − | * Distro: [http://www.raspberrypi.org/downloads Raspbian Jessie] (2015-09-24)
| |
| − | * '''Self-powered USB hub''': Belkin 7 ports F4U017 (self-powered = with an external power supply)
| |
| − | * Keyboard: n25te plugged on the USB hub
| |
| − | * Mouse: Logitech G500 plugged on the USB hub
| |
| − | * PS3: FAT - FW 4.41
| |
| | | | |
| − | * Bluetooth dongle: Pluscom BT20 (CSR Bluecore4-rom) plugged on the USB hub
| + | Use a USB HUB only if there are no ports available on the RPi.<br /> |
| − | | + | It is highly recommended to use a HUB with an external power supply. |
| − | * DIY USB adapter: Teensy 2.0 + CP2102 plugged on the USB hub
| |
| | | | |
| | == Firmware update == | | == Firmware update == |
| Line 18: |
Line 12: |
| | Updating the firmware may also be useful if you plan to use a Logitech force feedback wheel (the uhid kernel module was missing in earlier firmwares).<br /> | | Updating the firmware may also be useful if you plan to use a Logitech force feedback wheel (the uhid kernel module was missing in earlier firmwares).<br /> |
| | Type the following command: | | Type the following command: |
| − | <pre>sudo rpi-update</pre> | + | <pre>sudo rpi-update |
| − | And don't forget to reboot:
| + | sudo reboot</pre> |
| − | <pre>sudo reboot</pre> | + | If you have issues with the latest firmware, install the following instead: |
| | + | <pre>sudo rpi-update 771a503cfc2a1130e2df2a4ddfc45ffa0f592b3f |
| | + | sudo reboot</pre> |
| | Tested Rpi firmware: | | Tested Rpi firmware: |
| | <pre>pi@raspberrypi ~ $ uname -a | | <pre>pi@raspberrypi ~ $ uname -a |
| − | Linux raspberrypi 4.1.9+ #819 PREEMPT Thu Oct 1 20:31:26 BST 2015 armv6l | + | Linux raspberrypi 4.1.21+ #873 Mon Apr 11 18:00:37 BST 2016 armv6l GNU/Linux</pre> |
| − | GNU/Linux</pre> | |
| | <!--== UHID kernel module == | | <!--== UHID kernel module == |
| | | | |
| Line 56: |
Line 51: |
| | make INSTALL_HDR_PATH=dest headers_install | | make INSTALL_HDR_PATH=dest headers_install |
| | sudo cp dest/include/linux/uhid.h /usr/include/linux/--> | | sudo cp dest/include/linux/uhid.h /usr/include/linux/--> |
| | + | |
| | + | == USB adapter using the on-board UART interface == |
| | + | |
| | + | === Hardware requirements === |
| | + | |
| | + | The on-board UART runs at 0V/3.3V levels, and the AVR USB board has to run at 5V to operate at 16MHz (running at 3.3V would only allow to operate at 8MHz).<br /> |
| | + | Connecting the RPi and the AVR USB board directly may damage the hardware!<br /> |
| | + | One cheap solution is to use a voltage divider:<br /> |
| | + | * Connect both GNDs |
| | + | * It's safe to connect the TXD pin of the RPi to the Rx pin of the AVR USB board (the GIMX firmwares configure the Rx pin as an input) |
| | + | * To connect the Tx pin of the AVR USB board to the RXD pin of the RPi, you'll need to convert the voltage level from 0..5V to 0..3.3V.<br /> |
| | + | This can be done with a simple resistive divider: |
| | + | <div class="image200px">[https://gimx.fr/img/wiki/Resistive_divider.png https://gimx.fr/img/wiki/Resistive_divider.png]</div> |
| | + | Vin is the Tx pin of the AVR USB board, Vout is the RXD pin of the RPi, R1=2.2kΩ , R2=3.3kΩ |
| | + | * Do not connect any other pin! |
| | + | |
| | + | === Sotware adjustments === |
| | + | |
| | + | By default, the RPi UART is configured as a serial console.<br /> |
| | + | Disable this serial console using raspi-config: |
| | + | <pre> |
| | + | sudo raspi-config |
| | + | </pre> |
| | + | Then select: |
| | + | <pre> |
| | + | "Advanced Options", "Serial", "No", "Finish" |
| | + | </pre> |
| | + | The default configuration does not allow high baudrates.<br /> |
| | + | Enable high baudrates editing /boot/config.txt: |
| | + | <pre> |
| | + | sudo nano /boot/config.txt |
| | + | </pre> |
| | + | Add the following line at the end of the file: |
| | + | <pre> |
| | + | init_uart_clock=8000000 |
| | + | </pre> |
| | + | Reboot to apply the changes: |
| | + | <pre> |
| | + | sudo reboot |
| | + | </pre> |
| | | | |
| | == GIMX installation == | | == GIMX installation == |
| − | <pre>sudo apt-get install gdebi | + | <pre>wget https://gimx.fr/download/gimx-raspbian -O gimx.deb |
| − | wget http://gimx.fr/download/gimx-raspbian -O gimx.deb | + | sudo dpkg -i gimx.deb |
| − | sudo gdebi gimx.deb</pre> | + | sudo apt-get -f install</pre> |
| | | | |
| | If you get a "Dependency is not satisfiable: ..." error message, upgrade Raspbian: | | If you get a "Dependency is not satisfiable: ..." error message, upgrade Raspbian: |
| Line 77: |
Line 112: |
| | == Run GIMX == | | == Run GIMX == |
| | Read the [[Quick_Start|Quick start page]] to learn how to run GIMX through the GUI.<br /> | | Read the [[Quick_Start|Quick start page]] to learn how to run GIMX through the GUI.<br /> |
| − | A good idea is to run GIMX directly from a terminal, without starting a graphical session.<br /> | + | A good idea is to run GIMX directly from a terminal, without starting a graphical session, which can be done over the network, using a ssh client, or you can [[#Autostart GIMX at boot without GUI]]<br /> |
| − | This can be done over the network, using a ssh client.<br />
| |
| | Ideally, GIMX should be launched without using the Ethernet port (because it is connected on the USB bus).<br /> | | Ideally, GIMX should be launched without using the Ethernet port (because it is connected on the USB bus).<br /> |
| | More details on command line options on [[Command_line|this page]].<br /> | | More details on command line options on [[Command_line|this page]].<br /> |
| − | === Bluetooth ===
| |
| − | In a terminal:
| |
| − | gimx -t Sixaxis -c <config file> -b <PS3 bdaddr>
| |
| − | The dongle address has to be changed before running the above commands.
| |
| | | | |
| − | === DIY USB adapter === | + | == Autostart GIMX at boot without GUI == |
| − | In a terminal:
| + | Simply create a file /etc/systemd/system/gimx.service (as root) with the following content: |
| − | gimx -c <config file> -p /dev/<ttyUSB port>
| |
| | | | |
| | + | <pre> |
| | + | [Unit] |
| | + | Description=GIMX |
| | + | After=syslog.target network.target |
| | | | |
| − | === Without DIY USB adapter (RU) === | + | [Service] |
| | + | User=pi |
| | + | Type=simple |
| | + | ExecStart=/usr/bin/gimx -p /dev/ttyUSB0 -c LogitechDrivingForceGT_G29.xml --nograb |
| | + | Restart=always |
| | + | RestartSec=5 |
| | | | |
| − | ====Подготовка RPi==== | + | [Install] |
| | + | WantedBy=multi-user.target |
| | + | </pre> |
| | | | |
| − | Нам подойдет любая из моделей RPi:
| + | Replace ttyUSB0 with your device and LogitechDrivingForceGT_G29.xml with your mapping file (which should be available in the pi home directory as /home/pi/.gimx/config/LogitechDrivingForceGT_G29.xml) |
| − | Raspberry Pi A+
| + | |
| − | Raspberry Pi B
| + | Run <pre>sudo systemctl daemon-reload</pre> to notify systemd about the new file and <pre>sudo systemctl enable gimx && sudo systemctl start gimx</pre> to enable the gimx service start at boot and start it in the same line. |
| − | Raspberry Pi B+
| + | |
| − | Raspberry Pi 2
| + | == Notify when GIMX is running using a led == |
| − | Raspberry Pi Zero
| + | In order to have a proper confirmation about if the gimx service is up and running, you can add a simple python script that turns a led on if the gimx service is running. |
| | + | |
| | + | The file will be located at /home/pi/blink.py: |
| | | | |
| − | По умолчанию RPi отправляет отладочные сообщения на последовательный порт.
| |
| − | Что бы использовать последовательный порт для своих нужд необходимо выполнить команду в терминале:
| |
| | <pre> | | <pre> |
| − | sudo raspi-config
| + | #!/usr/bin/python |
| − | </pre>
| + | import os |
| − | Откроется gрограмма конфигурации
| + | import time |
| − | Выберем пункт:
| + | import RPi.GPIO as GPIO |
| − | <pre>
| + | |
| − | "Advanced Options" затем выберем "Serial" затем "No" затем "Finish"
| + | led = 23 |
| − | </pre>
| + | button = 18 |
| − | Но этого не достаточно. По умолчанию частота последовательного порта 3 MHz поднимем её до 8 MHz.
| + | GPIO.setmode(GPIO.BCM) |
| − | Выполним команду в терминале:
| + | GPIO.setup(led, GPIO.OUT) |
| − | <pre>
| + | GPIO.setup(button, GPIO.IN, pull_up_down = GPIO.PUD_UP) |
| − | sudo nano /boot/config.txt
| + | |
| − | </pre>
| + | def Shutdown(channel): |
| − | Добавим строку (если она существует просто поправте ее значение)
| + | GPIO.output(led, True) |
| − | <pre>
| + | time.sleep(0.2) |
| − | init_uart_clock=8000000
| + | GPIO.output(led, False) |
| − | </pre>
| + | time.sleep(0.2) |
| − | Установим GIMX для этого выполним последовательно команды в терминале:
| + | GPIO.output(led, True) |
| − | <pre>
| + | time.sleep(0.2) |
| − | sudo apt-get install gdebi
| + | GPIO.output(led, False) |
| − | wget http://gimx.fr/download/gimx-raspbian -O gimx.deb
| + | os.system("sudo shutdown -h now") |
| − | sudo gdebi gimx.deb
| |
| − | sudo service triggerhappy stop
| |
| − | sudo update-rc.d triggerhappy disable
| |
| − | sudo reboot
| |
| − | </pre>
| |
| − | После того как перезагрузится RPi (если она загрузится не в X) выполним команду в терминале:
| |
| − | <pre>
| |
| − | startx
| |
| − | </pre>
| |
| − | И сделаем ссылку на AMA0
| |
| − | <pre>
| |
| − | sudo ln -s /dev/ttyAMA0 /dev/ttyUSB0 | |
| − | </pre>
| |
| | | | |
| − | ==== Подготовка Teensy ==== | + | GPIO.add_event_detect(18, GPIO.FALLING, callback = Shutdown, bouncetime = 2000) |
| | | | |
| − | Нам подойдут
| + | while True: |
| − | Teensy 2.0
| + | found = False |
| − | Teensy++ 2.0
| + | time.sleep(5) |
| | + | pids = [pid for pid in os.listdir('/proc') if pid.isdigit()] |
| | + | for pid in pids: |
| | + | try: |
| | + | cmd = open(os.path.join('/proc', pid, 'cmdline'), 'rb').read() |
| | + | if "gimx" in cmd: |
| | + | found = True |
| | + | except IOError: # proc has already terminated |
| | + | continue |
| | + | if found == True: |
| | + | GPIO.output(led, True) |
| | + | else: |
| | + | GPIO.output(led, False) |
| | + | </pre> |
| | | | |
| − | Следуя инструкции
| + | As a bonus, you can add a button so when it is pressed, there is a little blink effect, and the pi is shutted down. |
| − | https://www.pjrc.com/teensy/3volt.html
| |
| − | Припаяем MCP1825S-3302E/DB
| |
| − | Это даст нам напряжение на последовательном порту безопасное для RPi
| |
| | | | |
| − | Скачаем нужную нам прошивку
| + | <div class="image200px">[https://gimx.fr/img/wiki/PiButtonLed.png https://gimx.fr/img/wiki/PiButtonLed.png]</div> |
| − | [http://gimx.fr/download/gimx-firmwares Firmwares] | |
| − | Прошьем её с помощью [http://www.pjrc.com/teensy/loader.html Teensy Loader].
| |
| | | | |
| − | ==== Схема подключения ====
| + | To start at boot, simply add it to the pi user crontab (crontab -e) as <pre>@reboot python /home/pi/blink.py &</pre> |
| − | [http://i.imgur.com/zKHfN3F.png http://i.imgur.com/zKHfN3F.png]
| |
| − | [http://i.imgur.com/sdedoFG.jpg http://i.imgur.com/sdedoFG.jpg]
| |
Warning: RPi support should be considered as experimental. Be prepared to face issues if you try GIMX on the RPi.
GIMX can run on many Linux targets, and the the Raspberry Pi is one of them!
Hardware considerations
Use a USB HUB only if there are no ports available on the RPi.
It is highly recommended to use a HUB with an external power supply.
Firmware update
As early firmwares had severe USB issues it is recommended to update the firmware before using GIMX.
Updating the firmware may also be useful if you plan to use a Logitech force feedback wheel (the uhid kernel module was missing in earlier firmwares).
Type the following command:
sudo rpi-update
sudo reboot
If you have issues with the latest firmware, install the following instead:
sudo rpi-update 771a503cfc2a1130e2df2a4ddfc45ffa0f592b3f
sudo reboot
Tested Rpi firmware:
pi@raspberrypi ~ $ uname -a
Linux raspberrypi 4.1.21+ #873 Mon Apr 11 18:00:37 BST 2016 armv6l GNU/Linux
USB adapter using the on-board UART interface
Hardware requirements
The on-board UART runs at 0V/3.3V levels, and the AVR USB board has to run at 5V to operate at 16MHz (running at 3.3V would only allow to operate at 8MHz).
Connecting the RPi and the AVR USB board directly may damage the hardware!
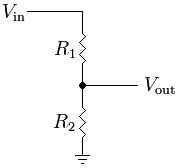
One cheap solution is to use a voltage divider:
- Connect both GNDs
- It's safe to connect the TXD pin of the RPi to the Rx pin of the AVR USB board (the GIMX firmwares configure the Rx pin as an input)
- To connect the Tx pin of the AVR USB board to the RXD pin of the RPi, you'll need to convert the voltage level from 0..5V to 0..3.3V.
This can be done with a simple resistive divider:
Vin is the Tx pin of the AVR USB board, Vout is the RXD pin of the RPi, R1=2.2kΩ , R2=3.3kΩ
- Do not connect any other pin!
Sotware adjustments
By default, the RPi UART is configured as a serial console.
Disable this serial console using raspi-config:
sudo raspi-config
Then select:
"Advanced Options", "Serial", "No", "Finish"
The default configuration does not allow high baudrates.
Enable high baudrates editing /boot/config.txt:
sudo nano /boot/config.txt
Add the following line at the end of the file:
init_uart_clock=8000000
Reboot to apply the changes:
sudo reboot
GIMX installation
wget https://gimx.fr/download/gimx-raspbian -O gimx.deb
sudo dpkg -i gimx.deb
sudo apt-get -f install
If you get a "Dependency is not satisfiable: ..." error message, upgrade Raspbian:
sudo apt-get update && sudo apt-get upgrade
Stop/disable triggerhappy service
Triggerhappy is a daemon that opens every input device for reading, and that consumes a few percent of the CPU time.
It seems a good idea to stop it while running GIMX.
To stop triggerhappy:
sudo service triggerhappy stop
To disable triggerhappy:
sudo update-rc.d triggerhappy disable
Run GIMX
Read the Quick start page to learn how to run GIMX through the GUI.
A good idea is to run GIMX directly from a terminal, without starting a graphical session, which can be done over the network, using a ssh client, or you can #Autostart GIMX at boot without GUI
Ideally, GIMX should be launched without using the Ethernet port (because it is connected on the USB bus).
More details on command line options on this page.
Autostart GIMX at boot without GUI
Simply create a file /etc/systemd/system/gimx.service (as root) with the following content:
[Unit]
Description=GIMX
After=syslog.target network.target

[Service]
User=pi
Type=simple
ExecStart=/usr/bin/gimx -p /dev/ttyUSB0 -c LogitechDrivingForceGT_G29.xml --nograb
Restart=always
RestartSec=5

[Install]
WantedBy=multi-user.target
Replace ttyUSB0 with your device and LogitechDrivingForceGT_G29.xml with your mapping file (which should be available in the pi home directory as /home/pi/.gimx/config/LogitechDrivingForceGT_G29.xml)
Run
sudo systemctl daemon-reload
to notify systemd about the new file and
sudo systemctl enable gimx && sudo systemctl start gimx
to enable the gimx service start at boot and start it in the same line.
Notify when GIMX is running using a led
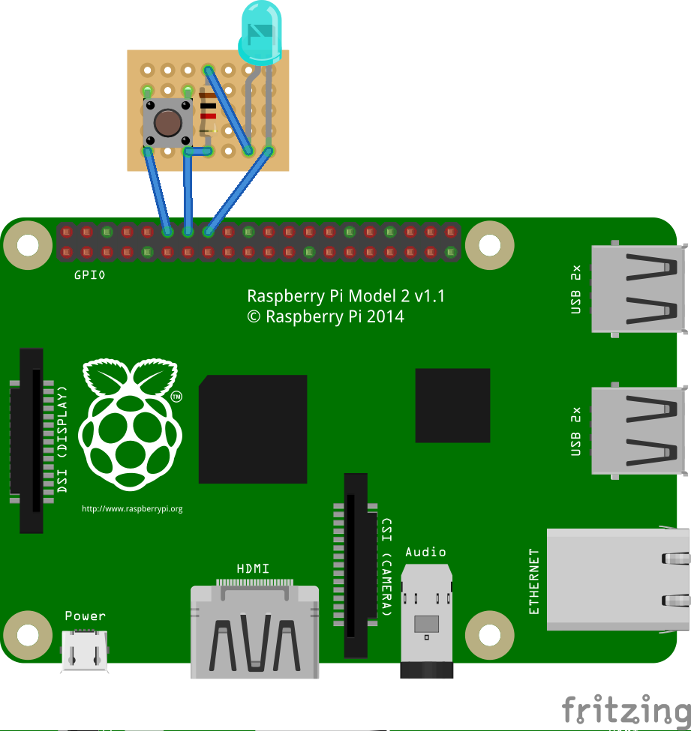
In order to have a proper confirmation about if the gimx service is up and running, you can add a simple python script that turns a led on if the gimx service is running.
The file will be located at /home/pi/blink.py:
#!/usr/bin/python
import os
import time
import RPi.GPIO as GPIO

led = 23
button = 18
GPIO.setmode(GPIO.BCM)
GPIO.setup(led, GPIO.OUT)
GPIO.setup(button, GPIO.IN, pull_up_down = GPIO.PUD_UP)

def Shutdown(channel):
  GPIO.output(led, True)
  time.sleep(0.2)
  GPIO.output(led, False)
  time.sleep(0.2)
  GPIO.output(led, True)
  time.sleep(0.2)
  GPIO.output(led, False)
  os.system("sudo shutdown -h now")

GPIO.add_event_detect(18, GPIO.FALLING, callback = Shutdown, bouncetime = 2000)

while True:
  found = False
  time.sleep(5)
  pids = [pid for pid in os.listdir('/proc') if pid.isdigit()]
  for pid in pids:
    try:
      cmd = open(os.path.join('/proc', pid, 'cmdline'), 'rb').read()
      if "gimx" in cmd:
        found = True
    except IOError: # proc has already terminated
      continue
  if found == True:
    GPIO.output(led, True)
  else:
    GPIO.output(led, False)
As a bonus, you can add a button so when it is pressed, there is a little blink effect, and the pi is shutted down.
To start at boot, simply add it to the pi user crontab (crontab -e) as
@reboot python /home/pi/blink.py &