Difference between revisions of "RPi/de"
(Created page with "==Firmware aktualisierung== Erste Firmwares hatten Probleme mit den USB Ports, deshalb ist es empfehlenswert die Firmware Updates vor der Nutzung von GIMX durchzuführen.<br /...") |
(Created page with "==USB Adapter mithilfe der On-Board UART Schnittstelle==") |
||
| Line 53: | Line 53: | ||
sudo cp dest/include/linux/uhid.h /usr/include/linux/--> | sudo cp dest/include/linux/uhid.h /usr/include/linux/--> | ||
| − | == USB | + | ==USB Adapter mithilfe der On-Board UART Schnittstelle== |
=== Hardware requirements === | === Hardware requirements === | ||
Revision as of 16:18, 29 December 2016
Warnung: RPi Unterstützung sollte als experimentell betrachtet werden.Es kann zu Problemen kommen, wenn GIMX auf dem RPi ausgeführt werden soll.
GIMX läuft unter verschiedenen Linux Geräten und der Raspberry Pi ist einer davon !
Contents
Hardware Empfehlungen
Nutze nur einen USB HUB wenn am RPi keine resp. zu wenige Ports verfügbar sind.
Es ist empfehlenswert einen USB HUB mit externer Stromversorgung zu nutzen.
Firmware aktualisierung
Erste Firmwares hatten Probleme mit den USB Ports, deshalb ist es empfehlenswert die Firmware Updates vor der Nutzung von GIMX durchzuführen.
Die Firmware zu aktualisieren kann auch hilfreich sein, wenn geplant ist ein Logitech Force Feedback Wheel einzusetzen (Das uhid Kernel Modul fehlte in früheren Firmwares).
Folgende befehle ausführen (Terminal/SSH):
sudo rpi-update
sudo reboot
Falls Probleme mit der aktuellsten Firmware auftreten, sollte diese installiert werden:
sudo rpi-update 771a503cfc2a1130e2df2a4ddfc45ffa0f592b3f
sudo reboot
Getestete RPi Firmware:
pi@raspberrypi ~ $ uname -a
Linux raspberrypi 4.1.21+ #873 Mon Apr 11 18:00:37 BST 2016 armv6l GNU/Linux
USB Adapter mithilfe der On-Board UART Schnittstelle
Hardware requirements
The on-board UART runs at 0V/3.3V levels, and the AVR USB board has to run at 5V to operate at 16MHz (running at 3.3V would only allow to operate at 8MHz).
Connecting the RPi and the AVR USB board directly may damage the hardware!
One cheap solution is to use a voltage divider:
- Connect both GNDs
- It's safe to connect the TXD pin of the RPi to the Rx pin of the AVR USB board (the GIMX firmwares configure the Rx pin as an input)
- To connect the Tx pin of the AVR USB board to the RXD pin of the RPi, you'll need to convert the voltage level from 0..5V to 0..3.3V.
This can be done with a simple resistive divider:

Vin is the Tx pin of the AVR USB board, Vout is the RXD pin of the RPi, R1=2.2kΩ , R2=3.3kΩ
- Do not connect any other pin!
Sotware adjustments
By default, the RPi UART is configured as a serial console.
Disable this serial console using raspi-config:
sudo raspi-config
Then select:
"Advanced Options", "Serial", "No", "Finish"
The default configuration does not allow high baudrates.
Enable high baudrates editing /boot/config.txt:
sudo nano /boot/config.txt
Add the following line at the end of the file:
init_uart_clock=8000000
Reboot to apply the changes:
sudo reboot
GIMX installation
wget https://gimx.fr/download/gimx-raspbian -O gimx.deb
sudo dpkg -i gimx.deb
sudo apt-get -f install
If you get a "Dependency is not satisfiable: ..." error message, upgrade Raspbian:
sudo apt-get update && sudo apt-get upgrade
Stop/disable triggerhappy service
Triggerhappy is a daemon that opens every input device for reading, and that consumes a few percent of the CPU time.
It seems a good idea to stop it while running GIMX.
To stop triggerhappy:
sudo service triggerhappy stop
To disable triggerhappy:
sudo update-rc.d triggerhappy disable
Run GIMX
Read the Quick start page to learn how to run GIMX through the GUI.
A good idea is to run GIMX directly from a terminal, without starting a graphical session, which can be done over the network, using a ssh client, or you can #Autostart GIMX at boot without GUI
Ideally, GIMX should be launched without using the Ethernet port (because it is connected on the USB bus).
More details on command line options on this page.
Autostart GIMX at boot without GUI
Simply create a file /etc/systemd/system/gimx.service (as root) with the following content:
[Unit]
Description=GIMX
After=syslog.target network.target

[Service]
User=pi
Type=simple
ExecStart=/usr/bin/gimx -p /dev/ttyUSB0 -c LogitechDrivingForceGT_G29.xml --nograb
Restart=always
RestartSec=5

[Install]
WantedBy=multi-user.target
Replace ttyUSB0 with your device and LogitechDrivingForceGT_G29.xml with your mapping file (which should be available in the pi home directory as /home/pi/.gimx/config/LogitechDrivingForceGT_G29.xml)
Run
sudo systemctl daemon-reload
to notify systemd about the new file and
sudo systemctl enable gimx && sudo systemctl start gimx
to enable the gimx service start at boot and start it in the same line.
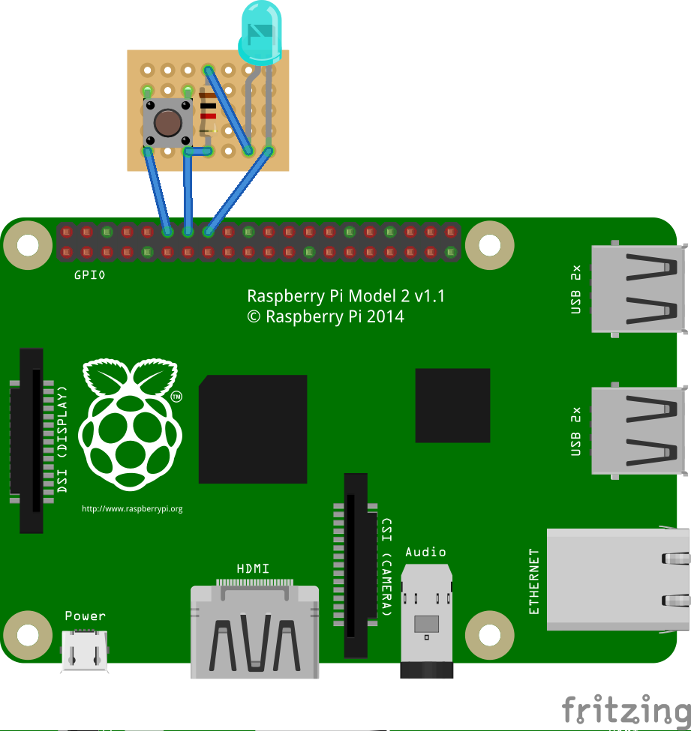
Notify when GIMX is running using a led
In order to have a proper confirmation about if the gimx service is up and running, you can add a simple python script that turns a led on if the gimx service is running.
The file will be located at /home/pi/blink.py:
#!/usr/bin/python
import os
import time
import RPi.GPIO as GPIO

led = 23
button = 18
GPIO.setmode(GPIO.BCM)
GPIO.setup(led, GPIO.OUT)
GPIO.setup(button, GPIO.IN, pull_up_down = GPIO.PUD_UP)

def Shutdown(channel):
  GPIO.output(led, True)
  time.sleep(0.2)
  GPIO.output(led, False)
  time.sleep(0.2)
  GPIO.output(led, True)
  time.sleep(0.2)
  GPIO.output(led, False)
  os.system("sudo shutdown -h now")

GPIO.add_event_detect(18, GPIO.FALLING, callback = Shutdown, bouncetime = 2000)

while True:
  found = False
  time.sleep(5)
  pids = [pid for pid in os.listdir('/proc') if pid.isdigit()]
  for pid in pids:
    try:
      cmd = open(os.path.join('/proc', pid, 'cmdline'), 'rb').read()
      if "gimx" in cmd:
        found = True
    except IOError: # proc has already terminated
      continue
  if found == True:
    GPIO.output(led, True)
  else:
    GPIO.output(led, False)
As a bonus, you can add a button so when it is pressed, there is a little blink effect, and the pi is shutted down.
To start at boot, simply add it to the pi user crontab (crontab -e) as
@reboot python /home/pi/blink.py &