Difference between revisions of "RPi/fr"
(Created page with "=== Matériel requis ===") |
(Created page with "L'interface série fonctionne aux niveaux 0V/3.3V, alors que la carte AVR USB doit être alimentée à 5V pour fonctionner à 16MHz (à 3.3V elle ne peut fonctionner qu'à 8MH...") |
||
| Line 22: | Line 22: | ||
=== Matériel requis === | === Matériel requis === | ||
| − | + | L'interface série fonctionne aux niveaux 0V/3.3V, alors que la carte AVR USB doit être alimentée à 5V pour fonctionner à 16MHz (à 3.3V elle ne peut fonctionner qu'à 8MHz).<br /> | |
| − | + | Connecter directement la RPi et la carte AVR USB peut endommager le matériel !<br /> | |
| − | + | Une solution peu couteuse est d'utiliser un diviseur de tension :<br /> | |
| − | * | + | * Connecter les broches GND. |
| − | * | + | * Il est sans danger de connecter la broche TXD du RPi à la broche RX de la carte AVR USB (le firmware GIMX configure la broche RX comme une entrée). |
| − | * | + | * Pour connecter la broche TX de la carte AVR USB à la broche RXD du RPi, il faut convertir les niveaux de tension de 0..5V à 0..3.3V.<br /> |
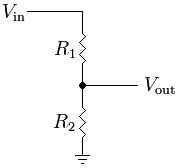
| − | + | Ceci peut se faire simplement à l'aide d'un diviseur de tension : | |
<div class="image200px">[http://gimx.fr/img/wiki/Resistive_divider.png http://gimx.fr/img/wiki/Resistive_divider.png]</div> | <div class="image200px">[http://gimx.fr/img/wiki/Resistive_divider.png http://gimx.fr/img/wiki/Resistive_divider.png]</div> | ||
| − | Vin | + | Vin est la broche TX de la carte AVR USB, Vout est la broche RXD du RPi, R1=2.2kΩ , R2=3.3kΩ |
| − | * | + | * Ne connecter aucune autre broche ! |
=== Sotware adjustments === | === Sotware adjustments === | ||
Revision as of 12:31, 10 March 2016
Attention : le support de la RPi doit être considéré comme expérimental. Soyez prêt à affronter des problèmes si vous exécutez GIMX sur la RPi.
GIMX peut s'exécuter sur beaucoup de cibles GNU/Linux, et le Raspberry Pi est l'une d'entre elles !
Contents
Considérations matérielles
Utiliser un HUB USB seulement si tous les ports USB sont occupés sur la RPi.
Il est fortement recommandé d'utiliser un HUB avec alimentation externe.
Mise à jour du firmware
Comme les premiers firmware avaient de gros soucis de gestion de l'USB, il est recommandé de mettre à jour le firmware avant d'utiliser GIMX.
Ceci est aussi utile pour utiliser un volant Logitech avec retour de force (le module uhid était absent dans les firmwares plus anciens).
Taper la commande suivante :
sudo rpi-update && sudo reboot
Firmware testé :
pi@raspberrypi ~ $ uname -a
Linux raspberrypi 4.1.9+ #819 PREEMPT Thu Oct 1 20:31:26 BST 2015 armv6l
GNU/Linux
Utiliser l'interface UART avec l'adaptateur USB
Matériel requis
L'interface série fonctionne aux niveaux 0V/3.3V, alors que la carte AVR USB doit être alimentée à 5V pour fonctionner à 16MHz (à 3.3V elle ne peut fonctionner qu'à 8MHz).
Connecter directement la RPi et la carte AVR USB peut endommager le matériel !
Une solution peu couteuse est d'utiliser un diviseur de tension :
- Connecter les broches GND.
- Il est sans danger de connecter la broche TXD du RPi à la broche RX de la carte AVR USB (le firmware GIMX configure la broche RX comme une entrée).
- Pour connecter la broche TX de la carte AVR USB à la broche RXD du RPi, il faut convertir les niveaux de tension de 0..5V à 0..3.3V.
Ceci peut se faire simplement à l'aide d'un diviseur de tension :
Vin est la broche TX de la carte AVR USB, Vout est la broche RXD du RPi, R1=2.2kΩ , R2=3.3kΩ
- Ne connecter aucune autre broche !
Sotware adjustments
By default, the RPi sends debug messages on the UART port. To use it for GIMX, we should execute:
sudo raspi-config
Then select:
"Advanced Options", "Serial", "No", "Finish"
Open the /boot/config.txt with the nano editor:
sudo nano /boot/config.txt
Add the following line at the end of the file:
init_uart_clock=8000000
Create a symbolic link to make gimx-launcher find the port:
sudo ln -s /dev/ttyAMA0 /dev/ttyUSB0
GIMX installation
sudo apt-get install gdebi
wget http://gimx.fr/download/gimx-raspbian -O gimx.deb
sudo gdebi gimx.deb
If you get a "Dependency is not satisfiable: ..." error message, upgrade Raspbian:
sudo apt-get update && sudo apt-get upgrade
Stop/disable triggerhappy service
Triggerhappy is a daemon that opens every input device for reading, and that consumes a few percent of the CPU time.
It seems a good idea to stop it while running GIMX.
To stop triggerhappy:
sudo service triggerhappy stop
To disable triggerhappy:
sudo update-rc.d triggerhappy disable
Run GIMX
Read the Quick start page to learn how to run GIMX through the GUI.
A good idea is to run GIMX directly from a terminal, without starting a graphical session.
This can be done over the network, using a ssh client.
Ideally, GIMX should be launched without using the Ethernet port (because it is connected on the USB bus).
More details on command line options on this page.
Bluetooth
In a terminal:
gimx -t Sixaxis -c <config file> -b <PS3 bdaddr>
The dongle address has to be changed before running the above commands.
DIY USB adapter
In a terminal:
gimx -c <config file> -p /dev/<ttyUSB port>